Using Your Backsplash to Add Accent to Your Kitchen

Backsplashes protect kitchen walls from splashes and spills, but that doesn’t mean they have to be bland or boring. Rather than being a functional part of your kitchen, backsplashes can be an eye-catching accent that showcases your personal style.

If you’re looking to upgrade your kitchen backsplash, consider these innovative ideas that add a creative touch.

Add a Built-In Shelf

A backsplash that doubles as shelving is a great way to add style and storage to your kitchen. Adding a herringbone or elongated hexagon tile backsplash with open shelving allows you to showcase your decorative items (like jars, glassware, and Grandma’s plates) in a way that doesn’t hide them behind cabinets.

You can choose to paint your shelves a color that matches or contrasts with your backsplash. If you decide to go with a color that isn’t painted, use a stud finder to determine where your studs are before you cut a hole in the wall for the shelf supports. This will help you avoid the possibility of ragged edges on your newly installed shelving.

If you want to make your built-in shelves even more unique, consider using a staggered tile transition on the backsplash and shelving. This is a popular design element in bathrooms, but can also be used creatively to add accent in the kitchen or laundry room. If you’re building the shelves yourself, it may help to lay out a tape measure on your wall before cutting into the drywall to make sure your dimensions are accurate.
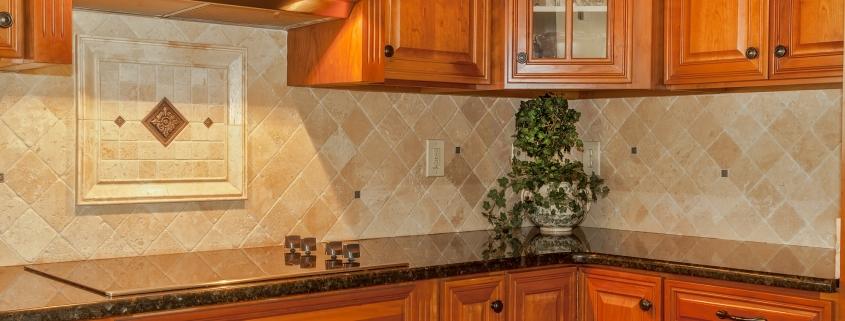
Go Mosaic

A modern mosaic backsplash can add a beautiful and creative touch to any kitchen. Mosaic tiles are available in a wide range of colors and styles, so you can find the perfect fit for your kitchen design. Mosaic tile patterns can also fill up space that may be too empty or uninteresting, creating a focal point that can draw attention to your kitchen.

For example, a classic Mediterranean mosaic featuring cascading grapes can bring peace and tranquility to your kitchen while adding color and interest. Mosaic backsplashes can also showcase cooking utensils, herbs, and spices, highlighting the culinary artistry of your kitchen.

If you want to install a mosaic backsplash, remember that it’s important to apply tile spacers between each tile. This will ensure that all tiles have equal spacing between them, which will make the finished backsplash look neat and professional. Then, use caulk to seal around the edges of the backsplash. This will protect the tile from moisture and make it easy to clean.

Highlight an Accent Color

Choosing the perfect color for an accent wall can instantly catch the eye and strengthen your kitchen’s style. Sleek, bold colors can accentuate modern designs while soft pastel hues complement farmhouse and shabby chic styles. For a fun twist on the classic backsplash, opt for patterned tiles that incorporate various geometric or organic shapes into their design.

Alternatively, if you have a solid-colored backsplash, choose a paint color that matches one of your cabinet or countertop colors. This allows you to introduce a splash of color without having to commit to a major redesign project.

Stone walls offer a sense of luxury, while their natural color variations and textures create a one-of-a-kind touch to any kitchen. Stone is also a durable material that holds up to spills and other everyday kitchen activities.

A backsplash can also be an excellent way to add a pop of color in a rec room or basement bar. Match your favorite team’s colors to a patterned backsplash or opt for a retro theme with bottle caps mounted as accents.

Add Texture

Most kitchen backsplashes are flat and sleek, but they don’t have to be. You can have a little fun with the design of your tile by playing with color and texture. A popular look is a herringbone or stacked style that brings more dimension to the wall. If those are a bit too classic for your tastes, consider tiles with a unique pattern like a hat print, mid-century starburst, or monochrome Talavera.

Texture can also be introduced through the material used for your backsplash. A reclaimed wood wall creates a warm, cozy vibe that’s perfect for an urban kitchen, while shiplap can add a nautical touch. Brick walls have a historic, lived-in feel that can work in many kitchens.

If you’re looking for something that’s a bit more subtle, try using a color-blocking technique on your accent wall. Using different shades of one color—like light sky blue, deep navy, or classic blue—creates a clean and cohesive effect that looks polished without being too flashy.

Go Dark Grey

The color grey creates a sense of balance and harmony, making it ideal for any kitchen design. Its neutral and balanced appeal also makes it a great background shade that allows other elements to shine, including your backsplash.

A dark grey kitchen backsplash can be an eye-catching way to accentuate your cabinets and draw the attention of guests. There are many different shades of grey to choose from, so you’re sure to find one that complements your kitchen’s overall style.

For a modern and luxurious look, try a marble backsplash that incorporates natural veining and patterns for a unique touch. If you prefer a more industrial aesthetic, consider a concrete backsplash that has a raw and edgy look.

Design Ideas For Outdoor Firepits

When creating an outdoor fire pit, it’s important to keep flow and function in mind.

A Southwestern motif helps this space feel like a cozy backyard escape. Decorative planters, Aztec-printed rugs and corten steel accents unite hardscape materials and create a pleasing variety in color tones.

Cinder Block Designs

Cinder block fire pits are a great option for those who want to add a touch of elegance to their backyard. They’re easy to build and can be made either temporary or permanent. However, you should always be careful when building a cinder block fire pit since they can easily become a fire hazard. You should also consult your local fire department on what requirements you might need to meet for constructing a fire pit in your area.

First, you’ll need to clear the area of your yard where you want to construct your cinder block fire pit. You should make sure the spot is at least 10 feet away from other buildings, fences, sheds, and trees to ensure that you don’t accidentally cause a fire. You’ll also need to inspect the ground above your cinder block fire pit location to ensure that there aren’t any tree branches that could fall over and cause a fire hazard.

Once you have the land cleared, dig out a hole in the center of the cinder block design to form your base. After that, you’ll start stacking the blocks to form a circle shape or whatever type of design you prefer for your fire pit. You can use masonry adhesive to secure the cinder block pieces together, but it’s better to leave them unpainted for a more authentic look.

Pea Gravel Patios

A simple pea gravel patio makes an ideal base for an outdoor firepit. This DIY backyard design idea requires only pea gravel and a little landscaping skill. The gravel serves as the main surface for this patio area and is surrounded by lush greenery. The natural texture of the pea gravel contrasts nicely with the greenery and the modern folding chairs. A firepit with a gas-powered burner is a perfect addition to this garden space.

A gravel patio can also make an ideal surface for a pergola-style fire pit. In this cozy backyard patio idea, the pea gravel acts as the foundation for the firepit and a simple wrought-iron table and chairs. The color of the gravel matches that of the pergola and ties the backyard decor together. The gravel’s earthy hue also makes a nice backdrop for the wood and concrete materials of the seating area.

For a more unique look, use pea gravel in combination with pavers. The small size of the gravel complements the larger sizes of the pavers, creating a checkered pattern that adds interest to the patio flooring. This design works well for backyards where a fire pit is used frequently.

If you want a more sophisticated look for your pea gravel patio, try using pavers with a herringbone pattern. This design looks great with contemporary furniture and can be used as a transition to lawn or gardens.

Gas Fireplaces

Infuse an outdoor space with cozy charm and Insta-worthy lighting by crafting a built-in fire pit. The centerpiece of any backyard retreat, this unique feature elevates gatherings with a mesmerizing dance of light and shadows. In the hands of a skilled designer, this element becomes the heartbeat that connects and captivates guests.

Wood-fueled firepits offer a classic campfire feel with crackling sounds and sparks flying up into the air, but the labor involved in collecting and stacking logs turns some homeowners off. A gas-powered design offers the same look, but eliminates the need for piling wood and requires no sweeping up of ash.

For a contemporary touch, add an ornate fireplace door to your outdoor firepit. This enchanting detail serves as both a conversation piece and a functional addition that protects against snags, so guests can chat around the warm flames safely.

Reimagine your outdoor fireplace with a sunken seating layout. Rather than circling guests around a small area, this unique design invites you to descend into an intimate world of warmth and artistry, where conversations become more engaging and memories last longer.

Even if you’re short on space, you can still enjoy the warm glow of an outdoor firepit with this simple patio setup. By pairing a stone fire pit with matching cushions on lounge chairs, this cozy nook gives the impression of an expansive backyard oasis.

U-Shaped Patios

Fire pits may have a rustic reputation, but their versatility makes them well-suited for a variety of landscapes. For example, a backyard retreat can include a carved out intimate seating zone around a stone fire pit that is placed near a dining area for social synergy. The result is a relaxed backyard space that feels like a natural extension of the house. Boxwoods and mondo grass keep the planting palette anchored to true-to-deep greens, while safety fencing and grade changes separate the fire pit from a pool area.

A U-shaped patio is another great way to create a cozy and intimate setting around an outdoor firepit. The concrete seating in this design echoes the shape of the firepit to create an overall cohesive feel. Concrete also offers a cool, neutral palette that complements the warm wood of the furniture and the crisp greens in the surrounding landscaping. To make the most of the patio’s secluded locale, this design uses a series of steps and paths to navigate the scene — from wide steps down to the paving, a gravel path lined with grass-set pavers, and finally a small terraced garden.

What to Do If an Animal Gets in Your Chimney

Animals in chimneys can carry diseases that are dangerous for humans, including rabies. They also can cause a lung disease called histoplasmosis.

The first thing to do if an animal gets in your chimney is identify what type of animal it is. You can do this by listening to it chirp, squawk, flap, sniff, or claw.

Call a Professional

A wild animal trapped in your chimney can cause many problems. It can stink up your home, attract pests, and even spread disease. Additionally, it can leave feces behind, which can cause skin problems for people with sensitive skin.

It’s important to note that you should always call a professional to help with any chimney cleanup if an animal is stuck inside. This is because wildlife rescues have the proper credentials to deal with the animals and will be able to safely remove them from your chimney. It’s also illegal for homeowners to move wildlife without proper licenses and equipment.

You can usually tell whether an animal is stuck or chose to make your chimney their home on purpose based on the noises they are making. Stuck animals will make more frantic noises and scratch on the sides of the chimney as they try to get out. They will also usually scream if they are scared or feel their bodies being pulled against the wall of the chimney.

If you hear birds singing or chirping in your chimney, they are likely nesting there with their babies. It is best to wait for the baby animals to fledge before taking action. It’s also best to call a bird removal expert or wildlife control specialist. They can help you set no-kill traps in or around your chimney to catch the birds and return them to the wilderness.

Cover the Fireplace

If you think an animal is in your chimney and cannot get out, covering the fireplace can be a good way to keep it away from your home. This will prevent the animal from coming into your home and damaging your chimney, as well as preventing it from leaving feces, urine, and nesting debris behind inside your fireplace.

The best way to tell if an animal is stuck in your chimney is to listen for sounds. If you hear scuffling noises, or if the sound seems louder at certain times of day and night, this is usually a sign that an animal has made your chimney their new home. Animals that are stuck will also be frantic and make more noise as they try to escape.

Chimneys resemble caves, which attract animals looking for safe places to shelter from predators. Additionally, squirrels and birds often fall down chimneys when they are trying to evade predators or find new homes during winter.

If you can safely lower a rope down to the bottom of your chimney, you can help a trapped animal escape. A squirrel, for instance, can climb up a rope to the chimney damper, and then it will be able to open the damper and climb out of the fireplace. Be sure to cover the chimney with a protective covering or close your fireplace doors after you’ve lowered the rope down to ensure that the squirrel doesn’t climb back in.

Try to Get the Animal Out

It may seem like a good idea to run up onto the roof with some netting and try to get that animal out of the chimney yourself, but it’s not safe. It’s a good idea to call a professional for this kind of animal removal.

Instead, if the critter isn’t injured, you could lower a rope down into the chimney to help it escape. If you do this, be sure to have someone spotting you from the ground and that your ladder is sturdy enough to stand on. The animal might climb up the rope and return to its natural life in the wild.

If the animal doesn’t seem to be trying to escape, it might be making a nest or birthing its young inside the chimney. These animals can cause a lot of damage to the structure of the chimney and to the roof. They also may contaminate the living space with feces and urine, and they might leave droppings and other waste materials behind.

Another way to help keep critters out of your chimney is to install a top-sealing damper. This kind of damper has a rubber seal that prevents squirrels and other small animals from getting into the chimney. This is one of the best ways to keep raccoons and other larger animals from entering your home, too.

Outdoor Maintenance to Get Ready for Fall

While it’s tempting to let summer’s leaves pile up, raking them prevents the soil from becoming oversaturated and encouraging mold. It’s also a good time to check outdoor stairs, railings and the driveway for safety issues.

Before the really cold temperatures arrive, shut off and drain spigots to avoid damage from freezing temperatures, and empty ceramic or clay pots that are too large to bring indoors (they’ll crack). Seal air leaks around windows and doors with caulk.

Leaves

As the leaves turn color and begin to fall, you will need to properly care for them, either by raking or blowing. Grass does not grow well with leaves covering it, and piled up leaves block sunlight from the soil and can cause lawn diseases like snow mold.

When raking, it’s a good idea to wear garden gloves to protect your hands from thorns and insects. Also, a pair of lightweight work gloves are perfect for handling weeds in the vegetable garden and for tasks like mulching flower beds.

Once you’ve raked or blown leaves into piles, use a wheelbarrow to move them to a compost area. If you have a large yard, consider creating several small compost piles to reduce the number of trips to and from a compost bin. To speed up composting, chop the leaves before adding them to the piles.  If your town has “green” pick up, use the provided garbage can or paper leaf bags for the weekly pick up.

Leaf mold can be used to fertilize the soil in vegetable and flower gardens next year, or it can be spread as a thick layer of mulch over the entire garden to conserve water and keep the ground warm for plants. It’s a great alternative to chemical fertilizers. In addition, you can add the compost to a raised bed vegetable garden and create a “hot bed” that promotes fast growth of vegetables and other edible plants.

Plants

Whether they are inside or outside, plants need proper care to thrive in fall and winter. This includes adjusting watering, fertilization, bug patrol and proper placement.

As the days get shorter, houseplants need less water and won’t be growing as quickly. If possible, move them closer to a window to help boost light levels. And remember that they don’t like dramatic temperature changes. Drafty windows and exterior doors can cause them to suffer. Keep them away from heaters and fireplaces, too, as they can scorch plants and make them dry out.

While you may be ready to put your gardening to bed for the year, perennial shrubs, trees and spring blooming bulbs need special attention in autumn. They’re going through a not-so-attractive period called dormancy, which is when they stop producing flowers or foliage.

To encourage them to re-bloom next spring, feed them a good amount of liquid fertilizer at this time. Also, reapply mulch around the base of plants to retain soil moisture and prevent weeds. If you have a lawn, raise the mowing height to help the grass hold up better in hot temperatures and drought conditions. Remember to alternate mowing patterns to avoid creating strips or ruts. And don’t forget to water new shrubs, lawns and tree seedlings a few times a week, moistening the soil to about 1 inch deep.

Pruning

Often, when homeowners get their gardening tools out in the fall, they also reach for their pruning shears. As you may know, proper pruning is essential to a healthy garden and landscape. However, many people aren’t sure when it is appropriate to prune trees and shrubs and how best to do so.

Many resources warn against pruning anything woody in the fall, and it is generally not recommended unless a specific situation calls for it. This is largely because most plants are slowing down and preparing to enter dormancy in the fall. By pruning a plant at this time, you can disrupt the dormant process and potentially damage it.

If you do prune in the fall, it should be limited to removing any dead branches or limbs that are dangerous or overhanging a structure. Also, it is important to note that pruning should only be done when the weather is dry, if possible. Pruning when it is wet encourages the spread of disease.

Some flowering shrubs, such as lilacs and azaleas, should not be pruned in the fall because they set buds for next year on old wood. Other shrubs that require pruning to shape or for other reasons can be done in late summer and early autumn, if needed.

Water

While summer ends and fall begins, plants are busy storing sugars and nutrients in their roots for the winter. It’s important to make sure they get enough water. If you’re in an area with drought conditions, it’s a good idea to wean your perennials and shrubs off daily or weekly watering and move to a bi-weekly schedule. Watering in the fall also helps with winter hardiness by keeping the soil moist.

Before it gets too cold, trim back dead branches that could pose a threat during winter winds and storms. It’s also a great time to clean rain gutters, especially around the home where debris can block proper drainage. It’s also a good idea to drain and store hoses, fountains and drip irrigation systems before they freeze. You can even pay a landscape pro to blow out your system with compressed air to avoid costly repairs in the spring.

Lastly, a fresh coat of exterior paint can keep your home protected and looking new. While it’s still warm enough, it’s a good idea to use caulk to seal cracks and gaps on your doors, windows and frames, and where wires and pipes enter the house.

5 Ways to Transform Under Step Storage Areas

Transform a small stretch of wall at the base of your stairs into storage or a cozy nook. This space is ideal for a wide variety of projects, including:

Turn this area into a pantry to store extra kitchen items that wouldn’t fit in your cupboards. Then, install mirrored doors to make the room feel bigger.

1. Add Shelves and Cabinets

The small stretch of space at the base of your stairs is a perfect place to incorporate some built-in storage. The height and shape of the staircase will play a big role in what you can do with this space, but many people find that simple shelves are a great solution. They can be used to store all sorts of things, from oversized items like blankets and pillows to board games and toys. You can also keep sentimental things such as Lego creations, school art projects and even some of your child’s favorite books.

To build a shelf, start by measuring the space. It’s important to be as accurate as possible during this step, because even a slight discrepancy can lead to an ill-fitting frame. Once you’ve got all your measurements, sketch out a diagram of the space so that you can easily refer to them later. Next, use the plywood you’ve measured out to build the framework of the shelves. Be sure to reinforce them with 2x4s for added strength. If you want your shelves to be closed, then you’ll need to add doors as well.

2. Create a Pantry

Depending on the layout of your home, converting under stairs storage into a pantry could be an ideal solution. This will help keep the main kitchen area free from clutter and create a dedicated space for bulk food items, baking trays, tins and jars. It’s a great way to reclaim under stair space and give the kitchen a much-needed upgrade.

The shape and size of your staircase will play a major role in determining the type of storage you can fit, so be sure to take measurements before you begin. It’s also important to consider any obstructions in the space, such as pipes and electrical wiring. To help you stay organised and on track, consider sketching a diagram of the space to keep for reference.

Don’t forget to include a light in your pantry, as this will make it easier to access and will ensure the space is well-lit at all times. To add a touch of elegance to your under stairs pantry, you can also choose a pocket door or folding panel door, which are both stylish and practical.

3. Install a Bar

The space under stairs is an ideal spot for a bar. It’s perfect for stashing mixers, bottles of wine, and other cocktail essentials. It also offers plenty of room for crowd-pleasing snacks.

To install a bar under your staircase, first you’ll need to determine the dimensions of the area. A good idea is to sketch a diagram so you can better visualize the space and keep track of your measurements. Make sure to double-check your measurements because even a small discrepancy can lead to an ill-fitting bar or wasted storage space.

Once you’ve decided on the dimensions of your bar, purchase a foot rail that fits the area. Choose from a variety of styles, including metal and wooden, depending on the look you’re going for. If using a wooden rail, consider purchasing end caps to cover the ends of the tubing.

4. Install Drawers

Turn the area under your staircase into a home library with a set of drawers. Store books, art supplies, toys and other media items for easy access, without taking up floor space. This clever storage solution is the perfect alternative to purchasing or building a large bookcase.

Drawers are fairly simple to build from scratch if you have basic tools and a bit of DIY know-how. Start by measuring the area to determine the potential size of your drawers. Choose the right material and finish for your furniture, as well as a color that coordinates with your existing décor.

Next, use a stud finder to locate a stud in the wall to ensure that your drawers will be properly mounted and secured. After the drawer box is installed, install a set of heavy-duty drawer slides. Lastly, add the drawer fronts and test each one to make sure they open smoothly and are properly aligned within the storage frame.

5. Create a Cozy Nook

Creating a cozy nook from your under step storage area is an excellent way to make this space feel like its own separate room. Whether you want to use the space for reading or as an additional playroom, this is a great way to utilize a wasted area and turn it into something useful.

If you have enough room to install a built-in bench, a bookshelf and a chair, you can transform the area into a reading nook. Adding a few comfy cushions and a cute reading lamp will make this spot a perfect place to enjoy a book or relax.

A reading nook can also serve as a great home office if you need to stay on top of work. You can add shelves for large storage bins, hooks for out of season clothing and even a wine or beverage bar if you’re a host who loves to entertain guests.

Regardless of how you choose to use your under stairs space, the key is to make sure that you’re using it efficiently so that it doesn’t become a cluttered mess that is hard to keep clean. These smart ideas are an excellent way to transform your stairwell into a functional and aesthetically pleasing space.

The Parts of a Chimney and Their Purposes

A chimney is a vital part of your home’s ventilation system. Understanding the parts of a chimney and their purposes will help you spot problems and keep your chimney working efficiently.

The chimney crown is the cement part at the top of the chimney. This should be routinely checked to ensure it doesn’t leak water into your house.

The Flue

The flue is a duct within the chimney structure that vents toxic gases, smoke and heat to the outdoor air. The duct must be properly sized and shaped for optimum draft, and it should be well-insulated to prevent the corrosive byproducts of combustion from entering your home.

The chimney’s flue lining is made of a ceramic material like terra cotta or pumice. If it cracks, breaks or has missing mortar joints between the flue tiles, the system is unsafe for use because deadly carbon monoxide could leak into the house.

A metal chimney cap is placed over the top of the flue to keep out animals, debris and precipitation. It also forces water away from the chimney’s connection with the roof. Alternatively, you can use a lintel to support the chimney’s masonry crown. The crown is a concrete surface that slopes away from the chimney’s opening and protects it from water damage.

The Throat

The throat is where smoke first enters the chimney on its path to the flue. It has sloped walls that help to compress the combustion byproducts and propel them upward into the flue. It also prevents downdrafts from interfering with this process.

The chimney liner is a pipe that goes inside the flue of a fireplace to protect it from heat and toxic fumes. It is typically made from ceramic, clay, or stainless steel. Chimney liners are often replaced when they crack or break due to age, wear and tear, or damage.

The chimney cap sits atop the chimney and acts as a barrier against rain water, sleet, debris, and animals from entering the chimney. It also helps to keep hot embers from escaping the chimney and burning the roof. Chimney caps should always be in good condition to ensure that they work properly.

The Firebox

The firebox is the inner section of your chimney system where you light and burn your fireplace fires. It is made with masonry material that can stand up to intense heat, and it is designed to be compatible with your chimney flue liner to ensure safe and effective venting.

When smoke and combustion particles exit your firebox, they travel into the expanded smoke chamber, a non-combustible section that’s typically slanted so the air will flow downwards rather than back up into the room (backdraft). If the smoke chamber isn’t slanted properly, or it’s not lined with the proper flue lining, there can be serious airflow problems in your fireplace.

Also inside the firebox, there is a metal grate that’s used to hold the burning embers. This grate is positioned in the bottom of the firebox, and it should be constructed with a solid, non-combustible material like brick to prevent sparks from igniting flammable materials on your floor.

The Smoke Chamber

Located just behind the firebox, the smoke chamber is a space that begins the process of channeling smoke and combustion gases up to the flue. It often goes unnoticed because it is not a visible part of the chimney structure. But, if the smoke chamber becomes damaged, it can lead to serious safety issues and prevent your fireplace from functioning properly.

The smoke chamber is most often constructed using a masonry technique called corbelling. This method staggers the chamber’s bricks like steps as it narrows toward the flue opening. This creates jagged edges that can collect creosote, causing it to deteriorate faster. This deterioration can cause gaps, cracks and other imperfections that allow toxic gases such as carbon monoxide to escape the chimney and into your home.

Smoke chamber parging, which is a masonry technique that smoothes the surface of the chamber, can reduce or eliminate these dangerous problems. It is important to schedule your chimney system for regular inspections and maintenance in order to ensure that the smoke chamber and smoke shelf are working properly.

The Damper

Chimneys are necessary to help heat and circulate air in a house, but they can become problematic if not installed correctly or serviced on a regular basis. Having a good understanding of the terminology associated with chimneys, vents, and connectors can help you to identify potential problems or hazards more easily and allow you to better discuss them with professionals who service these systems.

A damper is a valve that stops or regulates the flow of air inside of a duct, chimney, VAV box, or other piece of air-handling equipment. This allows you to control how quickly a fire burns and how much smoke is vented.

The Smoke Shelf

The smoke shelf, located above the damper, allows a mixture of smoke and fumes to rise into the flue. It also helps to deflect downdrafts that could otherwise blow ash and creosote into the firebox.

The surface of the smoke shelf must be smooth in order to facilitate drafting. If it becomes too rough due to age or improper construction techniques, drafting may become impaired. Additionally, the textured masonry can trap flammable creosote, increasing your risk of chimney fire.

A smoke shelf usually looks like either a flat or slightly concave area that curves up towards the chimney flue. Besides helping with the transition of large amounts of smoke into the small space of your chimney, the smoke shelf also catches rain, falling debris and ash. It can be very easy for these materials to collect on the smoke shelf, especially if it’s not cleaned after every chimney sweep.

How to Add Fall Accents to Your Landscape

Add rosy reds, yellows and oranges to your yard landscaping for fall colors that will beautify your outdoor decor. Yellow, orange and red autumn-themed accessories make great outdoor decorating ideas for porches or gazebos and will also set a cozy mood for patio ideas when entertaining family and friends.

No autumn landscape is complete without a few hay bales. Use them to hold pumpkins and other decorations.

Corn Husks

The color and texture of corn stalks, husks, and ears makes it an excellent decorating material for fall. This versatile material also lends itself to a variety of crafting projects, from simple arrangements to more complicated skills like weaving.

Corn husks, dyed in bright colors, add a rustic touch to table centerpieces and mantel displays. You can easily make these flowers from the husks of any breed of corn, but a special breed called “Indian corn” produces especially colorful husks that are ideal for fall decorations.

Fashion corn husks into seasonal napkin rings. Start with a soaked husk, then shape it freehand into a rose-like form with at least four rings. Glue ends together to secure. Make a few of these to match your autumn floral arrangements.

Wrap a piece of sisal rope with a bundle of broomcorn or Indian corn tassels to create a natural garland. Hang it around a door, across the porch, or on a mantel. A grouping of broomcorn or Indian corn also makes an attractive accent in the center of a fence.

Baby Peppers

A fun, modern touch to your fall landscape is a mix of succulents. These plants are well adapted to growing in pots, and they are available in a wide range of colors and shapes. They make an attractive accent for any planter and they pair especially well with a fall color palette that focuses on greens.

No front porch is complete without pumpkins, and their shapes come in a variety of sizes and patterns. They pair perfectly with ornamental kale, cabbage and pappers in container arrangements. For a unique twist, add baby peppers to the display. These compact vegetables offer a variety of color options, including dusty orange ‘Fairytale’ and cute white ‘Baby Boo.

Build a theme in your fall container with stems, flowers and foliage that match a specific hue or tone. For example, the rich greens of ‘Icicles’ licorice plant and ‘Jarrahdale’ blue spruce contrast with the silvery tones of the ‘Fairytale’ pumpkins in this display. A few sprigs of ‘Crossings’ eucalyptus and strawberry hydrangea add to the appeal. Textural grasses and ferns are another great way to add interest to fall containers, and they stay fresher longer than flowering plants.

Pumpkins

Pumpkins are a fall staple and can be used for more than just carving. Try painting a few different colors, drawing or even using stickers to give them some personality.

Use hollowed out pumpkins to hold cut flowers. Paint them to match the color palette of your arrangement and fill with water. This is a great option for bringing in some of that bright orange color to the front porch without having to worry about the flowers dying.

Instead of traditional chrysanthemums, try other flowering plants with mood-boosting shades of cream, yellow and red. Sunflowers, rudbeckia, snapdragons and thistle all come in vibrant hues of blush, burgundy, rust and crimson that complement a wide variety of fall foliage colors.

Make your front stoop stand out by adding a mix of pumpkins, gourds and other natural decorations. For example, Four Generations Under One Roof placed some small pumpkins in wooden frames to create a cute, non-carved kitty cat design. You can also try using a stencil to create an ombre effect on pumpkins. Or, try this idea from Lovely Indeed that uses a foam pouncer to inscribe spooky messages on tiny pumpkins.

Leaves

Fall colors inspire outdoor seating areas, decorate a gazebo, and transform house exterior walls and fences. Bold yellow, orange and red hues energize yard landscaping with their energizing color combinations, beautifying modern houses and cottages alike.

Using dried foliage is a great way to add autumn decorations without clogging up landfills with discarded bags of leaves. Look for items in the garden that dry well, such as stiff sandy-colored grasses, soft-curved zebra grasses and strawberry hydrangea sprigs. Tuck sprigs of pussy willow into an antique window frame, or create a natural wreath using leaves and flowers.

Layering a two- to three-inch layer of organic mulch in the landscape not only looks beautiful but also provides arthropod and wildlife overwintering habitat. Mulch is also beneficial for plants by keeping down weeds and preventing them from frost heaving out of the ground when temperatures fluctuate throughout winter.

Flowering Plants

A few seasonal accents can make a big impact on your outdoor landscape design. Hay or straw bales are classic fall decorations, and can add a harvest look to any yard. Bundles of broomcorn or shredded grapevine also offer fall color and texture, especially when wrapped with raffia bows.

Flowering plants are a group of the largest and most varied plant types. They produce seeds, fruit, and flowers that often attract pollinators and serve a function in the ecosystem. There are many different kinds of flowering plants that are suitable for fall, including helenium blooms in shades of yellow and orange and brightly colored chrysanthemums.

Decorative fall flowers are a great way to complement any garden, and can be planted in place of summer annuals or perennials. Chrysanthemums, marigolds, pansies, asters, and sedum all add beautiful hues to the garden or containers. They work well with other cool-season flowers and foliage, such as ornamental kale, spiky santolina, and festival grass (Cordyline ‘Viking’). In this container, white pine and blue spruce shrubs echo the rounded shapes of the heleniums, sedums, and kale.

How Does Radon Enter Your Home?

Radon is a radioactive gas that can cause lung cancer over time. It comes from the ground and can enter your home through cracks in floors, walls or foundations.

Households are most affected by radon because indoor air pressure is lower than outdoor pressure, allowing radon to be drawn in. Building materials like concrete, wallboard and granite countertops can give off radon, too, as can water from wells.

Foundations

Radon enters homes from the soil through cracks in foundations and walls. It also can seep into the air from well water and building materials. The radon enters your home as a gas and accumulates inside, increasing the risk of lung cancer. It is the second leading cause of lung cancer in smokers and increases the risk for non-smokers as well.

Radon is a radioactive element that forms as uranium, thorium and radium break down in water, rocks and soil. The radon is then released in the air, and it can get into your house through foundation cracks, basement windows and doors, or even through gaps around utility openings. It can also enter through the ground into your home from water if it contains uranium, but this is much less common.

A high concentration of radon can develop in basements, crawl spaces, and living rooms where it gets drawn upward by pressure differences within the house (from warm air rising and furnace/air conditioner exhaust). It can also enter through the ground into the lower level of a slab-on-grade home. It can also be driven into a basement by water appliances (washing machines, dishwashers, clothes dryers, and hot water heaters), allowing it to move through cracks in the floor and walls. It can also be carried into the house by a forced-air system that brings in outside air (furnaces, heat pumps and air conditioning). Some homes built on slabs or crawl spaces have higher radon levels than those with basements.

Crawl Spaces

A crawl space is a place often out of sight and out of mind, but this area is still exposed to the soil, making it an important entry point for radon. Crawl spaces with dirt floors are especially prone to elevated radon levels as they act like open windows and provide a pathway for radon gas to enter the home above.

Radon forms when uranium, thorium, and radium break down in water, rocks, soil, and building materials, releasing radioactive gas that can travel through the ground to the living areas above. This can be a problem for homes built on slabs, but it’s also an issue in houses with basements. Radon can also travel from crawl spaces into living areas through different pathways, including cracks in the foundation, gaps in floor and walls, old furnace vents, and ductwork.

Radon that enters your crawl space can find its way into your home’s upper floors through the “Stack Effect.” This happens when air pressure in your house is lower than in the crawl space, causing the gas to get pulled up into the home. Once inside your living space, radon can build up to dangerous levels and cause health problems. To prevent this, a radon specialist can recommend a crawl space membrane and sub-membrane depressurization system. These systems can be vented mechanically or passively, depending on your needs.

Windows

Opening windows to ventilate a home may reduce radon levels temporarily, but it will not make a lasting difference. This is because a home will exchange its air about every 6-8 hours, through natural convection and through circulating the air with the furnace or AC system. This constant air movement actually can increase radon levels during a short-term test, and opening windows in the upper part of the home will make this effect worse.

The best way to reduce radon levels is to hire an experienced professional to conduct a radon test in your home. A professional will be able to determine how high your radon levels are, and recommend the appropriate treatment options.

Doors

Radon is a naturally occurring radioactive gas. It comes from the breakdown of uranium in soil, rock and water. It moves through these materials and into living spaces, where it can become trapped and concentrate to dangerous levels. Radon can also infiltrate drinking water.

The main way radon enters homes is by riding on soil gases that penetrate concrete foundations or a part of the structure in direct contact with the ground, such as a crawl space. It can also enter through loose-fitting pipe penetrations, floor-wall joints and cracks in walls and floors. Radon can even ride on air coming from heating, ventilation and cooling systems (HVAC) or through open windows and doors.

Most radon problems develop in basements, but any home can have a radon problem, including slab-on-grade or crawl space foundations, and even newer or well-sealed homes. The type of foundation a home has and other factors, such as the size of the house, its ventilation system, and the temperature differences between indoor and outdoor air, affect how much radon is pulled into the residence.

The EPA warns that while some parts of the country have higher radon levels than others, no home is safe from the risk. This is because radon can vary widely between adjacent homes. It can also change over time. This is why it’s important to test for radon regularly, and to have the EPA-recommended system installed if a test shows high levels.

Ideas for Closet Organization

Whether you have a large walk-in closet or a tiny studio apartment closet, there are plenty of ideas for closet organization to keep your clothes and accessories neat. Try using clothing dividers to categorize and declutter, as well as hook organizers for organizing hats, bags and scarves.

Clothes arranged by priority and occasion have been reported to make people feel happier. Consider implementing this closet organization tip along with shelf dividers to keep stacks from becoming leaning towers of chaos.

Drawers

Whether your closet is a dreamy walk-in or a tiny storage pantry, it can be hard to keep clothes and accessories organized. But with the right organization tools, you can make a big difference in even the most chaotic closets. From drawer organizers to hangers, these ideas for closet organization will help you keep your clothing and accessories tidy and easily accessible.

Try using the vertical folding method to tuck bras inside of each other and store smaller purses or bags within bigger ones, maximizing your closet drawer space. You can also purchase store-bought drawer dividers to separate socks and undergarments from other items in your closet.

If your closet is short on shelf and drawer space, use a hanging shoe rack to store shoes and purses, and stack clear acrylic jewelry drawers to organize small accessories and baubles. These can be stacked easily to save space, and you can even add a label for each drawer so you know exactly where to look. Then, if you need to take your outfit out of the closet, you can easily grab the shoes you need without having to dig through your entire pile.

Bins

You can improve the organization of your storage with bins and other organizing supplies. Labeling everything—even the contents of a container—makes it easier to locate what you need, and it’s especially helpful for opaque bins on high shelves or in the back of closets. Grab a label maker and get to work!

If you have a shoe rack, fill the empty cubbies with clear plastic shoe boxes to keep off-season items and everyday shoes organized. A bar cart is another easy way to keep shoes off the floor and out of sight.

If you have limited shelf space, linens and other folded clothing tend to overflow, and if you’re trying to find something among the chaos, you might not be able to see what you’re looking for. The solution: a set of rod dividers that creates sections to separate items by category. It’s an easy DIY project that the experts love, and it also looks beautiful.

Hanging Organizers

If you have a walk-in closet, make use of its vertical space with a hanging organizer. These handy hangers come in all shapes and sizes, and can be arranged to fit your space. They’re also ideal for a small wardrobe, where they help prevent garments from touching each other.

A good rule of thumb is to donate any clothes that no longer serve you, and this simple closet hack makes it easy to wrangle these items into the donation pile. You can also add a trash can and a bin for the things you don’t want to keep, like this clever sock organizer that doubles as a hamper.

Chalkboard Labels

Whether you have a dreamy walk-in closet or just a small storage pantry, it’s essential to keep it tidy. Keeping your clothes, shoes and accessories organized streamlines morning routines, eliminates the search for that one item you can’t find and helps prevent dust bunnies from taking over. These DIY closet organization ideas will help you tame the mess and get your closet feeling functional again.

Using labels in your closet is a simple, easy-to-maintain closet organizing idea that cuts down on search time. Labels can also be used in your kitchen pantry to quickly identify items such as oats, rice, flours, sugars and more.

You can buy chalkboard labels at most office supply or craft stores, but for a quick project you can make your own by simply covering an old bin with contact paper and drawing on it with a chalkboard marker. These removable labels can then be wiped clean and reused for other containers.

Hooks

Instead of stuffing your purses into a drawer or onto a shelf (which can crush and wrinkle delicate fabrics, and create scuff marks on leather items), consider using a pair of purse hooks to store your collection. This smart closet hack allows you to see your entire selection and makes it easy to grab your favorite when heading out on the town.

Other closet organizing ideas worth implementing include using a divider to label each section of your wardrobe, such as shirts with shirts, dresses with dresses, or pants with pants. Another space-saving idea is to install shower rings that are ideal for holding scarves, so you can easily see what’s available and avoid knotting multiple scarves together (which can cause major wrinkles). If your closet lacks built-in shelving, try a set of canvas hanging shelves that hook on the closet rod to provide instant cubby-like storage—perfect for shoes, bags, and other accessories.

Types of Hardwood Flooring

There are many types of hardwood flooring, each with its own unique characteristics. Understanding these differences can help you determine what wood floor is right for your home.

Oak is a common choice because of its durability and color versatility. Its varied grain pattern helps to hide scratches.

Maple is a light-colored wood that complements both modern and rustic decor styles. Its natural finish can also be stained darker to create an elegant look.

Red Oak

Oak wood is an extremely popular choice for flooring and is durable and easy to care for. It also accepts stains very well. Both red and white oak will take on a darker color when stained.

When choosing the type of red or white oak hardwood floor you want, you must consider how much traffic your home will have. Red oak has a medium Janka hardness rating, which means it won’t scratch as easily but can dent slightly easier than some harder types of wood.

The grain pattern of red oak is more varied, with wider or wavy lines. This gives it a rustic and natural look that can warm up or complement many decor styles. White oak has a tighter, more uniform grain and can offer a cleaner look to your floors. Both species are beautiful and durable, but you must decide which is right for your home. The ultimate decision will come down to personal preference and your instincts. Both will look great in your home with the correct stain color.

White Oak

White Oak is a domestic hardwood that is more affordable than some of its imported competitors. It also receives a high score on the Janka hardness scale, which means that it can withstand heavy foot traffic without any significant damage.

White oak is available in a wide variety of finishes and stain colors. It’s neutral color palette works well with nearly any interior design style. Staining white oak floors with a dark color will enhance its unique grain pattern and make the floor look more substantial.

This species can be sawn in several different ways, including cathedral (Plain Sawn), fleck (Quarter Sawn) and rift/quartered/live (Rift Sawn). Each cut accentuates the beauty of the grain patterns, which vary from wave-like mineral streaks to more linear lines.

Because it’s so hardy, white oak holds up well to heavy foot traffic and household pets. But it’s always a good idea to select pre-finished hardwood flooring that includes a thick wear layer, which will extend its lifespan and provide the best resistance against scratches and other common wear and tear.

Hickory

Hickory hardwood floors offer an authentic look with plenty of natural character. These natural wood floors typically contain a lot of color variation, knots and mineral streaks. They can be used in any style of home from rustic to contemporary. Hickory is often milled into solid wood flooring planks that are nailed to the wooden support beams of a house known as joists. Hickory wood flooring is also available in engineered options for more stability and moisture resistance.

When a homeowner chooses to install a solid hickory wood floor they should be aware that these floors are very hard and durable with a Janka rating of 1,820. This is a very strong and sturdy option for heavy traffic areas.

Like all types of hardwood floors hickory can be sensitive to moisture and changes in temperature. To ensure a long lasting beautiful floor it is recommended that homeowners have a pinless moisture meter installed in their home prior to installing any type of hardwood flooring.

Cherry

Cherry hardwood flooring brings warmth and a natural beauty to any room. Its unique color palette of warm reds and browns creates an elegant look that also ages wonderfully. This hardwood can be found in both domestic and Brazilian varieties.

Domestic cherry is grown in North America and offers a wide range of color options. Its natural coloring can be enhanced with a variety of wood floor stains, though it is often left bare for the most vibrant look. Cherry wood floors have a medium density, making them somewhat soft in comparison to other hardwood types. It is therefore best suited to low-traffic areas.

Brazilian cherry is grown in Brazil and offers a stunning array of natural colors. It is known for its unique graining pattern and deep red tones that oxidize into rich brown tones over time. Its high Janka rating of 2350 makes it one of the strongest and most durable hardwood species.

This beautiful hardwood can be found in both solid planks as well as engineered flooring for a quick and easy do it yourself installation. You can even find it as handscraped flooring, which is machine textured to reproduce the shallow grooves commonly seen in antique hand-scraped floors.

Walnut

Walnut hardwood floors add a touch of luxury to your home. Its natural dark colors give it a look that stands out from other wood flooring options and can create a focal point in your home. Walnut is a durable and long-lasting floor that will look great for years to come.

This domestic hardwood is fairly soft with a Janka hardness rating of 1010. The variation in color between the light sapwood and rich brown heartwood gives walnut flooring its unique appearance. The natural color tones can also hide dents and scratches from furniture.

Walnut has a straight grain but can be irregular in places with the grain lines being wavy or swirly. It is an attractive hardwood that will complement many design styles. It looks especially good with darker stain colors and can be used in rooms that get a lot of sunlight.