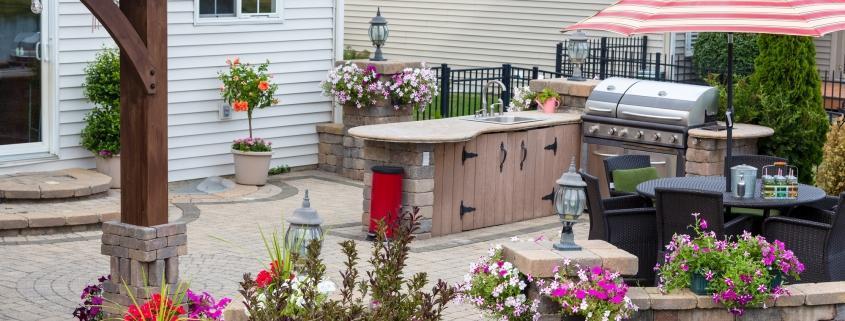
Masonry Landscaping Projects for Your Home

Masonry is the craft of working with stone, brick and concrete to build structures like chimneys, walls, patios and fire pits. It also encompasses the landscaping features made from these solid materials, called hardscaping.

Ideally, landscape masonry should seamlessly integrate with the natural and existing elements of your yard. Here are five ways masonry can enhance your outdoor living experience:

Pavers

Adding pavers to your property will not only improve the look of your home but also increase its value. It’s a great way to bring in more visual interest to your landscaping design and give it a high-end feel that will make it even more livable after the sun goes down.

If you decide to do this project yourself, it is recommended that you purchase a few essential tools like a rubber mallet for tapping the pavers into place and a circular or diamond-bladed saw to cut the pavers to size. Other necessary tools include a plate compactor and a rake.

Before you start laying the pavers, excavate the installation area. Spaces that will only be used for foot traffic require 4-6” of base material, while driveways or projects in wet soil need more like 12”. Using stakes and string to mark out the work area helps gauge the slope’s degree. If the slope is too steep, you will need to install a retaining wall to level the installation area and prevent soil erosion.

Next, spread and compact the base material. Use a rake and a plate compactor to achieve the desired thickness, and make sure that the slope is consistent throughout the installation area. Then, install a layer of sand on top of the base. This is important, as sand fills in the gaps between pavers and prevents them from shifting.

Bricks

Brick is a durable building material and can be used in a variety of projects. Brick walls can be used to enclose patios, pools, and gardens. They are also used for fireplace surrounds, walls and other interior masonry. Bricks are available in a wide range of colors and textures. They can add a rustic or modern feel to any space.

Before starting to build a brick wall, it is important to prepare the site. This includes making sure it is level and plumb. It is also important to choose the proper type of brick for your project. There are two main types of brick: engineering and facing. Engineering bricks are made with precise specifications for weight distribution and tensile strength. Facing bricks, on the other hand, are more focused on appearance and texture.

When installing a brick wall, it is best to use running bond. This means that each course of brick should be set a half brick back from the previous course. This will help to create a straight wall and ensure that the mortar joints are spaced correctly. It is also important to use mason’s blocks and line at the ends of each course. This will help to keep the wall straight and make it easier to cut.

When working with brick, it is essential to wear a dust mask. Mortar mix can contain lime which can irritate your lungs if inhaled. It is also important to protect your skin from contact with the mortar and to wash your hands after touching it.

Stone

There are many different types of stone and each offers a unique look that can complement your design style. A masonry contractor can help you choose the right materials for your project and layout. For example, a brick walkway may be more suitable for high traffic areas than a bluestone walkway.

Masonry stones can be used for sidewalks, patios, and driveways to add a touch of elegance and sophistication to your home. They can also serve a functional purpose by defining your garden, lawn, and driveway space and reducing debris, dust, and runoff. They are available in a wide range of textures, colors and surfaces with load-bearing capacities and permeable finishes to reduce runoff.

Before installing any stone veneer, make sure the surface is clean and free of dirt, paint, and other residues. If you are covering an existing wall, you can apply the stone directly, but any new installation requires a sheathing of metal lath. If you’re installing on a wood surface, a weather-resistant vapor barrier must be installed first.

Prepare the surface for the veneer by applying a scratch coat of mortar that’s composed of two parts washed sand and one part Portland cement. While this mortar mix is still soft, scrape horizontal grooves into it with a metal scraper and let the scratch coat dry for 24 hours.

Fire Pits

This easy DIY project combines face brick and firebrick to create a circular fire pit that’s ideal for seating up to four people. Because regular brick can crack at high temperatures, use firebrick (also called refractory) to line the inside of your DIY outdoor fireplace. For the outside of the pit, use a type of face brick that has holes (“cored”) in it. You can buy it in various sizes at home centers and brickyards.

First, dig a hole for the pit that’s at least 7″ deep and make sure it’s completely round by tracing the circle on the ground with a stake or garden hose. Fill the hole to almost ground level with gravel, lava rock or sand. It’s important to avoid flammable materials such as pea gravel and compressed concrete blocks, which can trap moisture that turns to steam and explodes. Instead, use non-porous materials that don’t retain moisture such as sand or lava rock.

Whether it’s building stone stairs that align with your home or adding outdoor fireplaces that become the focal point of social gatherings, masonry is synonymous with creating a sense of permanence on one’s property. From constructing retaining walls to stabilize hillsides to laying paver patios that serve as the centerpiece of our landscapes, masonry is the perfect complement to any home.

Should I Stain or Paint My Deck?

Decks are exposed to extreme elements all year. Sunlight fades the wood, while humidity and rains break down the lignin that holds the fibers together. Paints protect a deck from these conditions and offer an array of color choices.

Stains highlight the natural wood design and come in solid and semi-transparent styles. Painting a deck is more time-consuming initially and costly than staining one.

Cost

Although they both may be applied in the same way and contain many of the same materials, stain and paint are very different. Stain seeps into the wood and can be transparent, semi-transparent or opaque allowing the grain and texture to show through while paint creates a top layer that covers the surface with thousands of color possibilities.

With the right choice of color, you can use paint to match your home or complement other outdoor fixtures and furnishings. It can also be easier to wash dirt off a smooth, painted surface than a rough, stained one. However, painting can make your deck slippery when wet or icy, which could be a concern if you have kids or pets.

If you opt for stain, it is important to choose a product that is rated for floors, contains mildewcides and UV protection to prevent fading. It should also be water, weather and mold resistant. Stain may last longer than paint, but it is still a more labor-intensive option because it needs to be reapplied more frequently.

It is best to have a professional perform a general inspection of your deck before you stain it, as they can identify potential problems like wood rot or damage from insects and recommend repairs. They can also help you determine the best color options and provide a detailed estimate for the project.

Appearance

Stain is a popular choice for decks because it can be more natural-looking than paint. It’s available in a wide range of opacities and colors, and it’s easy to apply with a brush or roller. It’s also available in a water-based formula, which reduces the amount of chemicals released into the environment.

The only downside of stain is that it’s not as durable as paint, and may need to be reapplied in a few years. It can also be difficult to clean, as dirt tends to cling to the surface of the wood. However, stains do offer some protection against weather damage, such as rot and mold, which is not always the case with paints.

Paint, on the other hand, offers a more uniform appearance. It can hide cracks in the wood, and it’s available in a wide range of color options to match your home or create a bold statement. Paint is thicker than stain, so it’s able to fill in gaps and ridges on the surface of the wood. It also dries more quickly than stain, and can be used on other outdoor surfaces like fences or unpainted wood siding.

However, it’s important to remember that if you choose to go with paint, you’re stuck with that color for the life of your deck. If you ever want to change the look of your deck, you’ll have to completely strip the old stain and repaint.

Maintenance

A good painting or staining company can give you the results you want for your deck. It is important that the wood is clean and dry before applying any coating. If you power wash a deck in the morning, and then paint or stain it that same day, there is a chance of moisture trapping within the wood and causing peeling or flaking. Using an oil-based stain is best as it will last longer than water-based products. A solid stain will also hold up against UV damage better than semi-transparent or transparent stains.

Staining your deck takes less time than painting, but it is important to apply it properly. A stain pad will make the job easier and faster. A stain sponge will help you get into corners and other trim areas that are difficult to reach. It is best to stain your deck when the weather is dry and clear, but if you cannot do it that way, it is still possible to stain your deck with the right techniques.

Environment

Wood decks are one of the great outdoor living spaces that many homeowners enjoy. They can be places to entertain friends and family, or quiet retreats for personal relaxation.

Regularly staining or painting a deck can help it endure the elements and last for years to come. Staining, which is more forgiving than painting in terms of misses and mistakes, also allows the natural beauty of the wood grain to show through, something that many people like. Stains also tend to be less slippery than paint, which can be a concern if you have young children or elderly guests who might fall.

Some top-quality woods, particularly tropical hardwoods, don’t hold stains well. If you’re going to stain a deck made with these dense and beautiful materials, be sure to use a penetrating stain that’s suitable for the type of wood. Stain can damage grass and plants, too, if it gets on their leaves, preventing them from absorbing water, nutrients, and sun.

It’s generally best to paint a deck in early spring, before the weather starts getting warmer and hotter. When the temperature starts to rise, the wood can expand and contract more than it does when it’s cold, causing the paint to crack or peel. It’s important to do this work on a cloudy day, as direct sunlight interferes with adhesion and color uniformity.

When choosing whether to stain or paint your deck, it is also important to consider the color and style you want. Paint offers more color options, and can be applied in a wide variety of finishes. It will not fade in direct sunlight like a stain, but it may fade over time. Paint can withstand the freeze/thaw cycle of colder winter states better than stain as well, but it will need to be reapplied more often.

Trending Bathroom Upgrades 2023

Whether you love modern, glamorous or rustic styles, these bathroom remodeling trends will inspire your next home makeover.

Houzz and NKBA report that shower upgrades remain popular, including larger two-person showers, multiple shower heads and zero-entry options for ageless accessibility.

Metallic finishes add a warm, luxe feel to the space, as well as a visual pop. Mix and match your hardware and fixtures to create a custom look.

1. Freestanding Tubs

Freestanding tubs are a great way to add style and luxury into your bathroom without overwhelming it. They can also work well in small spaces because of their clean lines and definition. They are available in a variety of styles and colors to fit any decor style and can be paired with many other bath upgrades to create a spa-like bathroom.

A freestanding tub can be paired with a walk-in shower, a tub-filler faucet or a jetted tub-filler to create a luxurious bathroom. If you’re planning on adding a bathtub-filler faucet, make sure you consult with a licensed plumber to ensure your home is properly wired and that you have enough electrical power for it.

2. Curved Tubs

The bathtub is the focal point of a bathroom, and it can make or break a home’s style. It’s important to keep the tub in sync with other design elements, and curved styles offer a unique aesthetic that stands out in a room.

Whether you choose a freestanding or built-in option, a curved tub is an eye-catching way to add style to your master suite or guest bath. Pair the design with soft neutrals or a subtle raffia wallcovering to highlight the smooth curves of your tub.

A whirlpool tub can also bring spa-like comfort to your home. The soothing experience will have you feeling relaxed and ready for bed after a long day.

A modern shower is another popular choice with buyers, according to Nancy Almodovar, president of Nan and Company Properties. The water-saving fixtures and sleek glass are an added bonus that boosts a home’s value. The design can be paired with a simple tile or bolder patterns for added visual interest.

3. Double Vanity

One of the most popular bathroom remodel ideas 2023, a double vanity provides plenty of storage space for personal toiletries without taking up too much floor area. A large mirror or two helps visually enlarge a small room, while brass fixtures and classic cabinets add elegance to the look.

For a contemporary aesthetic, choose a bold shade of blue such as navy-blue paint color which looks great on the walls or cabinetry and pairs well with white tile or wainscoting. It can also be used to highlight natural wood or anthracite-black bathroom elements for a bold contrast.

Fluting is getting a new twist as a design trend. Delicately ribbed finishes on vanities and shower doors are a visual and tactile treat, reminiscent of Art Deco glamour.

Aegean Teal and Hale Navy are other trendy bathroom paint colors that work well in a variety of styles. Earth tones are also on-trend, with sandy beiges and warm clay tones creating a serene backdrop for the bathroom. These nature-inspired shades are also a way to bring biophilia into the home with a modern twist.

4. Curved Sinks

While minimalist aesthetics still cling to many homes, new interpretations of the design style are finding their way into bathrooms. From vanity cabinet fronts to decorative shower doors, curved surfaces add subtle interest. These bathroom trends bring a touch of glamour to a primary bath and look equally at home in either traditional or modern designs.

Another way to bring a touch of luxury to the space is with a curved sink. This elegant feature is available in a variety of sizes, shapes, and materials. However, it’s important to choose a sink that matches the overall look of your bathroom. A curved sink can look out of place in an otherwise sleek room.

While brushed metals and chrome continue to be popular, softened metallic finishes like sage green and smoked glass are also making their way into the bathroom. Look for unique shaped hardware and sconces to complete the look.

5. Modern Lighting

Whether it’s for a modern bathroom design or a classic powder room update, a few well-placed fixtures can make a big difference. From recessed downlights to slimline wall sconces, you can add just the right amount of visual interest to your master bath without breaking the bank

Modern lighting is another popular bathroom upgrade that can help create a relaxing atmosphere. It’s important to have good lighting in a bathroom, especially when it comes to preparing for the day or unwinding at night. Pairing a light fixture with other stylish accessories, like sconces and a brass mirror, can also help pull your bathroom’s look together..

Lighting also plays a big role in the 2023 bathroom color trends. We’re seeing saturated shades like deep red and rich greens, as well as matte finishes that align with broader furniture trends. Meanwhile, black continues to shine in new shower enclosures and accessories.

For those who want to add a little extra sparkle, hardware and fixture designers are introducing softened metallics such as brushed gold. This look offers a bit of warmth and contrast that’s a great complement to sleek tile or marble surfaces. It’s also a good option for homeowners who don’t want to commit to a full-on brass bathroom.

Common Debris That Builds Up In Air Ducts

Over the years, it’s not uncommon for ducts to get filled with dust, lint, pet dander and other debris. These materials contaminate indoor air, and they can exacerbate respiratory conditions like allergies and asthma.

Generally, you should clean your ducts every three to five years. However, there are some things that can indicate a duct cleaning is needed sooner.

Dust

When people cook and eat in the same room where they use their air conditioning, they drop food particles that can build up in the home’s air ventilation system. These crumbs, along with dust, can be blown through the vents with each cool or warm breeze. This debris can trigger allergies and aggravate respiratory conditions. A professional cleaning can remove these particles from ductwork.

Soot is another common allergen that can be found in ducts. It can settle in the winter during furnace use and resurface in the summer during AC run-off. This black dust can be a respiratory health risk and damage the efficiency of the AC.

It’s common for ducts to collect dust, dirt and pet dander as well. These contaminants are small and light, so the air drafts that blow through the ductwork carry them along. Even if you keep your house tidy, it’s likely that these contaminates will find their way into the ducts.

The air ducts can also harbor biological contaminants like rodents, insects and mold. If these pests make their homes in your ducts, they can circulate contaminated air throughout the entire home. In many cases, a combination of duct repair and cleaning is the best solution for this type of problem. The repairs will ensure that the moisture and biological contaminant isn’t carried through the ventilation system to other areas of the house.

Dirt

Air ducts maintain circulation by transporting warm and cool air throughout your home. They also provide pathways for dust and other debris to escape and settle in rooms. Over time, this can cause a build-up of contaminants that negatively affect your indoor environment. Dirt is one of the most common contaminants that can build up in ducts. It can come from fabric items in your home, such as drapes and carpeting, or it may blow into the duct system from outside. Despite cleaning your home regularly, it is likely that dirt will accumulate in the air ducts over time.

A dirty air filter is not the only source of dirt in your ducts; it can also be caused by construction materials, such as bits of drywall and asbestos. These materials can be released into the air by contractors working in your home, or they could fall from deteriorating parts of your HVAC system.

Some service providers offer duct sanitizing with chemical biocides, which are designed to kill microorganisms. However, these products have not been fully tested for safety in ductwork and can be dangerous to your family’s health if not properly applied and monitored. Further, they cannot prevent future contamination and may encourage microbial growth. Biological contamination can be prevented by controlling moisture and correcting leaks in ductwork.

Animal Debris

Although we all love cute furry animals, you don’t want them making their homes in your ducts. Rodents are notorious for getting into ductwork through loose seals and cracks, where they build nests and leave behind feces. These fecal particles are circulated through your home, irritating allergy sufferers and others who need healthy indoor air quality.

These fecal particles can also lead to mold and mildew growth, which are a serious health risk. Mold spores release toxic chemicals that can cause headaches, fatigue, nausea, and other ailments in humans.

Another problem with animal debris is that it can be flammable. Dead rodents, birds, and other animals can catch fire in your ductwork, which could result in a devastating house fire.

In addition, animals can also introduce other allergens to your indoor air, such as pet dander and pollen. These contaminants are circulated throughout your home by the air conditioning system, which can aggravate allergy and asthma symptoms in household members.

Mold

Mold is a fungal substance that grows in moist environments. It can cause allergies in humans and pets. It can also damage surfaces it grows on. Molds get their nourishment from organic materials and other living organisms, such as dead leaves, plants and animals. They can also break down wood in buildings and food. They release enzymes that aid in this process. Molds can be toxic to people, especially when they are exposed in high doses. They can cause rashes, watery eyes and a sore throat. Mold spores can grow in air ducts and then be blown around the house by the AC vents.

If a homeowner notices that the AC vents have mold in or around them, they need to take action immediately. They should contact a professional air duct cleaning service to handle the mold removal and cleaning.

Air ducts are a great place for mold to grow because they have warm temperatures and lots of moisture. Mold needs to have these two things in order to grow. It doesn’t grow in freezing temperatures, but it will grow in warmer areas. It can live off of organic debris, such as dust, oil films, skin cells and dirt that is deposited on the surface of a material. It can also grow on surfaces like drywall, wallpaper, carpet and fabric.

How to Paint Your Deck

A fresh coat of paint can brighten up a deck and help it last longer. If you decide to paint rather than stain, choose a high-quality oil or acrylic product designed for outdoor use.

You’ll need a hose capable of a pressure wash, a scraper to remove loose peeling paint, and brushes (both large and small). Be sure to plan your project for a day without rain.

Prep the Surface

A freshly painted deck adds a pop of color to any outdoor entertaining area. It’s also a relatively simple, not too labor-intensive project that can make a big difference to the overall look of your space. Whether you’re replacing peeled, outdated paint or giving your new deck a splash of design drama, the key to successful deck painting is preparing the surface properly.

Before you begin your deck repainting project, sweep the whole area to remove any dirt, dust and debris. This can be hard work, but it’s necessary to make sure that the primer will adhere to the wood. Be sure to pay special attention to the corners and in between boards, as these tend to wear down faster. Give the surface a good clean using a pressure washer or garden hose. This will help to eliminate any dirt or grime and ensure that the wood is completely dry before you start. Leaving any moisture in the wood can lead to peeling paint in the future.

Next, sand the surface of your deck using a sanding tool to remove any splinters or rough spots. This will help the new paint to adhere and create a smoother finish when you’re finished.

Lastly, it’s important to choose the right type of paint for your deck. There are a number of different options available, including oil-based and water-based paints. It’s essential that you use a high-quality, weatherproof deck paint designed for exterior wood surfaces, as this will protect the wood and help it to last longer.

Prime the Wood

A fresh coat of paint can breathe new life into your deck, whether it’s to replace a peeling layer or give this highly-trafficked outdoor entertaining space some design drama. Before you get started, it’s important to make sure that the entire surface is ready for a new look and will be able to stand up to the elements.

Once your deck has dried from powerwashing, take the time to repair any damage by filling in any dents or holes and applying a rust-resistant primer, if needed. This will help protect the wood from further rusting and will help the new paint hold up longer.

Apply the First Coat of Paint

Be sure to use painters tape to cover areas that you don’t want to paint, such as the areas of your deck that touch walls, doors, windows, metal railings, or other buildings or features. It’s also a good idea to cover plants and yard ornaments with drop cloths to protect them from paint stains.

The deck should be completely dry before you start applying the first coat of paint. Moisture will not only prevent the new stain or paint from adhering to the wood, but it can also push existing color away. It can take hours for a deck to dry, depending on the weather and location, so don’t rush it.

After you apply the first coat, let it sit for a few days. During this time, you can replace any furniture or accessories that you moved out of the way. If you are using a stain instead of paint, follow the manufacturer’s instructions on how many coats your deck should have. Transparent stains typically only require one, while solid-color acrylics and oil based paints will often need two.

It’s important to choose a quality product, and be careful not to overdo it on the amount of color you use. A light application of color will give your deck a beautiful, fresh look that stands up to the elements.

If you are trying to repaint a deck that already has peeling paint, it’s best to go with a stain over paint. Stains penetrate the wood grain and do not form a solid coating on top like paint does, so they have less of a chance to blister or peel. If you want to stick with paint, there are several options on the market that work well and will cover up old peeling paint.

Apply the Second Coat of Paint

The second coat of paint is the “magic” that fills in gaps and creates a finished look. Apply the second coat of paint in a similar manner to the first, using a roller for the majority of the area and smaller paintbrushes for hard-to-reach spots.

When applying the second coat, be sure to use a thick coating and work in the direction of the wood grain. This will help the paint adhere to the surface and last longer. Let the second coat dry completely before walking on the deck.

It’s important to remember that a new deck can only take so much moisture and temperature changes before the boards begin to split and crack. If you notice any cracks forming, be sure to fill them with exterior-grade putty before starting the staining process. This will give the deck a consistent texture and ensure that it’s fully protected from water and sun exposure once the stain is dry. Then, you can be confident that your deck will look great for years to come!

Is it Necessary to Grind a Tree Stump?

Tree stumps are a natural part of a tree’s demise, but they can also be an eyesore and a safety hazard. Additionally, they can attract insect pests and cause fungal diseases.

If a stump is near or on your property, it’s necessary to remove it to ensure the safety of you and your family. This is especially true if your property is on the market.

Cost

Stump grinding costs are variable, depending on a number of factors. These include stump size, how deep you want it ground, and whether or not the tree is accessible for the grinder to get to.

The cost also depends on the type of wood used for the stump, as some types are tougher to grind than others. Arborists will typically charge less for grinding smaller stumps than larger ones.

Another factor that will affect the stump grinding price is how close the stump is to other trees or structures on the property. Stumps that are too close to buildings or other structures could damage foundations, footings, or underground utilities if they are ground out.

Stump grinding is usually done with a large grinder that has a blade that rotates fast and rips the stump into small chips. The grinder is usually brought to the site and is operated by a professional.

Safety

Stump grinding is an effective and quick solution to remove stumps and roots. However, it is important to consider safety concerns before you start the process.

First, you should walk around the area and look for buried objects such as pipes or fencing that could be dangerous. Also, check for rocks or other debris that could cause injury.

Second, you need to determine how deep you want to grind the stump. Shallow stump grinders go about six inches below the surface, while deeper ones reach 20 inches or more.

Third, you need to consider how the stump will affect any future replanting. Stump roots that remain underground will make it difficult for new trees to grow in that same spot.

Getting rid of a tree stump is necessary because it’s an eyesore, takes up valuable space on your property and can attract harmful pests such as termites, carpenter ants and other insects that damage your property.

Environmental Impact

Stump grinding is an eco-friendly method for eliminating tree stumps. It involves using a machine to grind the stump down to wood chippings, which can be used as mulch elsewhere on your property.

The benefits of stump grinding include reducing soil compaction, improving the quality of your soil, and preventing root rot and fungal infections. Additionally, this process creates a safer work environment for workers.

When you hire an eco-friendly company for stump grinding, 23% of the waste will be recycled instead of thrown into a landfill. This is a big deal for the environment as it helps prevent trash overload and reduce greenhouse gasses.

Besides being an eyesore, a tree stump can be dangerous for children or senior citizens to step on. It also takes up valuable space in your yard, making it difficult to use for other design elements.

Replanting

Tree stumps are not the most attractive thing in the yard, and they can be an eyesore and a source of pests. They also can interfere with the growth of other plants in the area.

Fortunately, there are methods to remove tree stumps without destroying the soil. One such method is stump grinding, which destroys the tree stump and its root system.

The downside to this process is that the stump can be difficult to remove and it could damage your home’s foundation.

Another issue with stump grinding is that it can leave behind a lot of sawdust and roots. This can alter the nutrient balance in the soil.

Therefore, it is important to consider the impact of stump grinding before planting a new tree in the same location. Generally, it is best to wait a year before replanting.


The Most Popular Home Remodels for 2023

If you’re thinking about remodeling your home, you might be curious about what the most popular home additions are for 2023. Luckily, we’ve put together an informative article that outlines the top trends you’ll want to keep an eye out for this year.

One of the most popular home remodel ideas for 2023 is creating a more personalized space in your house. For example, a custom coffee station or bar area is a great way to add a little personality and functionality to your home.

Home Offices

Home offices are a growing trend among homeowners following the lingering COVID-19 pandemic and the rise in remote work. They’re a way to reduce costs on rent, utilities and food services while still providing an office environment.

The Internal Revenue Service (IRS) allows qualified taxpayers to claim a home office deduction on their tax returns. However, the space must be used exclusively and regularly for business.

Larger Windows

If you’re looking to add a touch of modern luxury to your home, larger windows are an ideal choice. Not only do they add style and elegance, but they can also increase your home’s energy efficiency.

While they can be expensive, larger windows are an investment that will pay off in the long run. Plus, they can make your home look and feel more expansive by letting in a ton of natural light.

When it comes to larger windows, there are many options to choose from, including sun protection, energy efficiency, triple pane glazing, and custom sizing. There are also plenty of other gizmos to consider, like frame colors, grilles, and window hardware. With all of the choices available, it can be difficult to decide which ones are worth the extra money.

Curves

Curved furniture is one of the hottest trends this year. Squishy sofas, bulbous armchairs and boucle upholstered furniture are all in vogue.

Similarly, curved walls and arched doorways are big on the reno scene for 2023.

In fact, a curved wall or window can make a room feel bigger and more spacious, if only for a moment.

For example, a curved bathroom vanity is more practical and more stylish than a standard rectangle. You might also want to check out large curbless showers and the latest in heated floors. The most important thing to keep in mind when making the decision about which home addition is the best fit for you and your family is to think of your needs and lifestyle first. A good design consultant can help you decide on the most appropriate home addition for your needs.

Sustainable Design

Aside from energy savings, a home with sustainable design is better for the environment. It can help lower carbon emissions, reduce air pollution, and create new opportunities for urban growth.

In 2023, we’ll see more natural materials like bamboo, reclaimed wood, and recycled plastic making an appearance in home decor. These materials add warmth and character to any space.

Another popular trend is the use of sustainable flooring, which is made from plant-based materials such as cork. This eco-friendly material is a great choice for a variety of reasons, including its heat-retention properties.

Sustainable design can also include smart-growth policies that promote higher density, mixed-use land, and transport-oriented development. These features increase social cohesion, increase access to green spaces and public transportation, and decrease emissions from car dependency.

Spa Bathrooms

A spa bathroom is a luxury retreat that feels like the ultimate pampering experience. It’s all about the little touches that create a sense of tranquility, from soft towels and trays to soothing music and candles.

A bath tray, for example, gives you a place to relax in the tub while enjoying a glass of wine or tea. It also provides a place to store a loofah, a book and other items that make you feel extra pampered.

Another detail to consider in a spa bathroom is the color scheme. Calming blue tones are popular and elicit the feeling of relaxation.


The Lifespan of Roof Shingles

There are many factors that determine the life span of your roof shingles. Among those are the type of shingle, manufacturing methods, installation quality, and weather conditions.

Asphalt shingles have a lifespan of 15 to 20 years, while architectural shingles can last for 25 years or more. The key to maximizing the longevity of your shingles is to ensure they are properly installed and ventilated.

Asphalt Shingles

Asphalt shingles are one of the most popular and durable roofing options. They are also low maintenance and relatively easy to install, making them a great choice for homeowners on a budget.

The lifespan of asphalt shingles depends on several factors, including climate and weather conditions, as well as maintenance. UV exposure, debris, heavy temperature swings, and storm damage all impact the durability of your asphalt shingle roof.

A major issue that many homeowners are facing is that the granules that protect your asphalt shingle roof have become lighter in weight. This has caused a decline in the strength of these shingles and has shortened their lifespan.

Keeping your roof free of debris and trimming nearby branches should help extend the lifespan of your asphalt shingles. However, if you do not take proper care of your roof it will eventually start to wear out and you may need to consider replacing it altogether.

Architectural Shingles

Choosing the right roof shingle isn’t an easy task, as there are many factors that contribute to how long your shingles will last. Whether it’s material, color, durability, price, or other considerations, you want your new roof to be a worthwhile investment that enhances the longevity, beauty, and feel of your home.

As an upscale home finish, architectural shingles have become popular for their aesthetic value and cost-effectiveness. Their dimensional profile mimics the look of high-end slate or cedar shakes and can be designed to complement a variety of homes’ styles.

While they’re more expensive than 3-tab shingles, their higher initial costs can be offset by energy savings and a longer lifespan. They also come with a warranty that typically lasts 30-50 years, which nearly doubles the average you’d receive for standard shingles.

Additionally, the thicker construction and laminated structure of architectural shingles helps to improve their impact and wind resistance. This means that your roof is less likely to suffer damage from high winds, which can cause the shingles to crack or shear.

Wood Shingles

Wood shingles and shakes are generally considered more expensive than asphalt or metal roof tiles, but they also offer a variety of advantages. They can be made from a variety of different wood species, including cedar, redwood, and pine.

The lifespan of wood shingles and shakes depends on the quality of the material. They are more likely to develop physical damage, such as cracks and splits, over time if they are not well-maintained.

They are also more susceptible to insect infestation. Termites and wood borers love them, so it’s important to treat your roof with an effective pest-control product every year.

The lifespan of wood shingles and shakes can be increased by regularly cleaning, repairing, and re-coating them with fungicide or stain. This will protect them from moisture, rot, mildew, and mold, which can cause significant water damage over time.

Metal Shingles

The lifespan of a metal roof depends on several factors, including the style of home, the type of metal used and the climate. However, it is generally thought that metal roofs can last a minimum of 80 years with proper installation and maintenance.

This is a far longer lifespan than asphalt shingles, which tend to have an average lifetime of around 20 years. This can make metal a more appealing option for homeowners who are looking for a roof that will last for decades without the need to replace it.

Compared to other roofing materials, metal roofs are also much more durable, allowing them to withstand the harshest of weather conditions. They can withstand hail and snow, as well as ice accumulation that can damage other roofing materials. Moreover, their reflective properties help keep the home cooler during hot days. This reduces cooling costs, which can be a big factor in a homeowner’s budget.


Most Popular Interior Paint Colors for 2023

Every year, new paint color trends emerge and quickly become popular. If you’re ready to give your home interior a makeover, take a look at our list of the most popular interior paint colors for 2023.

This year, the trend is for grays to continue to be a dominant color in rooms. However, a few other hues are gaining in popularity as well.

Raspberry Blush

Benjamin Moore is stepping up the intensity of its 2023 Color Trends palette with a bold red-pink hue called Raspberry Blush. It’s described by paint company president Kim Magno as “charismatic,” a saturated vivacious color that’s both enlivening and captivating.

As a reimagined take on the dusty pink of Rosy Peach, it’s another nod to the latest design trends, which include more earthy shades and moodier blues and greens. And if the era of all-white or neutral palettes has left you feeling stuck, this color could be just the push you need to start incorporating more varied hues into your design.

In addition to Raspberry Blush, the paint company’s 2023 Color Trends palette includes Conch Shell (a gentle dusty pink), Wenge AF-180 (a rich brown with orange undertones), Cinnamon 2174-20 (a rusty shade of red), New Age 1444 (a soft pale lavender), Starry Night Blue 2067-20 (a deep navy blue), North Sea Green 2053-30 (a soothing blend of blue-green) and Savannah Green 2150-30 (a calming blend of ochre). To celebrate its bold choice, Benjamin Moore hired electrofunk duo Chromeo to release a song named “Raspberry Blush,” along with playlists curated for eight other colors from the Color Trends 2023 palette.

Viva Magenta

If you’re looking for a bold and fun way to add color to your interiors, consider painting your home with Viva Magenta. It’s a deep red tone that can be used as a focal point in a room or to accent other neutral colors, such as blue or green.

Viva Magenta is a powerful and exciting paint color that has been chosen as the color of the year by the Pantone Color Institute. It’s a vibrant shade that can stand out from other colors, making it an ideal choice for designing digital elements or creating a striking logo.

This paint color is a great addition to any home and will instantly uplift the mood of your space! It can be used as an accent or drenched on entire walls. It’s also an excellent choice for adding a pop of color to furniture and other decorative items, such as throw pillows or artwork.

Redend Point

Sherwin-Williams kicked off the 2023 Color Forecast with Redend Point SW 9081, which experts describe as minimal, calming, and intriguing. Its earthy clay-like quality lends itself to a variety of design options and pairs well with other warm hues.

This soft neutral has a natural being to create welcoming and warm spaces in your home regardless of your style. It can be used as a neutral wall color in a bedroom or as a subtle accent wall throughout your home.

It is also the ideal choice for an entryway or hallway. Pair it with a modern, minimalist look or historical architectural elements for a timeless vibe.

Alizarin

A multifaceted shade, Alizarin is a rusty red that’s warm and inviting. It looks great in neutral rooms with creamy whites and earthy green accents.

Terra cotta is a bold red-orange color with brown undertones that’s also from the warm side of the color wheel. It showed up on almost every paint company’s trend list this year, so it might be worth looking into if you want to add some depth to your room.

Another popular interior paint color for 2023 is Bamboozle, which Farrow & Ball describes as a spirited flame red that brings joy and warmth to any decor. It pairs beautifully with creamy whites and dramatic furniture.

If you’re looking for a more natural green hue, Krylon suggests Spanish Moss. It connects individuals to the restorative and organic elements of nature, while providing versatility in a room with metallic decor or wood tones.

Terra Rosa

If you’re thinking about refreshing your home this year, the most popular interior paint colors for 2023 are soft, earthy shades of pink and clay. They’re comforting, inviting, and a great way to add a touch of natural beauty.

For example, Terra Rosa by Dunn-Edwards is a warm shade of brown and burgundy tinged with rosy pink that emanates coziness, confidence, and creativity. It’s the perfect choice for a statement wall, or for using as a delicate accent in an otherwise neutral room.

Another trending color in home dcor is green, which is quickly becoming the new neutral as homeowners opt for comforting hues instead of crisp, bright whites. Krylon’s 2023 color of the year, Spanish Moss, is a deep forest green that nods to nature.

What Happens During Mold Remediation?

When a mold problem is detected, it is important to hire a company to do the remediation. This will ensure that the mold is removed completely and that it won’t return.

Remediation involves sealing off the affected area by closing all doors and windows, using duct tape to seal plastic sheeting, and exhausting air from the outside through a fan. This will prevent the spread of spores to unaffected areas.

Cleaning

During cleaning, mold remediation technicians disinfect the area and dispose of infected materials. They also apply solutions that kill remaining spores and prevent future growth.

The cleaning process starts with sealing the affected areas to reduce the likelihood that mold spores will spread throughout your home and cause more damage. Then, a wet/dry vacuum is used to clean the affected materials and contaminated air is sucked outside.

Wearing protective gear and a mask is recommended, but not always necessary. Spraying a moldy area with a solution of water and bleach will get rid of surface mold, but spores stay in the air.

Spores can be difficult to remove, even with professional help. A professional may use a combination of HEPA-rated vacuums, air purifiers and wet wipers.

Removal

During mold removal, professionals must isolate the area where mold is growing to keep mold spores from spreading. They do this by sealing windows and doors, and covering affected areas with plastic sheeting.

They then spray the affected area with biocide, which kills mold and prevents it from re-growing. Next, they clean all non-porous surfaces to remove spores and excess water.

Once this is complete, they dry all materials that were affected. Depending on the severity of the problem, this may include drywall, carpet, insulation, or even furniture.

The remediation professionals will also re-seal the damaged areas so that mold cannot grow again. This is a vital step, as it ensures that everyone living in the home is safe.

Once the cleanup is completed, the mold removal professionals will begin to clean up and restore the home. This may include retiling floors, replacing damaged items, or restoring upholstery and fabrics.

Disposal

During mold remediation, building materials like drywall and insulation that have mold on them are disposed of. They are carefully packaged in double-bagged air-tight bags and carried out accordingly.

The remediation team then sanitizes the contaminated areas using disinfectants that kill any remaining spores. This is done to protect occupants from any health risks.

To make the job safe, technicians wear protective gear like boots and goggles. This is to prevent inhaling spores that can cause serious respiratory illnesses and even fatality.

Next, the contaminated area is isolated from the rest of the home to ensure that it does not spread. Technicians use plastic sheeting to cordon off the area for safety.

During this process, technicians dry the contaminated area as quickly as possible. This can include setting up industrial fans and dehumidifiers.

Remediation

If a professional is able to pinpoint the location and scope of mold contamination, the remediation process starts. This involves identifying the source of moisture, and repairing any water or moisture issues to prevent further growth.

During this step, technicians will also check for other possible problems in the building that can cause additional mold growth. These include leaking pipes, flooding, groundwater intrusion, and poor ventilation.

Once they know where the mold is growing, they will start scrubbing affected areas. These surfaces can include drywall, carpet, insulation and wood trim.

They’ll use biocide, an EPA-approved mold killer, to make the area sterile, which will prevent the mold from reproducing.

Next, the team will clean any non-porous surfaces with HEPA-approved vacuums. This ensures that any spores that escaped during the previous steps are killed.

After the removal and cleaning processes are complete, the restoration company will begin restoring any contents that were salvageable. This may involve packing up furniture, electronics, and other belongings and taking them off site for repair.