What to Do When Wind Uproots a Tree

Whether they’re adding shade and beauty or providing privacy, trees are vital to our yards. However, gusting winds and heavy storms can uproot them.

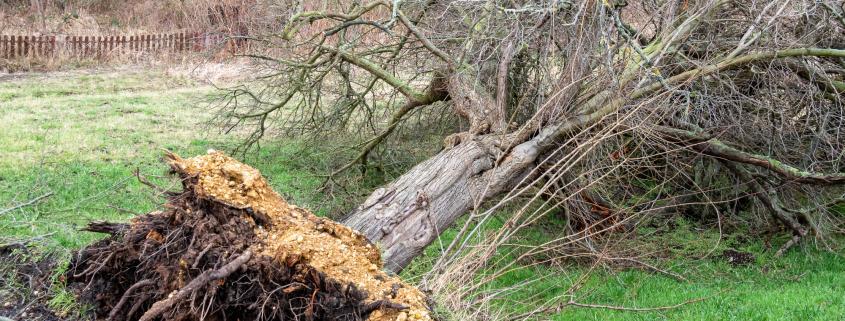
The most common cause of uprooted trees is windthrow. Unlike trees in forests or groves, solitary trees are exposed to high winds. The winds can uproot them when they reach speeds of 75 mph or more.

Remove Debris

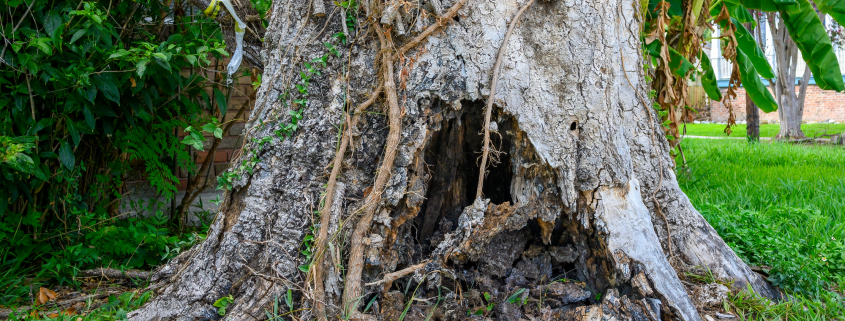
Trees are a beautiful and valuable part of your property. They provide shade, add to your home’s curb appeal, and protect your yard from the elements. But storm damage can cause serious problems for your trees, including uprooting. Strong winds can yank tree roots right out of the ground, and partially uprooted trees are a safety hazard that could fall over on your house or hurt someone walking by.

The best way to protect your property and prevent future damage is to remove debris as quickly as possible after a storm. This will reduce the risk of further wind damage and prevent your yard from becoming a tripping or falling hazard for you and your family.

Using a rake or blower, gather up any branches or pieces of a fallen tree and create a pile for disposal. You may need to hire a trash removal company to take the debris away for you. If you don’t have a trash service, you can use the pile to make mulch or burn it (if local laws allow).

Depending on the size of your uprooted tree, you might want to consider trying to save it by replanting it. But be sure to replant it in its original place and avoid twisting or turning the trunk as you do so, which could cause further root damage. Also, be sure to cover the roots with plenty of soil and water to avoid air pockets, which can dry out and kill the tree later.

Lift the Tree Upright

From their lush, green canopy in summer to the cascade of golds, browns, and auburns they add to the beauty of an autumn yard, trees are a big part of our yards. But when strong winds uproot them, the results can be devastating.

Wind is the number one cause of tree uprooting, and it requires a lot of force to pull up a tree and its roots from the ground. This is known as windthrow and can be more likely to occur when soils are wet or when the root system is damaged.

It is possible to save a tree that has been uprooted, but it depends on the condition of the tree and how severe the root damage was. If the tree is small, doesn’t have exposed root mass that will dry out in the summer sun, and receives adequate water, it has a good chance of survival.

If you decide to try and save an uprooted tree, cover the exposed roots right away to keep them from drying out. Then move the tree back into position, packing the dirt around it as you go, and make sure it gets ample water to avoid transplant shock. After that, prune a little to remove any broken branches and be careful not to disturb any remaining underground roots.

Replant the Tree

For small to medium-sized trees with shallow roots, the tree can be viable up to a day after being uprooted if it is replanted promptly and given proper care. However, this is not a guarantee that the tree will survive.

The type of soil the tree is growing in is another factor that can affect uprooting. Deep, rich, well-draining soils help to hold the roots and prevent them from easily being uprooted. Conversely, extremely loose or sandy soils do not provide the roots with much traction and may allow the roots to be uprooted more easily.

When replanting the uprooted tree, dig a hole that is wider and deeper than the root ball and carefully place it back into the planting area. Cover the roots with dirt to prevent drying out, gently tamp the soil to remove air pockets, and water thoroughly. Large and heavy trees may need to be staked to support them until the roots can reestablish themselves.

After the tree is replanted, be sure to monitor it regularly for signs of stress or disease. Keep the area around it free of debris, and be careful when using lawnmowers or other equipment in the vicinity. Also, apply a layer of mulch to the area to retain moisture and suppress weeds. In addition, provide a balanced fertilizer to the tree to help it recover from transplant shock and grow.

Monitor the Tree

Trees offer a long list of benefits for homeowners, from summertime shade to a winter cascade of auburn and gold leaves. They enhance the beauty of yards and gardens, create natural habitats for wildlife, and help reduce soil erosion. However, they can also be damaged by storms, including winds that uproot them.

For a tree to uproot, wind must produce an incredible amount of force to pull it out of the ground by its roots. The type of winds that cause this are usually produced by severe thunderstorms, Category 1 hurricanes, and F-1 tornadoes. Higher-category storms – F-3 and above – are more likely to snap tree trunks rather than uproot them.

After the storm, it’s important to monitor uprooted trees for signs of recovery. Check for ground upheaval that could indicate root destabilization, and seek professional assessment of ambiguous damage from an arborist.

If a tree has been successfully replanted, provide it with the proper care to promote growth and recovery. This includes covering exposed roots to prevent drying out, watering regularly during the first year, and applying balanced fertilizer. Be extra careful not to damage it with lawnmowers or other equipment, and avoid pruning too severely. Also, mulching can be helpful to retain moisture, suppress weeds, and regulate soil temperature. In addition, the replanted tree should be protected from transplant shock by regular monitoring to identify symptoms early on.

Ideas to Convert Your Attic into Usable Space

Finished attics add value to your home and are also useful for whole-home ventilation. They can help keep air circulating properly and reduce your energy bills.

Most attic spaces have rafters or trusses. If you have a trussed attic, making changes may be difficult or even impossible. The attic space must be able to support the weight of flooring, furniture and people.

Storage

The first thing most homeowners think of when they finish their attic is storing stuff up there. It’s a great space for holiday decorations, boxes of memories and tools.

When converting an attic to storage, it’s important to start with clean lines and a bare floor. This helps you maximize the amount of storage space you have and prevents things like cobwebs and dust from getting in your way. You can also install a pull-down staircase to make it easier to access your storage areas.

Depending on the size of your attic and your needs, you may need to install some custom-made storage solutions. For example, a recessed chest of drawers or DIY open shelves are great attic renovation ideas for creating functional, organized storage. You can also add a window seat to a cozy nook to create a reading corner or an attic office.

To keep your attic clutter-free, categorize and label items in storage bins or boxes to save time. Use plastic containers, as they are more durable than cardboard and can withstand temperature changes in the attic. Plus, they’re easier to see in and won’t be nibbled by mice. Also, try to place items you use often in the most accessible locations so you don’t have to go through everything to find what you need.

Game Room

The attic is the perfect spot for a game room that turns your home into the center of entertainment. A pool table, ping-pong, foosball or billiards are the ideal additionsf to bring fun and excitement into your attic. Just be sure to consult with experts to ensure your attic floor is strong enough to handle the frantic activity that often comes with a gaming space.

Since your attic has sloping ceilings, be careful not to overcrowd the space with furniture. A few padded benches are more than enough to offer seating for guests or players. Also, remember to place the focal point of your game room in the right spot within the attic room. It should be a feature that can stand out amongst the rest of the furniture and accessories. A tiny home bar or a sleek fireplace would serve as a great choice for an attic game room.

You can add even more seating to the room by converting an awkward attic niche into a built-in storage bench. You can also use this space to store away extra equipment, work supplies or those holiday decorations you’ve been hoarding. Using the existing walls as much as possible can help keep expenses down and maximize your attic’s potential.

Attic Nursery

A finished attic can be a comfortable bedroom for an extra guest or your child, adding value to your home if you ever decide to sell. If you plan to turn your attic into a bedroom, be sure to have a pro inspect the structure and foundation of your home to make sure it can support the extra weight.

An attic nursery makes great use of natural light, with a cozy nook framed by built-in shelves. Simple furniture allows the room to be adapted as your child grows, and a rug with a bohemian vibe brings a pop of color.

Wood paneling on the attic ceiling gives this nursery a warm, rustic look, while contrasting with white walls and trim. A broom closet houses cleaning supplies you don’t want to lug upstairs, and a recessed window seat offers an ideal spot to read or take in the view.

If your attic has a window, hang drapes to give the illusion of a full window. Without one, mirrors are a good option to bounce light around the room and visually enlarge it. In addition, paint the beams a color that coordinates with your wall and ceiling color to make the space feel seamless. A tongue-and-groove ceiling is easy to install and will protect the low attic ceiling from dings and dents.

Walk-In Closet

If you have a large attic space, turn it into a luxurious walk-in closet. Create custom shelving to fit all of your clothing, shoes and accessories, and install a dresser section with a mirror. Add a comfy nook for putting on makeup or sitting to relax, and your attic storage space will become an organized dream.

Attic closets need to be insulated and sealed properly to prevent moisture, mold and mildew problems. You’ll also need to upgrade the attic stairway and landing in order to accommodate furniture. Consult your renovation expert to ensure the stairs meet all of the required building codes.

A finished attic can make a great reading or TV room, but it can also be used as a playroom for children. Because kids’ furniture is smaller and shorter, it will work well in an attic room with lower ceilings.

Use a combination of rolling carts, storage benches and recessed cubbies to convert your attic into a multi-purpose playroom that can be used for both playing and studying. If you want to create a cozy little nook for relaxing or reading, install low shelves and a built-in bench in the corner with some soft pillows and a blanket. Then, hang a hanging rod to store clothing and other items that you don’t want on the floor.

How to Pick Out a Shingle Color

A roof’s color says a lot about your home. It boosts (or damages) curb appeal and creates an instant impression.

When selecting shingles, look at actual samples in natural light conditions rather than in a studio or with color-altered photos. You also need to consider your neighborhood’s aesthetics.

Look at Your Neighbors’ Roofs

When picking shingle colors, it’s important to look at what’s currently on the houses in your neighborhood. This is especially true if you’re considering selling your home in the future; buyers may be put off by an unusual roof color.

In general, dark neutral shingles go well with a wide range of home siding colors and tend to blend in nicely with neighboring roofs. These colors also work well with most architectural styles, from traditional Cape Cod and Tudor homes to contemporary designs.

On the other hand, if your home has a unique style that’s set apart from those around you, consider taking a risk with your roof color. Just be sure that your exterior colors and other features like shutters, doors and eavestroughing compliment the roof color you choose.

If you’re unsure about which colors might work best for your house, ask local roofing companies to provide you with sample boards. This way, you can see the colors in person and test them against your siding, in different lighting, and in real-world conditions.

Be aware that darker shingles absorb more sunlight, so they can potentially be more costly to maintain over time. If this is a concern for you, ask your roofing company if they offer light-colored shingles that can reflect more heat and reduce energy costs.

Look at the Shingles

When deciding on your roof color, you need to look at the actual shingles. You can ask your roofing contractor for a sample of different shingle colors and try them out on your home. Small samples are often hard to see how they will appear once they are stretched across the entire roof, so it is important to drive around your neighborhood and look at existing shingle colors in real life. This will help you pick a color that will compliment your house well without clashing with the rest of your exterior color scheme.

You should also consider what shingle colors are popular in your area. Many communities have a certain style that is followed by most homeowners, and it is best to stick with this if possible. For example, if your neighbors have gray or brown shingles on their homes, it would be best to match this color in order to avoid having your home stand out among the neighborhood.

If you have a brick home, for example, a simple black or dark gray shingle will complement the colors of your brick very well. The natural color of these shingles will help accent the architectural features of your home and let the artistry of the brick shine through.

Look at the Color of Your Siding

The overall color scheme of your house will also influence which shingle colors you should choose. For example, if your home has red bricks on the front and sides, brown or gray shingles will look best with those colors. The same is true for homes with wood accents.

If your home is surrounded by greenery, light shingle colors will make it blend in with the trees and bushes. If your home is in the mountains or on a lake, dark shingle colors can also work well with those natural surroundings.

Ask your roofing contractor for large samples of all the shingle colors you’re interested in. It’s much easier to compare them when they are in person rather than on a small swatch pad. Plus, you can test them outside to see how they look in different lighting and with your home’s siding.

You can also use online home visualizer tools to see how different shingle colors will look on your house. Just be aware that online photos of shingles can be misleading, as they may be edited and can vary in appearance based on your computer monitor’s brightness and settings.

Look at the Color of Your Eavestroughing

Choosing the right roof color is a big decision that can make or break the look of your home. It’s important to take into consideration your neighborhood, the style of your house, homeowner’s association rules, personal preference and even energy costs when selecting shingle colors for your home.

Fortunately, there are a few tips you can follow to help you choose the best shingle color for your home. Start by looking at your neighbors’ roofs to see what color they have. This will give you an idea of what colors would work well with your siding and home’s overall appearance. You can also use a virtual home visualizer tool to see what different colors will look like on your house.

The next step is to look at the trim, shutters, front door and landscaping to make sure they complement the shingle colors you are considering. You will want to avoid having the shingles stand out too much or detract from other parts of your home. Lastly, it is always a good idea to view the shingle colors in person and in natural light. Photos can look very different and may be altered by lighting, camera settings, etc.

Once you have taken these steps, it should be much easier to pick out a shingle color that compliments your home and suits your aesthetic preferences. If you are still having trouble, ask your roofing contractor to show you some samples and discuss options with them.

Electrical Jobs a Handyman Can Do

Electrical wiring is tricky. It requires a lot of skill to install correctly and follow safety protocols.

For some types of electrical jobs in the home, a qualified electrician should be called in. This includes notifiable electricity work such as replacing outlets or plug sockets, which must be carried out to regulated standards.

Upgrading Electrical Panels

An electrical panel upgrade is one of the most important jobs a handyman can do for your home. If you have an older fuse box, it might not be able to handle the amount of electricity modern homes use. This can lead to overloading, arcing, and even fire. When you get a new electrical panel, it will replace your old fuse box and give you more circuits to handle everything you need to run in your home. A good electrician will assess your current system and determine what size panel you need as well as how many additional circuits you might need. They will also work with the power company to make sure that the electricity is cut off for the day of the upgrade and ensure they have a permit for the job.

Flickering lights, unusual sounds coming from the fuse box, and breaker boxes constantly tripping are all signs that it’s time to upgrade your electrical panel. Taking care of this now will mean fewer issues in the future, such as electric fires that can be deadly and cost you thousands of dollars in repairs and property damage.

Upgrading your electrical panel can also add value to your house if you ever plan to sell it. Buyers will be reassured by the fact that your electrical system is up to date and won’t be at risk of fires or other problems.

Installing Smart Devices

The specialized work of an electrician Is often the purview of another professional, but there are plenty of other projects that can be accomplished by handymen. They’re able to handle the smaller tasks that most people don’t have the time or equipment to do themselves, including things like de-cluttering basements and building movable shelving. They’re also able to patch leaky guttering and do basic plumbing tasks, such as installing new taps or repairing leaky faucets.

In addition, they can also install smart devices in homes and businesses, such as mounting a video doorbell or smart thermostat. This can make a home more convenient for its inhabitants and even help them save energy. Handymen can also assist with connecting these appliances to the home’s internet connection, making them even more useful.

Fixing Light Fixtures

Many homes have multiple light fixtures that are either outdated or broken. Instead of replacing them, consider hiring a handyman to fix them. This is a much cheaper option and will save you the hassle of trying to do it yourself. There are plenty of light fixture replacement services that offer this service, and they can usually complete the job in a short amount of time.

First, make sure the power is off by turning off your circuit breaker for the room that needs a new light fixture. Always use a non-contact voltage tester before touching any wires to confirm there is no current flowing through them. Next, remove the light fixture and any decorative pieces to expose the wiring. Generally, there will be three sets of wires present: black, white, and a bare or copper (grounding) wire. The bare or copper wire connects to a screw in the ceiling electrical box and can be removed by unscrewing it.

Once the wires are disconnected, you can install your new fixture. Screw the mounting bracket into place and attach it to the electrical box with the provided hardware. Then, reconnect the wires. If you are unsure of how to do this, refer to the instructions that came with your new fixture or consult a professional. Then, screw in the bulb(s) and secure any other final hardware or screen that is provided.

How to Make Your Basement Into a Workout Room

A basement is a great place to turn into your own personal gym. If you want to make it feel like a gym that you will actually use, start by decluttering the space and adding some visual perks.

Organize the Space

If you’re converting your basement into a workout room, the first step is to get it organized. This may take a little time, but it’s worth it. This will give you the space you need to fit your exercise equipment, and it will also help you keep the area clean, free of clutter and moisture.

Start by getting rid of any items that are taking up valuable floor space. Then, divide the remaining space into different areas that will serve your needs. For example, create an easy-to-access storage area for items that you use frequently (such as Christmas decorations and off-season clothes). Another area might be a little more difficult to access for long-term storage purposes (such as extra canned food).

Once the different zones are designated, consider how much space you want each to have. Then, purchase a few shelving units and storage bins that will accommodate your belongings. For the shelving units, choose ones that have a decorative appearance. This will make your basement feel more like a living space rather than a dumping ground. For the bins, look for those that are moisture-proof to prevent mold and mildew from forming in your damp basement. Also, remember to consider lighting in your workout room. A well-lit area will add energy to your space and boost your motivation during your workouts.

Get Equipment and a TV

A basement home gym will require some equipment, but it doesn’t need to cost a fortune. You can purchase secondhand machines from Facebook Marketplace, Craigslist or at local garage sales. Alternatively, you can repurpose old furniture from another room or ask your remodeling contractor to install new shelving for storage.

To keep you motivated and engaged with your workouts, get creative with the space. If you have lots of windowless wall space, hang motivational messages or pictures that make you feel good. The more positive the visuals are, the more likely you are to actually work out.

For some, having a TV on during workouts can help stay motivated and pass the time on cardio equipment.  There are also plenty of apps you can install on a smart TV that provide workouts that fit everyone’s needs from yoga to kickboxing to strength training.  Don’t want to pay for an app?  Youtube has plenty of great workouts to choose from as well.

If you’re interested in doing strength training with free weights, a weight rack against one wall will be essential. You can even buy portable racks to keep in your garage when you’re not using them. You’ll also need to make sure there’s a place for your workout clothes, towels and shoes. If you don’t have enough storage, consider adding a small closet or dresser to hold your equipment and clothing.

Another important feature of a basement home gym is having plenty of lighting. This will help you see clearly while you work up a sweat. You can also add a fan or air conditioning unit to help ensure the space is cool and comfortable, even when you’re working up a sweat. This will also prevent moisture from forming in the room, which can cause mold and mildew. It’s also an easy way to avoid damp clothes and feet after your workout.

Decorate the Walls

Basements are usually windowless, so a bright and cheerful color scheme can help make the space feel energizing. If you’re worried about splurging on paint, consider checking out the cans of returned paint or oops paint at your local home improvement store for a great deal.

Hang a few mirrors to check your form while you work out, and use a whiteboard or chalkboard for writing down your goals and daily motivational quotes. Add a sound system to play your favorite music during your exercises, and be sure to include a water station if you plan on doing high-intensity workouts.

Get a Floor

Basements are often built on concrete floors, which can be cold and hard to work out on. If you have the resources, putting down vinyl panels is a better option for both comfort and safety. The panels are moisture resistant and designed to withstand heavy weights, making them perfect for a home gym.

Another great thing about putting down new flooring is that it’s a simple way to brighten up the room. Using a special paint designed for concrete floors is affordable and easy to do on your own. If you want to get a bit more creative, you can frame and hang a set of inspirational slogans or sports paraphernalia. This is a cheap and effective way to motivate yourself while working out.

Enhancements to Add to Your Bathroom

A well-lit bathroom is an easy and quick cosmetic upgrade. Swapping out dated lighting fixtures for new ones brightens the space and adds style.

Adding framed artwork elevates the look of any room and the bathroom is no exception. Hanging eucalyptus leaves in the shower is not only an easy upgrade but also infuses the room with natural fragrance and beauty.

Natural Stone Countertops

Natural stone is a visually stunning material that can add a touch of luxury to any home. It’s a one-of-a-kind material that can be used to create unique countertops in your bathroom that no one else will have. Each fleck of color, vein, or spot of stone can bring its own character and beauty to the space, making it an artistic point of interest that will be the envy of guests.

Whether you choose granite, which is often a dark color and has light veining similar to marble, or quartzite, which combines the durability of sandstone with the beauty of natural stone, this material will stand up well to heat and resists staining much better than traditional materials such as laminate. However, you will want to keep in mind that natural stone countertops need to be sealed regularly and can be damaged by acidic cleaners.

While natural stone countertops require more upkeep than some other countertop materials, they will last longer and can add a touch of elegance to your home that will impress future buyers when you decide to sell. This will help increase your home’s value and can go a long way toward increasing your returns on any investment that you make in your property.

Low-Maintenance Plants

Dotting your bathroom with plants may seem like an odd idea but this room is ideal for some greenery. The bathroom provides the perfect environment for plants that thrive in high humidity, and a few strategically placed houseplants can help transform your bathroom into a lush green oasis.

The ZZ plant, also known as the Eternity Plant, is a great low maintenance option for any bathroom. It can tolerate light and dark environments as well as low to moderate humidity levels.

Orchids are another beautiful addition that is very easy to care for. The orchid flower is a delicate and elegant element that will add a vibrant pop of color to your space.

Peace lilies are another air-purifying option. This plant is easy to care for and can grow quickly when provided with warm indirect sunlight and regular waterings. The snake plant, also known as the mother-in-law’s tongue, is another great low maintenance choice for your bathroom as it can survive in dark conditions and can purify the air of toxins including formaldehyde found in cleaning supplies or even toilet paper. Ferns are also a great option for the bathroom as they can handle humidity and require little to no sunlight.

Marble

There are few materials that can create the feeling of luxury in a bathroom like marble. It’s been popular for more than two millennia and has inspired some of history’s most iconic masterpieces, including Michelangelo’s “Pieta.” Marble is a porous stone that can stain or scratch, but it’s a stunning material that’s well worth the investment if you’re willing to commit to regular maintenance and re-sealing.

Marble’s gentle white hue and intricate veining patterns can establish a calming, tranquil ambiance in a bathroom space, while also helping to brighten the room by reflecting light. Whether you opt for full-scale cladding, or smaller tiles on the walls and floors, marble can instantly elevate your bathroom’s aesthetic.

Ladder Towel Rack

Ladder towel racks offer both form and function, blending aptly with modern or traditional bathroom decor. They are also a great choice for small spaces because they take up less visual room than standard towel bars.

Choose a metal ladder to add an industrial feel, or opt for a wooden ladder to incorporate rustic charm. There are also models that boast innovative shelving options that give you extra space to store towels, blankets, or other items.

When choosing a ladder towel rack, consider its color. Matte black is a new trend that looks great with both modern and traditional bathroom decor. It’s also easy to pair with other colors such as polished nickel and brushed bronze.

Whether you’re upgrading an existing bathroom or installing one in an en-suite, you can use a heated ladder towel rack to make the space feel warmer and cozy. Typically mounted near the shower or bath, these models have a low surface temperature and are crafted of corrosion-resistant materials. Look for a model with an anti-rust coating and a lifetime warranty.

Decorative Mirrors

The right mirror is more than just a reflection of your personal style; it can also elevate a bathroom’s overall design. Choose a mirror with an ornate frame to add a vintage look, or opt for a sleek frameless option that allows the wallpaper and other design elements to shine.

Another unique way to dress up a bathroom mirror is by adding a ledge for towels, skincare products and other small items. This is a great space-saving solution that eliminates the need for a medicine cabinet while enhancing the look of your bathroom.

If you’re looking for a more subtle way to dress up your mirror, try one with a white frame that matches the color of your walls. This creates a seamless look that’s perfect for modern bathrooms.

For a more dramatic effect, try a clover-shaped mirror to create a focal point above the vanity. This unique shape also works well for powder rooms and guest bathrooms. If you want a more minimalist and clean look, blend your mirror into the wall using a matte paint. This is a simple, inexpensive way to bring your bathroom to life.

How to Know if a Tree Needs to Come Down

While many homeowners, DIYers, and caretakers hate to say goodbye to a beloved tree, there comes a time when the benefits a tree provides outweigh the risks.

When is that time? To help you, we’ve gathered the most common warning signs that it may be time to cut down a tree on your property.

Dead Branches

When a tree starts to lose branches, it’s often a sign that the entire tree is dying. This can cause severe damage to your property if the tree happens to fall during a storm or on a calm day.

If a tree has holes in it’s trunk, this is another clear indication that it may need to come down. These holes can expose fungus and mushrooms that are dangerous for children and pets, as well as posing a risk for the overall health of your yard and home.

A common test that you can use to determine whether a tree is alive or dead is by skinning the bark of a small section. If the flesh underneath has a green hue, it’s still healthy. But if the flesh is dry or brown, it’s time to call in a professional for a diagnosis.

Damaged Roots

In nature, trees grow tall with few large limbs and branches. However, a tree on your property may have grown with too many limbs over time, making it vulnerable to damage in a storm. A professional can inspect a tree to determine whether the branches are too heavy and can fall in strong winds or during a sudden storm.

If a tree’s roots are damaged, it can affect the entire system of the plant. The roots of a tree give it survival and growth by absorbing water, oxygen and nutrients from the soil. When the roots are severed, the tree can’t take up these essentials, leaving it weak and more vulnerable to storms, wind, insect infestation, and other problems.

Root damage often shows up as a symptom in the canopy, with wilting leaves or yellowing. Root rot can also be a sign of root damage, with mushrooms and conks appearing on the base of a tree or in its trunk. This indicates that the tree is infected with a fungal disease that is slowly damaging the roots and causing decay.

Dead Leaves

When a tree loses its leaves, it typically becomes unhealthy and prone to fall damage. In the case of diseased trees that cannot be treated, removal is often the best option.

If a tree starts to look dead even though it still has leaves, it is a good idea to have an arborist come take a closer look at the situation. A dead tree can easily fall during a storm, causing severe property damage and injuries.

An arborist can also tell if a tree is infected with root rot or other serious conditions that will lead to death. A root rot infection makes it difficult for the tree to absorb nutrients from its roots, which can cause it to weaken and die.

In some cases, a tree needs to be removed because it is obstructing your view. Many people have experienced traffic accidents caused by obstructing trees or large branches. While it might be emotionally painful to say goodbye to a beloved tree, it is better to be safe than sorry when it comes to your family’s safety.

Pests

Trees are susceptible to pests and diseases. While a diseased or damaged tree can sometimes be saved, severe damage will almost always mean it needs to come down. This could include a tree that no longer produces leaves, a trunk that has large fungi growing on it, or a trunk with a deep fissure that weeps sap.

While it’s important to try to save a healthy tree, if a particular species isn’t doing well in your area or is causing problems on your property (such as rooting into the foundation of your house), then it may need to be removed and replaced with another species that can grow better. This is especially important for invasive trees that compete with native plants and suppress biodiversity.

Many homeowners have to remove obstructing trees that block driveways or street lights, but other trees may need to be taken down for public safety reasons. For example, if you have several stop signs or streetlights that are obstructed by tall or rotting trees, it’s a good idea to speak with a certified arborist about having them removed.

Leaning

Trees are resilient and strong, but they can still suffer severe damage during storms or wind. If you notice large cracks in the trunk or bark peeling off, it could be a sign that the tree is deteriorating and needs to be removed.

A new lean or a shift in the angle of the tree can be another sign that it needs to be taken down. If the tree is leaning significantly, it’s important to call an arborist to see how serious the issue is. A professional will take into account factors like how long the lean has been occurring and whether it’s getting worse over time.

Oftentimes, trees need to come down because they are blocking street signs, driveways, or other structures on your property. Even if you haven’t experienced any damage from the obstructing tree, it can still be a safety hazard for anyone walking or driving by. Taking down the tree can prevent them from becoming a home for animals like skunks and raccoons. This can be an environmental concern too since dead and fallen trees can cause pollution.

Ideas to Resurface Your Fireplace

Brick and stone fireplaces can become an eyesore when soot and stains accumulate over the years. But upgrading the hearth can add style to a living room and also make it easier to clean.

Some refacing materials, like tile and stone slabs, can be installed directly on the existing material; others require cement boards to ensure a flat surface. The following ideas will help you give your fireplace a facelift.

Tile

A fireplace is a natural focal point in any space. So, while it can be easy to skip over the hearth when re-designing a room, it’s important that you don’t. The right tile can transform the old eyesore into a beautiful design feature that complements your overall aesthetic. Plus, tiling is a fire-safe material that can add protection from stray embers.

Tile isn’t just for bathrooms and kitchens—it can also bring a dramatic touch to your fireplace surround. If you have a brick fireplace, consider covering it with ceramic tile to modernize the look of your living room or bedroom. Brick-style tiles come in a variety of colors and designs, including geometric and herringbone patterns. Other options include mosaic tiles and mother-of-pearl-finish tiles.

If you want a more contemporary look, opt for limestone tile. It has a gorgeous sheen that can make your fireplace stand out. Or, you can go for a more traditional look with marble-style tile. Both options are flame-resistant and work well with a range of color schemes.

You can even play with tile laying patterns to create a unique look for your fireplace surround. Try herringbone or chevron pattern tile to add texture and visual interest to your space. Or, experiment with specialty tile that has a fan or fish scales, arabesque cuts, or ogees for a more artistic style.

Stone

A stone fireplace adds a touch of elegance to any room, but one that’s overly large or dark can overwhelm a space. The solution to such a problem is painting the stones — either white to neutralize the orange and brighten the room, or a pale color to fit in with the decor.

A mortar wash is another easy-to-do refacing option for stone fireplaces. Combine equal parts water and white mortar that’s formulated for wall tile. Then, use a trowel to apply the mixture in a smear pattern over your fireplace. To achieve more texture, mix the mortar to the consistency of peanut butter; for less, make it like pudding.

You can also give your stone fireplace a textured finish with a simple plaster coat. This DIY feathered concrete makeover from a handy couple looks stunning. The new look isn’t just gorgeous—it also allows them to hang a flat-screen TV over the fireplace.

If you have a modern or farmhouse-style home, consider resurfacing your fireplace with natural stone slabs instead of tiles. Installing a new hearth and surround with seamless tone slabs may take more work than simply resurfacing the firebox with tile, but it will result in a much more dramatic, finished effect. Slate, granite, quartz and soapstone are popular choices for fireplace refacing. You can find these materials at home improvement stores, and they’re fairly affordable when compared to other refacing options.

Concrete

If the brick is in good shape, you may only need to resurface the hearth to give it a fresh new look. This is a project that’s perfect for the DIYer because it takes less than a weekend and costs very little.

You can use a concrete mix or stucco to create the surface, either troweled smooth or finished with texture to match the room. Both come in dry powdered mixes that you mix with water once you’re ready to apply them, and both are fairly affordable supplies for a fireplace remodel.

Before you can start applying your new concrete, be sure to tape the floor and sand down any rust or stains on the existing brick. Once the surface is clean, brush on a coat of grey tinted primer to ensure your final paint color will be as dark as you want it.

When you’re ready to start applying your new concrete, work in sections that are small enough to manage. Start by priming any areas that are already sanded and cleaned, then sand the rest of the surface again to prep it for the final coat.

If you’re resurfacing your fireplace surround, consider adding a mantel to your new space, as well. These can range from simple wood mantels to elaborate, carved and tiered options. Before you install a mantel, check the fire code requirements for how far it needs to be from the flames.

Stucco

Stucco can give your fireplace a modern update and add interest to the room, but it can also help keep your energy bills low. Stucco is fire resistant and helps to keep hot air in during the winter and cool air out during the summer. It’s an easy DIY project you can complete in a weekend, and it doesn’t require any major reconstruction to the fireplace.

The first step is to clear the area around your fireplace and cover anything that you want to protect from splatters. Once you’ve cleared the area, use a wire brush to clean the existing surface and lightly sand it to roughen it up, which will help ensure a strong bond. Then, you can choose to use a stucco product that is ready-made, or you can mix concrete and sand together yourself with a bucket of water and the proper amount of stucco powder according to the manufacturer’s instructions.

Stir the stucco mixture until it is smooth and a little thinner than toothpaste, then apply it to your fireplace. You can use a trowel or sprayer, but it’s important to work quickly and to be consistent to get straight lines. After applying the scratch coat, wait at least 30 minutes and then apply the final coating. Consult the product’s instructions to determine how long to wait between each coat.

Is it Better to Refinish Cabinets Or Buy New Ones?

Cabinet refinishing uses what you have already, which reduces your environmental impact. It’s also less expensive than replacing cabinets.

However, refinishing isn’t the right solution for everyone. If your cabinets aren’t working for you or have structural damage, it would be better to replace them. A consultation with a professional can help you determine the best option for your home.

Cost

Cabinet refinishing is cheaper than removing and replacing them, as it saves you the cost of labor. It also reduces waste by utilizing materials you already have. This type of project makes sense if your cabinets are in good condition but need a visual refresh. However, it’s best to work with a professional if your cabinets need more than just a coat of paint. If they’re starting to sag or aren’t functioning properly, it’s likely that you’ll need to replace them.

A cabinet refinishing company can charge anywhere from $10 to $25 per square foot, depending on the level of customization you choose. If you want your cabinets to look like works of art, the price will go up. For example, some professionals offer ornate carvings and unique types of finishing materials, which will add to the overall price tag. If you want to keep the costs down, ask your refinisher to use a lower-quality paint and opt out of the glazing. You can also save money by bundling painting projects with other areas of your home or purchasing hardware yourself instead of through the refinishing company.

The type of material your cabinets are made from will determine whether or not they can be refinished via stain or paint. Solid wood cabinets are ideal, as they can withstand the process. However, many homeowners choose to reface their cabinets with laminate or thermofoil instead of solid wood because these materials are more affordable and easy to maintain.

Time

Refinishing cabinets requires a lot of time. First, the wood must be stripped either manually or with chemical strippers. Then the raw wood must be sanded to smooth the grain and prepare it for staining or painting. This is a labor-intensive process, especially if the cabinets have lots of detail or ornate trim. Adding a darker stain or multiple coats of paint to the doors and drawer fronts also adds to the overall refinishing time. Using high-quality, time-saving products can help reduce the amount of time spent on prep work.

Once the sanding is complete, the cabinet doors and drawer fronts can be stained or painted. The type of finish chosen determines the final look of the cabinets. Staining is a great option for homeowners who want to keep their current layout and style but need to change the color. However, it’s important to note that not all materials can be stained. The medium-density fiberboard (MDF) used in many solid-color cabinets can’t accept a stain without showing the grain, for example.

In addition to sanding and staining, cabinet refinishers must also mask the cabinets and protect the surrounding walls and countertops. They may also need to repair small cracks and chips in the cabinet boxes or doors. Finally, they must clean and sand the newly painted or stained cabinets before applying a clear lacquer to protect the surface. Depending on the size of the kitchen, this can take several days. During this time, homeowners can still use the kitchen, but they’ll need to be careful not to damage or dirty the newly finished cabinets.

Appearance

Cabinet refinishing can make your cabinets look brand new, and it’s usually less expensive than replacing them with new ones. However, the finish may not last as long as it would with a new set of cabinets. If your current cabinet doors have been exposed to heat or moisture over the years, they may start splitting or warping. Purchasing a brand-new set of cabinet doors that match your existing cabinets is the best option if this happens, as they’ll likely last up to 50 years.

Cabinet refacing is a great option for fixing cosmetic problems such as scratches, dents and faded colors. However, it is not the best option if your cabinets have structural issues such as warped doors or faulty hardware. It is also not the best solution if you want to add more storage options, like lazy Susans and pull-out trash cans. Refacing isn’t the best choice if you want to replace your cabinets entirely, either, since this would require removing and installing new boxes.

Cabinet replacement is a more significant undertaking, but it gives you the freedom to completely change the look and layout of your kitchen. Homeowners often choose this option because they want a kitchen that better matches their family’s lifestyle, needs, and cooking style. This allows them to implement new storage solutions, add new lighting, or even move the location of certain fixtures.

It’s important to choose a reputable cabinet refinishing service to ensure that the finished product is high-quality and durable. They should know how to properly sand the surface before applying a stain or paint. They should also be familiar with the various types of finishes available, including glazed, lacquer, or varnish. They should be able to help you find a color that suits your tastes and complements the style of your home.

How to Design a Walk-in Closet

Stylish storage solutions and design elements turn walk-in closets into a chic dressing area. Open cubbies, baskets, and cabinet storage help to organize clothing, shoes, and extra items like purses.

To increase storage capacity, hangers should be located around 40 and 80″ on a vertical wall. Placing rods at these heights allows you to double your hanging space without interfering with walking areas.

Determine Your Storage Needs

While most people take a haphazard approach to storage, taking the time to carefully assess their needs can save them a lot of space and money. Determining what you’ll need is key to finding the right solution.

Start by creating a list of your belongings and their approximate dimensions. If you have a lot of shoes or purses, you will want to look into different storage possibilities to get the best use of your space.

Plan the Layout

Once you have a clear understanding of your storage needs and what space constraints you might be working with, it’s time to start drawing up some design options. This can be done by hand or with a computer program that makes it easy to visualize a space and try out different layouts. A great option is Sketch Up. It’s free and has a learning curve, but it makes designing a walk-in closet much easier.

You’ll need to think about how many hanging rods you need, as well as shelving and shoe storage ideas. It’s also important to consider the arc of your movements when walking into a closet, so you can make sure that everything is easily accessible. For example, if you want to keep your dresser drawers close to the clothing, it’s best to have the drawers near the entrance. This way, you can reach things without having to go back and forth between the hanging and shelves.

It might seem obvious, but you should always try to position drawers so that they can be opened while standing in front of them. This is especially true in reach-in closets where you might have a lot of smaller items in the drawers. The same goes for shelving sections – you don’t want to put them in corners because they won’t be easily accessible.

Decide on a Design

If you have a small walk-in closet, the right design can help maximize your space. Installing double hanging systems, shelving units and drawers can make the most of unused wall space. This will keep your closet organized and efficiently functional.

Even if you don’t have much room for storage, a well-planned closet design can help you reach every piece of clothing and accessory in your collection. Whether you’re storing items in open cubbies, basket, plastic bins or cabinet storage solutions, make sure that every item has its own place. Keeping like items together can make your outfit planning easier and can help you avoid the cluttered look that plagues many closets.

You can even add a seat or lounge area to your closet if you want to create a luxurious experience while getting dressed. Just remember that a bench or ottoman will require extra floor space, so be sure to plan accordingly. The addition of a seating area can also be a great spot to lay out your outfits and accessories before you head out for the day. It’s also a good idea to add a mirror for last-minute checkups and some extra lighting to illuminate your closet space.

Create a Budget

A walk-in closet can be more than a repository for clothing. Seating areas, shoe racks and even counters with coffee bars can be incorporated into the space to keep everyday items organized.

Before you start laying out a plan for your closet, calculate how much storage you need to fit your needs and lifestyle. Then use a spreadsheet to determine your budget for a shelving system, hanging rods and other closet accessories. Once you’ve got your budget in mind, test out different layouts in the actual space to determine what dimensions will work best.

If you’re working with an existing room, remove the baseboards and measure along the wall where your new closet will be located. Use a stud finder to locate the studs that will form your closet walls, then use 2x4s to mark a straight line from floor to ceiling that will become the guideline for your new walls.

Creating a functional space starts with the basics, like flooring, lighting and a focal point. Carpet is warm and cozy first thing in the morning, while hardwood feels elegant and polished. Bright recessed lighting helps you see colors accurately, while natural light from a window can also be a good choice to illuminate the closet space and make it feel more open when you enter. Adding crown molding can also add a finished look.