masonry-6

The Benefits of a Rustic Fireplace

There is nothing better than being cold and being able to curl up next to a fire with a good blanket and the company of loved ones. If you want to integrate a chimney into the decoration of your home, do not hesitate to do so because the warmth and the feeling of well-being that they bring will be unmatched.

In addition to these two advantages is a heat source allowing you to use natural heat in addition to the radiators in the room that you install. To ensure heat for a few hours or days, you will need a place to leave logs or coal next to the fireplace so you don’t have to go outside to find material to source the heat.

Enhancing a room with chimneys therefore has an endless number of advantages. A rustic type is a decorative option depending on the style of your house. In rural homes or those located in the mountains this choice is the perfect solution. In addition, you can make the chimney the size you want and with features to your liking.

You must install a protective glass to prevent the flames from going outside. This glass will be of a special type that does not allow the material to overheat avoiding contact burns. In addition, it allows to remove the heat in such a way to create a pleasant and well-heated room.

Kitchen remodeling

Techniques for Painting a Faux Granite

The actual cost of using granite is much higher than the cost of painting imitation granite. Contractors and do-it-yourself remodelers know that the granite look can be achieved with appropriate materials and correct technique. First, decide on a color scheme, and then apply the paint using a spray technique, or sponge.

Color scheme

Anyone interested in painting granite must first decide the color scheme. The painter should know what colors work together and in what order they should be applied to replicate the look of real granite. Painters should use a minimum of three colors, one light, one dark and one medium. Metallics are a common choice for a base color because of the bright appearance of real granite. Using a piece of real granite as reference can take the guesswork out of choosing a realistic color scheme

Spray

Painters often use spray paint as a technique to create the appearance of granite. They must purchase an imitation granite spray finish. Apply the finish straight from the can on a properly prepared surface. Multiple layers are often necessary to achieve the desired look. Once the finish is dry, the painters apply a clear layer for brightness and ease of maintenance. This method works well for countertops, but can be used for walls and pillars as well.

Fluff

Sea sponges make impressive granite paint tools. Painters using the sponge method after applying a basecoat with a brush. The darker color is obtained by passing the sponge on the base first color, then the painters use a sea sponge to apply the next darker and finally the lighter. The lighter color ultimately acts as the dominant color. However, proper technique involves applying each sponge layer in a seemingly random pattern, so that the natural texture can emerge. The painters work with the same hand and sponge each layer in the same direction end up with surfaces that look cleaned with sponge not like granite.

Penetrate

Penetrating refers to the use of a plastic bag and a wrinkled appearance. Painters use this technique in combination with mixing nonlinear enamel paint. The glossy finish of this imitated granite finish is created by wrinkled plastic bags and helps avoid common sponge modeling technique.

Five Tips for Buying Your First Home

The real estate market offers a unique opportunity for buyers looking for their first home and have the means to do so. Prices have been reduced considerably, there are a large number of properties for sale to choose from and the negotiating ability of the parties involved is very high. However, it is worth taking into account some basic points when buying the first home.

An affordable budget

The budget is an essential element that should never be forgotten. Many buyers are not aware of how much money they have to buy a home. Falling surrender to the charms of a home that is not economically affordable is simple, but it could be a waste of time and illusion. In many cases, it can lose sight of the initial goal and budget.

Before shopping for a mortgage, make sure you have a thorough knowledge of the monthly expenses, as well as make a projection of income in the short and long term. All factors are important, whether the stability of the work that is available, the possibility of salary increases or reductions, and the mortgage index to be applied, etc. Ultimately it comes to analyzing the numbers and finding a comfortable mortgage payment.

Usually, unforeseen events always happen, so the goal is not to worry every night about having to choose between paying the mortgage or, for example, to undertake unexpected work or arrangements.

Realism first

Another virtue is to be realistic about the characteristics the future housing should bring. From your available budget, it is advisable to make a list of what would be desirable in the house you’re seeking.

Research is useful when developing this list. It is highly recommended to take a look at other houses in the same price bracket and see what features they have. For example, if the researched houses do not have a renovated kitchen or pantry, it may be logical to think that it will be difficult for the future house to have them.

In addition, the list can always be updated later, if you are lucky enough to find the house with everything you want.

Preview step to purchase

Have a professional perform a technical inspection of the property to be purchased. The objective is to determine the state of all elements of the property: mechanical systems, general layout and aesthetic-environmental conditions.

Certificates of Professional Housing Inspection can therefore be a decisive factor in closing on the property. For the first purchaser this certificate assumes the security that the property that you’re interested in is in perfect condition, or perhaps the possibility of raising a possible discount if there were any defective element.

The expenses come later

Understand the real economic cost of maintaining home ownership. At times, first-time homebuyers are so unaware of the purchase process that they forget what happens after signing the contract of sale. In reality, the most common expenses begin after the move. In addition to the mortgage payments, you must pay the corresponding taxes, homeowners insurance and possibly HOA fees. Not forgetting that maintenance problems arise from time to time. These expenses are one more reason not to invest until you’re 100% ready.

living room redesign

Tips for Improving Your Home Decor

When your home is properly decorated, it gives those who enjoy it a pleasant feeling through its organization, harmony and beauty. Unconsciously, a pleasant environment allows us to feel relaxed.

Sometimes, due to lack of information or advice, we make unforgivable mistakes that make the spaces inside our home lack personality and even seem unattractive. Here are some of the most common:

Undoubtedly classic style

Many times we use too many elements that were in fashion in the 1920s and highlight romanticism in the rooms. However, to use them in the 21st century is in bad taste. It uses light and translucent curtain panel. To create height, choose ones that go from floor to ceiling. If you want to cover up the natural light in your bedroom so you can sleep in the morning, you can install venetian blinds in addition to the curtains.

Disorder: silent noise

Housework can be tiresome, however, a messy space will significantly detract from the beauty of your decor. If you decorate a room that is always disorderly, the imagination and effort that you put in that project will be hidden. You can solve this problem by removing everything that clutters the room, choosing only the elements that go with the environment you want to create. Be creative and use storage ottomans, trunks and baskets to organize.

 Purchase of unnecessary decorations

Having too many decorations will disproportionate the room. When you go shopping, you tend to fall in love with an object, buy it, take it home and many times not even think if it goes with the style of your home. The result is a recharged environment, full of decorative accessories that do not go well with each other. The solution is prior planning to your style; having clear parameters of the style you want to achieve will make it easier when you go to buy accessories.

Excessive use of color

The tireless repetition of a color in the same space destroys the aesthetics of the decoration. This can even unconsciously make people moody and give off a negative aura. To highlight a color in your decoration choose a palette for the room and repeat the color to accentuate in strategic points only to unify the design. You will achieve the dramatic touch you’re seeking using the appropriate colors.

With these tips it will be easier to follow the right path in terms of decoration.

Improving the Thermal Insulation of your Home

A home with good thermal insulation can save up to 30% of energy, which has direct effects both in the electric bill and in the CO2 emissions to the environment. What precautions should we take to improve the thermal performance of our home? Here are some tips:

The thermal insulation of a dwelling is the capacity that it has to retain heat (in winter) or cold (in summer), which we basically generate through heating and/or cooling systems. No matter how much we invest in a good air conditioner or a good heating system, it will do little good if the house is not well insulated.

But not only because of energy saving or environmental awareness, but also because, in less than a year – as of January 1, 2013 – the Royal Decree of Energy Efficiency of Existing Buildings announced that it will require all homes that are bought, sold or rented in Spain have a certificate that guarantees their energy performance.

In this way, the homes will have a distinctive efficiency similar to that already have the appliances, which will also affect the sale or rental price of the same. In fact, housing will be classified by a series of letters, ranging from ‘A’ (maximum efficiency) to ‘G’ (lowest energy efficiency).

Let’s see what are some aspects you can take into account to improve, without major investments, the thermal insulation of our home:

In a home, heat loss occurs through windows, doors, floors, walls and ceilings. In the case of windows and doors to the outside, it is very important to check that there are no leaks of energy and, if they do, take the appropriate measures. In floors, walls or ceilings it’s essential to have good installation with effective products and high thermal resistance. If the house is older, there is a wide variety of materials that allow thermal insulation of a wall, a floor or a roof to be reinforced.

The windows are one of the weaknesses of the house. To minimize their leaks of heat or cold it is advisable that they have double pains and, if possible, an air chamber. It will also improve their thermal insulation capacity if they have a quality carpentry (PVC, for example) which prevents the formation of thermal bridges, as well as having a specific glass to reduce heat losses.

In summer it is highly recommended to use awnings and blinds to minimize overheating your house.

In winter, however, we must take full advantage of the sunlight and let it in through the windows by leaving curtains open.

Finally, it is essential to ventilate the house well in the morning and at night. Ten minutes is enough to renew the air of a room.

tree-services-16

Colors that Combine Well with Green

What colors match with green? It has always been said that green is for the daring, but you just need to know what to combine the color with to make the perfect setting in your home.

In addition, there are many shades of green that exist to decorate your walls, furniture or fabrics, from light greens to darker olive greens or more striking green apple. This is why we will see great ideas to discover the colors that combine well with green.

Ideas to integrate green in each room

After seeing how green can combine with numerous colors, what better than to see how we can integrate it into each environment? For many, the basic idea of ​​being able to combine color in a room is by applying it to the wall. But depending on the tonality that we choose, also combining green is something simple if you use the correct furniture or basic details.

Living rooms in green

If you have a small living room, you can paint some wall in light green tones. More than anything because it will give more light to the room. It is best to choose the main wall and let the others stay in a basic or neutral color.

To add some contrast, opt for the furniture in light finishes. The details are also important to integrate green color. You can leave the walls aside and add both rugs and cushions or even a sofa in your main tone.

Bedrooms with brushstrokes of green

In bedrooms, it is more common to see curtains or decorative details in green. Opt for neutral tones for the walls to help with relaxation.

Of course for the youth rooms, it is not too much to integrate a very striking green color, because it also gives light to a lot of fun.

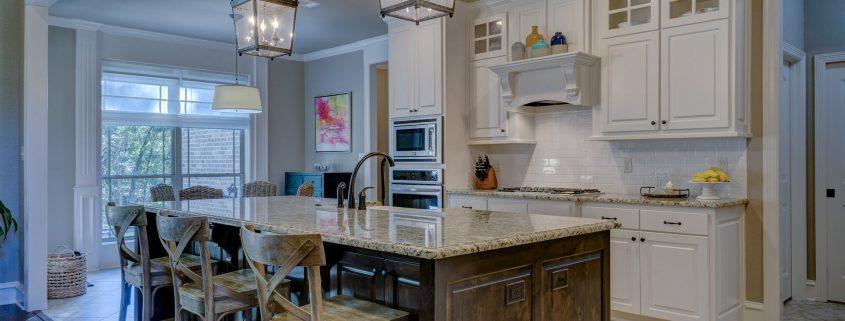
Kitchens and the color green

Again, this combination is more than perfect if we have a very vibrant tone. In this case, both cupboards and countertops may have a similar green hue such as pistachio.

Opt for details in softer shades or in simple prints, without very vibrant colors.

Green dining room?

It is recommended to purchase furniture in all colors except green. In the dining room, leave the green again for the details. The upholstery of the chairs or cushions of the same, some lamp or, paintings and even mirrors. It is best to avoid it on the walls, although if it is your taste, then choose a soft tone, which brings freshness along with softness.

Colors that combine with aquamarine

Aquamarine or a light sea green, has a double blend. It can be said that it has brushstrokes of green but also of blue. Undoubtedly, whatever it is, the result is special and very intense.

To create an elegant ambiance along with romantic airs, this color can be combined with very soft shades of brown. Beige or cream will be perfect for aquamarine. Also pastel pink can be added to complete a very chic style.

Of course, we cannot forget the basic white color and the pearl gray, which as neutral tone and will also be perfect to complete a magical decoration.

Colors that combine with green on walls

If you have decided to paint the walls in green, you have to make decorations that g with the chosen tone. If the color is very vibrant, then it is best that the furniture and other details are basic or neutral tones. That is, white or cream color would be great ideas. This way, you will have a balance in your decoration.

Although, as we know there are tastes for everything, there is also the opposite option. Walls in vibrant green with furniture of the same style. Orange or acidic tones, like fuchsia, will bring us an extra shine to that originality. But always in small doses because we can end up saturated with too much color. If the tone of the wall is clear, you can bet on wooden furniture in dark color to create a great contrast.

Of course, if the room is small, use white to give more depth and luminosity to the room. So, when in doubt, the best is white and beige. To create a unique and innovative style, you can use the most colorful colors.

Different ways to combine green with other colors:

Green and blue

Blue is another of the colors that combines well with green. For this combination it’s advised to use bluish greens reminiscent of the sea such as turquoise. They blend very well with light blue and green and even dark navy blue.

This combination creates cool environments and is perfect for homes on the beach, living rooms and bedrooms.

Green and brown

It is a perfect combination because it alludes to nature, trees, grasslands and forests. In this combination you can use the most striking greens to the darkest.

Green and pink

In their lighter shades this combination is perfect for girls’ bedrooms, but in their more saturated version they can create a very funny and eye-catching decoration.

Green and white

As with any color that is combined with white, a serene environment with a touch of color is achieved. This combination is suitable for any part of the house, whatever its function. In terraces and gardens green and white are perfect for their allusion to nature, but can also be used in bedrooms or living rooms.

Green and yellow

Being two very similar colors, this combination is perfect in its more acidic versions, but it is not advisable with dark greens.

mold-remediation-4

How to Dry a Water Damaged Ceiling

If your roof has water damage, you will need to remove the drywall and let the inside of the roof dry out. If not, mold may grow inside your ceiling. Correct the initial cause of the leak to avoid future damage. If you are not sure where the leak is, ask a professional roofer or plumber to inspect your home. If you notice mold development anywhere in your home, hire a professional mold-removal contractor to get rid of it immediately.

Instructions

  1. Push gently over the area to determine the magnitude of water damage. You have to remove and place sections of plasterboard that are soft or severely arched.
  2. Use a knife to mark a line around the entire damaged area.
  3. Break apart the area within the score lines with a hammer and remove all damaged plaster.
  4. Reach inside the hole to find the wooden posts closest to the edges of the hole. Use the knife and hammer to remove the plaster up to the wooden posts, leaving a square or rectangular hole in the ceiling.
  5. Remove some gypsum (drywall) panels in the middle along the uprights on each side of the hole (leaving half of the exposed beam showing to allow for installing screws to secure the new piece of gypsum).
  6. Set fans and dehumidifiers up to dry the interior ceiling area. If the outside air is dry, open the windows and doors to let fresh air in. Depending on the magnitude of the water damage, it could take several days for everything to dry completely. The goal is to avoid the development of mold after closing to the ceiling. Do not proceed until the interior of the roof is dry.
  7. Cut a new piece of plaster to fit the hole. Use drywall screws and a drill to attach to wood. Install screws every four to six inches along the outer edges of the hole where the wooden crossbars are. This will strengthen the connection between the existing roof and the new part.
  8. For normal ceiling, use a 6-inch gypsum knife to compound on each joint. Place a section of drywall tape over the composite and wipe it flat. Fill in all heads from the screws. Wait for the joint compound to dry completely (usually 24 hours). Use a 12-inch gypsum knife to apply a second layer of compound over the entire area, this time leaving a thick, soft layer. Allow to dry and then sand the area with 150 grit sandpaper.

Prime and paint as normal. If you notice rusty or yellowish water stains showing through the composite joint, use a special concealed primer (available from hardware stores). Ask the staff or check the label to verify the primer is specifically designed to conceal water stains.

kitchen-82

Choosing a Paint Color for your Kitchen

The kitchen is the heart of your home and is inviting to family and friends to enjoy each other’s company. A simple decorating project can be to create this atmosphere in your kitchen by added some color.  If you choose the right paint color, you can create the most gorgeous room in the house.

Instructions

  1. Control the color ratios when designing a color scheme for cooking. A good rule is to divide the use of color into three components, using your main color in 60% of the room or on the walls.
  2. Bring a notebook with fabric swatches, wallpaper, countertop and cabinet colors you’ll use in your kitchen when you go to buy paint. When fabric samples are not practical, get paint samples first and then combine it with the other items.
  3. Experiment with a combination of contemporary colors that combine opposite colors on the color wheel. For example, a rustic kitchen can be painted red and green to get that attractive complementary aspect to the eye.
  4. Choose colors that are close to each other on the color wheel to achieve a combination of similar color to your kitchen. Combine citrus shades such as lime green, lemon yellow and orange to create a striking and cheerful combination.
  5. Use multiple shades of a single color to create a monochromatic color scheme for your kitchen. This is successful especially when you choose neutral colors for a contemporary monochrome look.
  6. Choose colors that encourage enjoyment of food. Experts say the color red is a color that wets the appetite, making it ideal for painting kitchens and dining rooms. If the idea of ​​painting all your kitchen red seems overwhelming, just paint one wall in this striking color and the rest with a neutral color.
  7. To keep things fresh paint your kitchen with a soothing shade of blue or green. These colors create a relaxing environment for eyes and are suitable for kitchens with western exposure.
  8. Choosing a lighter color for the ceiling of your kitchen will make it feel larger. If your ceiling is not flat, you can choose two colors ​​to make clear contrast between the angular parts of the ceiling and the center.
Carpet Cleaning Services

Natural Solutions for Deodorizing Carpets

Several everyday situations can make your carpet become a smelly mess. Pets, children and even adults can leave unpleasant odors trapped in the fibers of a carpet. These odors can last for weeks and resist normal carpet cleaners. There are several ways to freshen smelly carpets using nontoxic and common household products.

Vinegar

Natural and cheap, vinegar does not mask odors, it removes them. Pour undiluted vinegar in a spray bottle. Start at one end of the carpet, and spray the bottle while moving forward and backward. Continue in this manner while moving across the carpet until you have saturated the fibers. As the vinegar dries, it eliminates the odors that are trapped.

Sodium bicarbonate (Baking Soda)

Used to clean and deodorize, sodium bicarbonate naturally eliminates pet odors, smoke and many other unpleasant odors from carpets. Cover the entire carpet with a thin layer of baking soda and wait several hours. If odors are strong, leave the baking soda overnight. Remove the powder with a vacuum cleaner. Repeat the process as often as needed to refresh carpets that smell bad.

Corn starch and herbs or spices

Instead of buying expensive carpet powders, create your own all-natural powder using common household items. Fill a plastic container with a lid with cornstarch. Add dried herbs or spices and mix with a spoon. Choose herbs and spices that are to your liking. Lavender, clove, cinnamon and rosemary are just some of the options available. Sprinkle the carpet with homemade dust and rub it between the fibers with a scrub brush. Wait a few hours and vacuum to remove dust from the carpet.

Borax and cornmeal

Borax is a versatile cleaning powder, when mixed with cornmeal, eliminates bad odors trapped in the carpet. You can find borax in the laundry sector in supermarkets. Pour 1 cup borax in a container and add 2 cups of cornmeal and mix with a spoon. Cover the carpet with this mixture and let stand for an hour before removing it with a vacuum cleaner.  Repeat the process as needed when the carpet begins to smell.

Considerations

Before removing odors from a carpet, pass the vacuum cleaner to remove lint, hair, dirt and other debris from the surface. Vacuum the carpet daily to keep it at its best and prolong its life. Use a sweeper equipped with a HEPA filter which helps reduce odors in the air during vacuuming.

masonry-6

Tips for Improving Home Heating with a Pellet Stove

When the trees begin to cover the ground with their leaves it’s a sign that the cold will soon be knocking on the door. That is when it becomes urgent to have a good home heating system. An economic, ecological, profitable and efficient system, such as a pellet stove, which uses biomass as fuel to make the home a pleasant environment. But how can you improve and optimize a pellet stove to heat a home?

The first important point is to take into account the location. Pellet stoves do not have a masonry shell like chimneys, so the heat they produce radiates 360 ° around them. That is why it is important to place the stove in an open room, preferably with a single wall around it, avoiding corners, thus the diffusion of heat has fewer barriers.

These home heating systems have a high calorific value, so with very little “pellet” fuel they are able to generate a lot of heat.  However, that heat can be reduced to your surroundings in large rooms. In these cases, in order to promote the diffusion of the produced heat it is advisable to install a pellet stove with integrated ventilation system.

Not all pellets are suitable for use in biomass stoves. As with chimneys there are woods that are better than others, with greater calorific power. So when buying pellets you must check that it has a low degree of humidity, that in the pressing it has been given a suitable density and that they come from sustainable productions, for example the pellets made with traces of olive bones.

The air to a pellet stove is supplied from below, thus ensuring that all biomass fuel has sufficient combustion and the fire has the required intensity. Lack of air causes fumes and poor heating, so it is important to clean the ash drawer frequently, preferably before each use and before each winter season use a chimney sweep cleaner suitable for pellet stoves to clean the evacuation ducts of fumes.

Finally, make sure that the room where the stove is is properly ventilated, which favors a better heating of the home.