Metal-roof-job-finished2-1

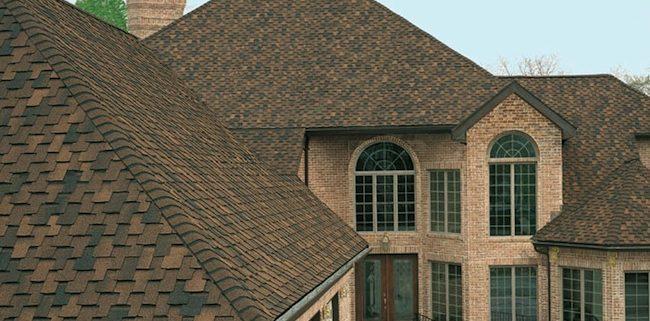
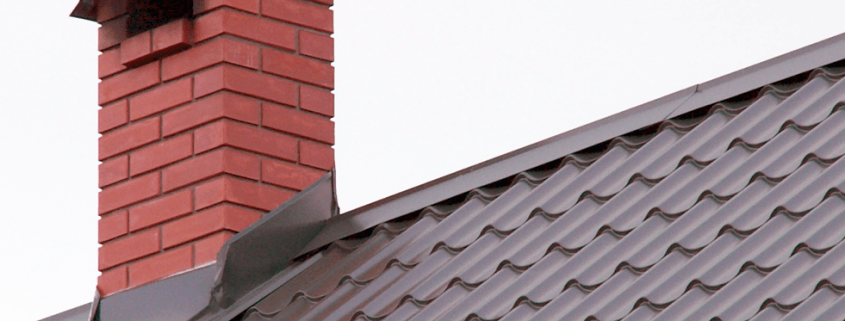
Guide to a hipped roof

A hipped roof is defined as a roof with four sides and four water beams. While a gabled roof consists of two sides configured to have the look of a tent, a hipped roof has four sides that are joined in one point or on a ridge at the top. The main difference in the context of a hipped roof and gabled roof is that the former has four water beams.

Geometry

A hipped roof begins with the construction of four water beams and a main beam. If the roof’s construction is that of a square, there should be a main beam and all sides will join at a point of the top. On top of a box will be a main beam that is parallel to the two larger sides. The shape and size of the desired roof sections need to be worked out on paper before beginning construction or framers may find unexpected construction surprises.

Tilt

The slope of the roof determines the size of the beams and the roof finished appearance. The roof pitch refers to the phases of the ceiling, expressed in terms of construction as a number of inches vertical (vertical meters) falling from the roofs on a fan of 12 inches (30 cm) horizontally. A roof down 6 inches (15 cm) to 12 inches (30 cm) horizontal refers to having a beam beams 6/12. When designing a roof hipped, you will make the construction process much simpler if you assign the same beam on the four sides of the roof. While it is possible to vary them, framed very complex situations are created.

Strength

Designing a hipped roof provides advantages when it is windy. Because there are not exposed gable ends, a hipped roof withstands dangerous winds as they tend to flow over the roof rather than into it. When you’re framing a hipped roof, you can further increase their resistance to high winds by incorporating the arms of the beams and a collar system design. The arms of the beams secure the beams in the lower hipped roof joists. The collars are metal strips that are cover around the bases of the joists and secure to the ends of the beams.

Design

The frame design for a hipped roof involves some simple geometry that allows you to determine length of wood you’ll need. You can get a preview of your hipped roof design by drawing a bird’s eye view but you need to take the roof pitch into account when determining the amount of beams you’ll need.  Knowing all these steps before you start construction, minimizes waste and gives you better use of your power and time.

concrete repairs

Attaching Drywall to a Concrete Wall

Concrete walls are common in basements and commercial spaces. They consist of large rectangular concrete blocks stacked one on top of the other and are held together by mortar. Drywall can give the concrete a more finished look. A frame with strips is installed to keep the panels of drywall in place. The strips of metal or wood serve as points of attachment for the drywall and as a buffer zone between the concrete and finished wall.

Instructions

  1. Measure the width of the wall in question with a measuring tape. Depending on the material you have, cut a strip with a hand saw to fit the entire horizontal length of the bottom of the wall parallel to the ground. Cut a second strip to the total horizontal length of the top of the wall parallel to the ceiling. Metal slats would require a hacksaw and wood require a hand saw.
  2. Place the bottom strip parallel to the floor along the bottom wall. Use the drill and a drill bit for drilling holes in the concrete wall every 18 inches (45 cm) or less, alternating high and low to avoid creating a straight line bearing holes. Use the drill to screw the bar to the wall. Set the bar at the top using the same method.
  3. Measure the height remaining between the lower and the upper part with the measuring tape. Cut strips with the saw to set there. Start in a corner of the wall and mark with a pencil where you will place the first vertical strip bar. Measure 16 inches (40 cm) from the mark along the surface of the wall and make a second mark where you will place the second strip vertical strip parallel to the first. Continue this process throughout the entire length of the wall. Place the last strip at the corner opposite the first end.
  4. Install vertical strips the same way as you did with slats from top and bottom.
  5. Measure the height and width of the wall with a measuring tape. Cut the drywall to fit, starting at the top of the wall and then down. Use a ruler and a pencil to mark lines measured in the drywall. Use a knife and a ruler to score the drywall and its outer casing and fold them until they break.
  6. Install the drywall on the strips with a drill. A screw placed every 18 inches (45 cm) or less along the strips, ensures the edges of each panel. Those who are not secured will be loose and give a poorly finished look.

Tips & Warnings

  • Lined metal strips provide the added benefit of moisture resistance. They do not twist or bend over time and maintain their original shape.
  • Always wear eye and hand protection when working with potentially dangerous tools such as knives.
drywall-8

Options for Dryer Vents

Ventilation ducts for dryers are quite easy to install and use, but can also cause potentially costly problems. Create a safe and reliable path for hot air to flow, fuzz and to ensure optimal operation for your dryer and protect your home from damage. Some key considerations can help you choose the best methods and materials for a dryer’s vent.

Materials

There are several effective and widely available dryer vent options. The most common is flexible aluminum, which can stretch and bend to follow the desired path. This line works well and is very versatile, but can be a little hard to expand and place at first. If ventilation should extend 10 feet (3 m), you may want to consider the rigid metal pipe. This is similar to heating and cooling ducts in your home and cause minimal air flow resistance, which is important to the other vents. Layered aluminum hoses are also available and can be useful for short distances, although they create greater air resistance than regular aluminum. Never use plastic flexible ducts for dryer vents. Although plastic ducts resemble those of aluminum and are fine for bathing, they do not hold up well with warm air and could catch fire.

Wind Route

Ideally, the path between the dryer and the end of the vent should be as short and straight as possible. If the outputs become longer and include more twists and turns, your dryer will have to work harder to push the air and increase the potential for accumulation of lint, moisture and heat. Most dryers and ventilation components include recommended settings, and the staff in the store where you purchase your system can also offer advice. As a general rule, try to keep ventilation within 25 feet (7.62 m) and minimize the number of bends (especially the 90-degree turns). When using pipes, compress them using metal clamps or foil tape to seal all joints and keep in the air and moisture to prevent it from escaping. If you run the ventilation through an unheated attic, insolate that section of pipe to prevent condensation from forming on the inside.

Starting

The dryer must always be vented to the outside, if possible. Look for a hidden place that is free of obstructions and open to good airflow to put the vent. You may also want to avoid high traffic areas or ones that are highly visible and vulnerable to water damage (for example, the bottom of a deck or stairs) to avoid problems with accumulation of moisture and lint. Ventilation near a patio or through a roof cap is usually a good choice. If needed, you can ventilate an electric dryer in a garage or use an indoor ventilation kit in the basement, but you will get a lot of moisture and lint in that room. For safety reasons, gas dryers must always be well ventilated outdoors.

Maintenance

Be sure to clean the lint trap in the dryer after every load.  If possible, avoid using fabric softener, which can worsen the problem of fluff.

Drywall

Ideas for Decorative Stone Walls

Add a wall to a decorative landscape by incorporating natural or constructed rock. Mix textures, create a slightly curved wall or add a touch of nature by using a technique called stacking dry, Illuminate the wall and its surrounding area for a late night display. Decorative rock walls may be small, quick projects or may be included in larger projects such as a fence that surrounds the property.

Mix textures

Build an outer wall to outline a patio, mark an entry to a courtyard or block a view, by mixing textures of rock. The rough stone (split face) is cut around on four sides, but is slightly flattened at the top and bottom to facilitate stacking. Mix it with a slab of sandstone, a rock found in colors from pink to white-gray to yellow. Create columns of sandstone slab within the rough stone wall. Match the colors of the two materials or put them in contrast. Add lighting to the top of the columns to mark entries or illuminate a walkway. Mix other combinations of stones such as river rock, granite rocks, basalt rock, slip stone or limestone.

Reconstituted stone

Reconstituted stone is made of crushed rock combined with authentic baked bricks and shaped to appear rough like a rock on both sides. It is used in commercial landscaping projects because of the price, convenience and speed of installation; they are excellent for outdoor decorative walls, along a flowerbed, street, or in a backyard landscape. Many products are designed with an alignment system in the finished product so that the stones can be easily aligned. They stack like bricks, but do not require mortar or cement. Mix colors and shapes for more decorative wall options or make the wall curved and angled to add more visual interest.

Make it bigger

Use a dry stacked style to create a low wall.  Dry stack references to the lack of cement or mortar needed to hold the rock together and this method may be used with a variety of sizes of rock. This technique creates a decorative rock wall that gives a look of a natural phenomenon rather than carefully placed look done by humans. Start with a large stone called a landscape rock, which is sold in stores. Select several shapes and sizes so the exterior wall does not seem to be planned. Measure the length of the area to cover and acquire a sufficient amount to fill the space for up to two or three layers. This type of rock wall are stacked and placed without worrying about holes in the rocks or regularity in the final design. This decorative rock wall idea requires the use of muscles. Hire help or gather a group of friends for the day to help you assemble the wall.

Finished-Basement-4

How to Remove Moisture from a Basement

Musty odors in a house are produced as a result of mold. Mold spores are generated in the air, but they require certain conditions to grow, like mushrooms. These conditions include a combination of humidity, warm temperatures, and lack of fresh air and food sources. The most common areas of the house where mold can accumulate are basements, crawl spaces, and even closets. In addition to generating an unpleasant odor, mold can damage various materials. Fortunately, it is not difficult to remove the bad odor and mold in basements.

Instructions

  1. Open the windows and exterior doors in the basement during a hot day. Place a couple of portable fans in the doorway, some looking inward to cool the atmosphere and others looking out to remove the moisture.
  2. Place a dehumidifier in the basement and keep it on day and night, with windows and doors closed. Check the machine and empty it frequently when it’s full. Place jars of silica gel around the room, because this substance absorbs moisture from the air.
  3. Remove objects from the basement and clean them. Put them outdoors, under the sun. Remove mold gently with a brush. Wash the objects, besides paper, with a soft sponge and a foam solution of detergent and water. Rinse thoroughly with clean water and let them dry in the sun. For deep cleaning mildew stains, mix two tablespoons of bleach to one quart of warm water. Apply the solution with a sponge on the stain or submerge the object. Let dry for 5 minutes, rinse with clean water and let it dry again.
  4. Clean the basement floor to eliminate musty odors. Sprinkle a thin layer of lime on the floor. When the musty smell disappears, sweep up the lime. To clean carpets, remove the rust with a carpet cleaning machine.

Tips & Warnings

  • The slight odor of mold can be removed only if you vent moisture and dry basement.
  • Fabrics that can be washed should be taken to the cleaners.
  • You must discard items that accumulate rust inside.
  • Keep bleach and other harmful chemicals out of the reach of children and pets.
  • Read and follow directions on the packaging of chemicals.
roofing-1

How to Install a Metal Roof

If local building codes permit, you may be able to save money by putting a corrugated metal roof on your shed or garage (this type of roof is not recommended for a home). A tin roof or corrugated metal is a relatively cheap investment, and is durable. Learn how to install a tin roof with this simple method. The materials are indicated for a shed measuring 10 feet (3,048 meters) by 10 feet (3,048 m). Buy more material and trim, if necessary.

Instructions

  1. Measure the dimensions of the shed or garage roof and add 4 inches (10 cm) on a slope. Take a picture or two if there is something unusual on the roof. Take your measurements, photos and list of things needed to buy to your local hardware store and ask for help to find the materials you’ll need for your roof.
  2. Put on thick goggles and gloves. Use a flat blade to scrape off the old shingles and tar. Remove all the old roof, stripped to the roof sheathing or plywood. Use pliers to pull all the nails that protrude from the surface. If there is no plywood on the joists, or it’s in poor condition, install plywood or have a professional install it for you.
  1. Line the ceiling, using new asphalt infused paper (tar paper). Most professional roofers use a nail gun to attach the tar paper, but a staple gun, or “big-headed nails” for ceilings (also called nail to paper) work well. Apply nails every 12 inches (30 cm).
  1. Install sheets together to place the new tin roof. Place a 1 by 4 inches (2.5 to 10 cm) board at the bottom edge of the roof. The board must be aligned with the 4 inch (10 cm) edge lying against the ceiling surface. Drill 3 inch (7.5 cm) wood screws through 1 inch (2.5 cm) board at the beams. If necessary, cut another 1 by 4 inches (2.5 to 10 cm) board and attach it, aligning it first. Add 2 feet (61 cm) and attach another board in the same way. Work from the bottom to the top of the roof.
  2. Nail the metal rim around the edges of the roof, using a hammer and hot dipped galvanized nails for waterproofing roof or a cordless drill and screws.
  3. Cut tin for the first part of the roof which go from the top of the roof going 4 inches (10 cm) to the roof edge. Place one of the sheets that is going to the other side of the roof, on top, in order to extend about 6 inches (15 cm) through the top. Fold the bottom of the sheet down over the top. Chalk 4 inches (10 cm), and remove the piece of roof. Cut all the pieces for the other side of the roof that length.

Installation

  1. First, screw the sheet metal strips together that are below it. Place the screws in the middle and inner edge of the blade. The panels must be able to expand and contract with temperature changes, so do not put nails or screws in all the way. Drill them until they just touch the sheet. Tighten only one in the center of the top of each panel.
  2. Overlay the first channel V of the second sheet in the last channel V of the first sheet, and screw or nail through the two sheets and continue to the left side of the second sheet, and then the center of the second sheet. Remember to tighten the screw or nail only at the top center. Repeat the process in the same way until you’re ready for the last sheet on that side of the roof. At the edge of the roof, you have to cut the last sheet to fit.
  3. Repeat Step 3 of Preparation section: sheets installed on the other side of the roof, working from the bottom up.
  4. Repeat Steps 1 and 2 of Installation to install the sheets across the roof. Be sure to leave 6 inches (15 cm) extra at the peak of the roof. Fold each sheet and screw into place throughout the upper edge before installing the next panel. Alternatively, you can install a vent and a cap on the ridge, but it’s not required on the roof of a shed.

Tips & Warnings

Make sure you place the first sheet on either side of the roof square, because the panels are attached to the previous panels. If they are not square, it will make the finished project off. Have a helper or two to make the work go much faster. For simplicity, you can skip the metal rim and leave an excess of film on both sides of the shed roof.

chimney-1

How to Fix a downdraft chimney

Inverted air creates downward pressure directing smoke and fire gases towards the inside of a home, which is a threatening situation for the owner. The downdraft may release carbon monoxide, a fatal gas to the residents. Invested chimneys require immediate attention.

Obstructions

A fireplace should have a good air circulation opening to run correctly. Some inverted air is the result of external obstructions that interfere or block the movement of air around the fireplace. A large tree near the unit, for example, can cause poor air circulation, resulting in the downdraft in the chimney. Also, nearby buildings may interfere with the airflow in the vicinity of the fire. Increasing the height of the upper part often solves the problem, as the tall chimneys have better air currents that low.

Negative pressure

A house develops negative pressure when the air is sent abroad exceeds the amount entering. The negative pressure, a major cause of the downdraft, often occurs when some appliances, such as range hoods, expel air from the house. Avoid turning the hoods on when the wood-burning fireplace is lit. You can also alleviate the negative pressure by opening windows to allow air intake.

Light the fire

Households and fireplaces operate on the basis that hot air rises. The heat creates an updraft, expelling the smoke through the unit and out of the house. When you first turn on the fire, it has not created enough heat to achieve an immediate upstream, causing a downdraft. Using newspapers or additional wood to create an intense fire to initially light it can help solve the problem, as explained by the magazine “Extreme How-To”.

Tapas

Strong wind can affect the ability of the chimney to maintain an effective updraft. The design of the top of the fireplace can also cause problems in the drafts. Special covers, however, can harness the wind to eliminate downdraft. These caps are comprised of two bells that guide the wind around the unit. As the wind blows around the top, an updraft is created, which expels smoke and gases out of the chimney.

photos-of-corner-shower-units-for-small-bathrooms-photo-773x1030

Removing black mold on the shower walls

Black mold usually develops on the walls of the shower, using soap film as source of food. This type of black mold is not usually one of the most deadly black molds, but still needs to be removed as soon as possible because it may contain a species of mold that cause allergy problems and asthma for members of the household susceptible to breathing problems. Removing the black mold on the shower walls is a two-step process, in which you kill mold, then remove the discoloration of black mold.

Instructions

  1. Squeeze the liquid detergent directly on a wet sponge and wash the moldy section of the shower wall to remove soap film and dirt. Do not use commercial cleaners to clean the area, since you’ll be using bleach later and don’t want to risk a chemical reaction.
  2. Rinse the section well with cold water and dry with a cloth or an old towel.
  3. Pour 1/4 cup of bleach in a one quart (1.14 L) spray bottle. Fill the rest of the bottle with cold water.
  4. Shake the bottle to mix the contents and then spray the moldy section with the mixture. Allow the mixture to sit for ten minutes.
  5. Rinse the wall with cold to remove the bleach. Make sure the wall is completely clean, with no bleach residue.
  6. Put a small amount of strong detergent, such as laundry detergent; rub on a pad or brush. Choose an tool that is suitable for cleaning the surface of the shower that will not scratch the finish.
  7. Rinse mold section with hot water, then rub with brush or pad until you have removed the stains.
  8. Rinse the area thoroughly with warm water. Be sure to remove the detergent.

Tips & Warnings

  • If the shower walls develop rust regularly, consider cleaning the shower more often to remove the soap film.
  • Wear gloves and a mask when working with chemical cleaners, especially bleach.
  • Ventilate the bathroom as much as possible when working with bleach.
living room interior

Making faux fire

Faux fire achieve a visual effect of flickering flames and colors like fire. It also makes an effective focal point on a fake fireplace. The advantages of the false fire include no real fire hazards, keeping the chimney clean and air smoke-free, and the opportunity to add a three-dimensional and decorative dynamic to the room. Give your fireplace the ambiance of a crackling fire with a few elements basic.

Instructions

  1. Take the measurements of your fireplace. Plan for the fire to be at least half the height of its opening, Stand at a distance away and decide how wide and high you want to make your faux fire to make it look real. For example, if the distance between the floor of the fireplace and its ceiling is 30 inches, make a fire 15 inches tall. Make the fireplace at least half the width of the fireplace opening.
  2. Buy small logs or cut firewood the length you decided in Step 1.
  3. Fix a mirror to the back wall of the fireplace, if desired. This will increase the lighting effect and the sense of movement of the fire.
  4. Draw flame shapes on cellophane with a marker. Make the shapes at different heights with each flame color based on the height range you selected in Step 1. Create different heights and shapes to achieve a realistic flame effect. Make sure they are as wide as the base and pointed at the top.
  5. Cut the cellophane around the shape of the flames.
  6. Stack the logs in the fireplace to give the appearance of real fire in proportion to the fake fireplace. Leave a space in the middle of the logs to place the fan.
  7. Place the fan on the floor of the fireplace, looking up. A small fan with a rechargeable battery are a good option to use.
  8. Paste the cellophane on the logs, alternating colors. Let the flames dry for at least 20 minutes.
  9. Place a fake candle flickering in the middle of the logs and light it. Turn on the fan.
concrete sidewalk

Making a concrete cordon

Concrete is often used in different applications of the home, like steps, patios, basement slabs, and shower floors. Cordons, or cords, are commonly used in bathrooms, where they form a barrier between the shower floor and the rest of the bathroom and are designed to be coated with a finishing material. There are different ways to construct a cord, one of which is poured concrete. To do this, you must first build a mold to hold the concrete in place until it dries.

Instructions

  1. Measure the width of the shower opening or the place where you want to install the cord. Determine whether you will need the cord to be 4 inches (10 cm) or 6 inches (15 cm) and use appropriately sized wood. Brand two pieces of 2 x 4 inches (5 x 10 cm) or 2 x 6 inch (5 x 10 cm), which will shape the front and back of the cord structure.
  2. Cut the pieces of wood with a miter saw. Place a piece of wood inside the miter saw and hold it flush against the back of the tray and firmly press it against the back. Hold it with one hand and using the other hand to operate the saw, pull the handle of the blade down and cut along the marked wood. Repeat with the second piece.
  3. Determine the width of the cord and place the two pieces of wood at a distance corresponding to the width, lifting the edge so that the walls (parts of the front and back) reach a height of 4 to 6 inches (10 or 15 cm).
  4. Connect the two parts of the specific width with two or three crosspieces nailed on top. With a miter saw, cut strips of wood to fit the width of the top. Screw them on the back of the frame to prop the ends and in the central part. Use a carpenter’s square and a level to make sure your walls are aligned and level with each other.
  5. Place the cord in the place where concrete will be poured. Screws inserted along the bottom edge, orienting and directing from the outer side through the bottom of the wood to the outside of the structure. This will hold the structure in place while the concrete is poured. Then pour concrete into the mold and wait 24 to 72 hours. Remove the structure.

Tips & Warnings

  • Few cords exceed 4 inches (10 cm) tall. Unless you are a person who is inclined to the upper heights, the most common way to build a frame is with 2 x 4 inches (5 x 10 cm) pieces of wood on the sides. If you prefer a higher cord, use pieces of 2 x 6 inches (5 x 15 cm).
  • The ends of the cord will be blocked by the walls of the shower or the entry in which you install it. No need to cut wood to form the ends of the cord, since the walls and structures of the opening of the shower will serve as building blocks while waiting for the concrete to dry.
  • Use safety equipment when working with power tools.