Bathroom

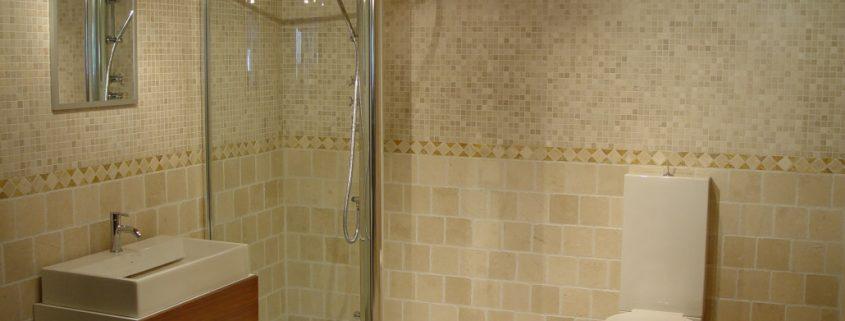
An Alternative to Replacing Bathroom Tiles

Painting bathroom tiles is a great alternative to spending a lot of money changing them. Discolored or ugly tiles in your shower or a counter can be fixed using epoxy, latex or paint to oil. If you are thinking of painting your tile, determine the wear and humidity it would encounter before choosing paint. Spray paints, enamels and epoxies are unsuitable for tiles because they flake easily. However, acrylic paint when applied to clean and primed walls works well for a professional finish. In addition to paint, you only need a few more things to do a quick makeover in the bathroom.

Instructions

  1. Place a tarp down to gather dust that may be full when sanding.
  2. Clean the tile. Use an abrasive sponge and wash and remove all traces of soap cleaner. This will help get rid of shine. Continue to clean any dirty cracks with a nail brush and bleach. Rinse the wall with warm water to remove the cleaner and let it dry.
  3. Remove any remaining gloss from the tiles with an orbital sander. This step is the most important and defines the quality and duration of your work. If there is any gloss left on the tile paint could peel off in as little as a week.
  4. Clean dust from the tile and apply primer. Make sure it is oil based and highly adherent. These characteristics help to block stains and will provide a more adhesiveness to the primer. Apply two coats of primer and allow to drying time between them.
  5. Sand the layer lightly to remove surface defects. Clean the dust with a damp cloth.
  6. Paint the tile with an oil based paint using a brush. Apply two or three thin coats of paint to the tiles allowing drying between each application. Allow two or three days for the last layer to dry completely.
  7. Finish the job by applying two coats of urethane using a natural bristle brush.
  8. Let the urethane dry according to manufacturer’s instructions. If you need to use the shower, it will be best to wait a day or two before letting the tile get wet.
Metal-roof-job-finished2-1

Types of Metal Roofs for Homes

Metal roofs are becoming the material of choice for many homeowners, replacing asphalt shingles. Metal roofs offer aesthetic and functional advantages over other materials, including options in design, durability, and versatility. These roofs are available in a number of different styles and materials, and can easily last for decades with little maintenance.

Materials

Steel is the most common material used on metal roofs. It is also one of the most affordable. Aluminum roofs are much more expensive, but may also be more durable in some applications. Copper is the most expensive metal roofing option, and is mainly chosen for its intense color and visual appeal. Tin roofs can be used in barns and sheds. This material is more durable, less expensive and used more often to create metal roofs.

Forms

Metal roofs can be used both in steep structures and low-slope roofs. Smooth or embossed panels are installed using a locking technique that creates a standing seam design. Some metal roofing tiles, shakes or tiles, can be used to mimic the look of wood or clay roofing. The metal can be fixed with wooden nails or in patterns to give an authentic look.

Benefits

While metal roofs usually offered many benefits to homeowners, each type of metal roofing material has its own advantages. Steel is one of the most durable types of roofs, and is resistant to dents caused by wind, hail and strong impact. Aluminum is highly resistant to oxidation and corrosion, and is often the best choice in coastal areas. Copper, tin and aluminum are usually left unfinished and require little maintenance to maintain their appearance.

Disadvantages

Each of these materials also has some disadvantages that must be considered. Steel can rust or corrode, and should not be used near salt water or very humid areas. Aluminum is a relatively soft metal and tends to dent easily. Copper interacts with atmospheric oxygen to form a greenish coating known as “patina”. While some buyers like this effect, others consider it a disadvantage. The steel must be repainted every few years to maintain its appearance.

Considerations

When choosing between different types of metal roofs, note the desired look and style of your home. The visual appeal is particularly important when the housing parts are visible from inside the house or from the outside. It also helps to consider the cost of housing compared with its useful life and maintenance requirements. Finally, note the local climate, including levels of wind, rain and snow.

weatherproofing-1

Types of Metal Roofs for Homes

Metal roofs are becoming the material of choice for many homeowners, replacing asphalt shingles. Metal roofs offer aesthetic and functional advantages over other materials, including options in design, durability, and versatility. These roofs are available in a number of different styles and materials, and can easily last for decades with little maintenance.

Materials

Steel is the most common material used on metal roofs. It is also one of the most affordable. Aluminum roofs are much more expensive, but may also be more durable in some applications. Copper is the most expensive metal roofing option, and is mainly chosen for its intense color and visual appeal. Tin roofs can be used in barns and sheds. This material is more durable, less expensive and used more often to create metal roofs.

Forms

Metal roofs can be used both in steep structures and low-slope roofs. Smooth or embossed panels are installed using a locking technique that creates a standing seam design. Some metal roofing tiles, shakes or tiles, can be used to mimic the look of wood or clay roofing. The metal can be fixed with wooden nails or in patterns to give an authentic look.

Benefits

While metal roofs usually offered many benefits to homeowners, each type of metal roofing material has its own advantages. Steel is one of the most durable types of roofs, and is resistant to dents caused by wind, hail and strong impact. Aluminum is highly resistant to oxidation and corrosion, and is often the best choice in coastal areas. Copper, tin and aluminum are usually left unfinished and require little maintenance to maintain their appearance.

Disadvantages

Each of these materials also has some disadvantages that must be considered. Steel can rust or corrode, and should not be used near salt water or very humid areas. Aluminum is a relatively soft metal and tends to dent easily. Copper interacts with atmospheric oxygen to form a greenish coating known as “patina”. While some buyers like this effect, others consider it a disadvantage. The steel must be repainted every few years to maintain its appearance.

Considerations

When choosing between different types of metal roofs, note the desired look and style of your home. The visual appeal is particularly important when the housing parts are visible from inside the house or from the outside. It also helps to consider the cost of housing compared with its useful life and maintenance requirements. Finally, note the local climate, including levels of wind, rain and snow.

living room interior

Stone Fireplaces Styles

Often a fireplace is the centerpiece of a living room, no matter the size, and can be made in any shape, size, style and material. In addition, a fireplace, especially those made ​​of stone, can be more than just a decorative part of the house; It can be the crucial part for a fire.

Fireplace finished in faux stone

This type of fireplace is very simple to install. Stone finishing is a composite material made ​​of cement, sand and colorants, and applied in construction on to an existing faux stone. People often have trouble recognizing actual stone versus faux stone. The stone finish is less expensive than real stone and weighs much less, which means it can be installed without the necessary foundations to install real stone. Also, it can be applied to both brick and metal chimneys. These materials are 50 to 60 percent less expensive than the materials needed for the installation of real stone.

Cultured stone

Cultured stone is light, a manmade product and used mainly for decorative purposes. Made of concrete and different pigments it’s usually formed into molds shaped like natural rock. The lightweight nature of the material provides less stress to the structure of the foundation and can be installed without a brick base to support it. But unlike the stone finish, it is more expensive and not always universal in color. If cultured stone needs to be cut for installation, the inside will probably have the color of gray cement.

Natural stone

Natural stone fireplaces are often built using a method of masonry. The stone is often largely uncut from its original state in the quarry; the only difference is that the stones are cut into manageable sizes. Natural stone fireplaces are more durable than their counterparts of bricks which splinter, flake and crack over time. Types of natural stone used for the fireplaces include common stone, river stone and flagstone.

Dry stacked stone

The method of using stacked stones for fireplaces is a design that requires greater skill in construction. Much depends on the weight of the stones to maintain the shape of the fireplace without using cement in visible areas. Cement is commonly used to reinforce and seal the crucial areas of the structure of a fireplace but is well hidden unless you look closely.

living room interior

Stone Fireplaces Styles

Often a fireplace is the centerpiece of a living room, no matter the size, and can be made in any shape, size, style and material. In addition, a fireplace, especially those made of stone, can be more than just a decorative part of the house; It can be the crucial part for a fire.

Fireplace finished in faux stone

This type of fireplace is very simple to install. Stone finishing is a composite material made of cement, sand and colorants, and applied in construction on to an existing faux stone. People often have trouble recognizing actual stone versus faux stone. The stone finish is less expensive than real stone and weighs much less, which means it can be installed without the necessary foundations to install real stone. Also, it can be applied to both brick and metal chimneys. These materials are 50 to 60 percent less expensive than the materials needed for the installation of real stone.

Cultured stone

Cultured stone is light, a manmade product and used mainly for decorative purposes. Made of concrete and different pigments it’s usually formed into molds shaped like natural rock. The lightweight nature of the material provides less stress to the structure of the foundation and can be installed without a brick base to support it. But unlike the stone finish, it is more expensive and not always universal in color. If cultured stone needs to be cut for installation, the inside will probably have the color of gray cement.

Natural stone

Natural stone fireplaces are often built using a method of masonry. The stone is often largely uncut from its original state in the quarry; the only difference is that the stones are cut into manageable sizes. Natural stone fireplaces are more durable than their counterparts of bricks which splinter, flake and crack over time. Types of natural stone used for the fireplaces include common stone, river stone and flagstone.

Dry stacked stone

The method of using stacked stones for fireplaces is a design that requires greater skill in construction. Much depends on the weight of the stones to maintain the shape of the fireplace without using cement in visible areas. Cement is commonly used to reinforce and seal the crucial areas of the structure of a fireplace but is well hidden unless you look closely.

masonry-4

Making Your Masonry Fireplace More Efficient

A masonry fireplace creates a warm and welcoming atmosphere anywhere. However, fireplaces are a source of significant heat loss, even when in use. Although the room will feel the heat being given off, the burning process pulls hot air out of the house. There are many ways to improve the efficiency of a fireplace, reduce heat loss from the house and use the existing masonry fireplace as the most effective source of heat.

Instructions

  1. Install a fire back, which is a thick sheet metal, such as cast iron, to help control the heat and radiate it back into the room. The fire back is placed in the back of the masonry chimney and fixed with masonry screws.
  2. Place a rack with a fan on the floor of the chimney fan. The fan will push the cool ambient air, heat it in the rack and blow warm air into the room. Put the fan in place and plug it into an outlet.
  3. Insert an inflatable pillow in the fireplace at the base of it when not in use. This prevents the heated air from another source, such as a furnace, from going to the fireplace. Be sure to remove the pillow from the chimney before starting a fire. Press the fireplace pad in place.
  4. Install tight fitting fire doors to seal the circulation and not lose the air in the room from the fireplace. Use them during operation, as when not. Attach them to the fireplace opening with masonry screws.
  5. Place a chimney fan on top of the chimney to help the fire burn hotter. Remove the chimney cap and put the fan in place. Secure it with screws to the masonry fireplace. Replace the cap on the chimney fan to prevent water and birds from entering the chimney.
  6. Install a vent from the outside of the chimney’s combustion chamber to extract the cold outside air for combustion instead of air heated from the inside. Pierce through the masonry with masonry hole saw from inside the combustion chamber. Insert the vent through the opening.
masonry-9

Making Your Masonry Fireplace More Efficient

A masonry fireplace creates a warm and welcoming atmosphere anywhere. However, fireplaces are a source of significant heat loss, even when in use. Although the room will feel the heat being given off, the burning process pulls hot air out of the house. There are many ways to improve the efficiency of a fireplace, reduce heat loss from the house and use the existing masonry fireplace as the most effective source of heat.

Instructions

  1. Install a fire back, which is a thick sheet metal, such as cast iron, to help control the heat and radiate it back into the room. The fire back is placed in the back of the masonry chimney and fixed with masonry screws.
  2. Place a rack with a fan on the floor of the chimney fan. The fan will push the cool ambient air, heat it in the rack and blow warm air into the room. Put the fan in place and plug it into an outlet.
  3. Insert an inflatable pillow in the fireplace at the base of it when not in use. This prevents the heated air from another source, such as a furnace, from going to the fireplace. Be sure to remove the pillow from the chimney before starting a fire. Press the fireplace pad in place.
  4. Install tight fitting fire doors to seal the circulation and not lose the air in the room from the fireplace. Use them during operation, as when not. Attach them to the fireplace opening with masonry screws.
  5. Place a chimney fan on top of the chimney to help the fire burn hotter. Remove the chimney cap and put the fan in place. Secure it with screws to the masonry fireplace. Replace the cap on the chimney fan to prevent water and birds from entering the chimney.
  6. Install a vent from the outside of the chimney’s combustion chamber to extract the cold outside air for combustion instead of air heated from the inside. Pierce through the masonry with masonry hole saw from inside the combustion chamber. Insert the vent through the opening.
fences-4

DIY Wooden Fence Installation

Installing a fence is a good way to prevent pets from escaping the garden and have a safe area where children can play. A privacy fence will increase the value of your property and provide further security. Within days, any man skilled in “do it yourself” projects can install a wooden privacy fence along the perimeter of the garden.

Instructions

  1. Consult with utility companies and requests them to mark underground wiring and pipes around your property. This allows you to visualize the place where the supply lines are so you do not bump into them when making the holes for the posts.
  2. Place a wooden post at each corner of the fence. Hold a tight rope stretched between these poles. With a tape measure, mark the location of the posts which should be spaced 8 feet (2.4 m) on center.
  3. With the rope stretched between the poles, insert a stake at every mark.
  4. Rent a gas driller to make holes in the ground that correspond to the posts at a depth of 36 inches (90 cm).
  5. Place a pressure-treated 4 x 4 x 8 feet (1.2 x 1.2 x 2.4 m) on each corner post. Pouring cement into the post hole. Tamp the cement once you consider that the post is straight and plumb and add water around the post; the concrete will absorb it and the pole will be installed. Use a level of 4 ft. (1.2 m) to make sure the post is vertical.
  6. Tie a string between the outside of each post. This will provide a guideline for placing the remaining poles and ensure proper installation of the fence.
  7. Set three boards of 2 x 4 x 8 (0.6 x 1.2 x 2.4 m) between the posts. Place a 9 inch (22 cm) from the floor and another on top, added another in the center of both boards. Use a level to ensure that they are level and screw them to the posts 4 x 4 ft. (1.2 x 1.2 m). For this step you’ll need an electric screwdriver and 3 (7.5 cm) outdoor inch wood screws.
  8. Install a stake in each corner of the fence. Place a screw on top of all the pins. Stretch a string tightly between the screws. This will serve as a guide to determine the height of the stakes.
  9. Screw the stakes tables 2 x 4 feet (0.6 x 1.2 m) with two 2 inch (5 cm) outdoor wood screws per table. Set ¾ inch (2 cm) screws to prevent lateral slipping. Leave a gap of 1/8 inch (0.3 cm) between the stakes to allow for expansion and contraction. If necessary, cut the stakes to the desired height with a miter saw.
  10. Check that the wooden stakes are plumb by using a carpenter 4 foot (1.2 m) level.

Tips & Warnings

  • Apply a finish to good quality exterior wood to protect the fence. This will provide greater duration.
  • Use safety goggles when using power tools.
master-suite-1

Designer Suggestions for Painting Small Bedrooms

Small bedrooms can feel cozy and comfortable when they are decorated with its size in mind. To help a small bedroom look brighter, use light cool colors and choose decorations, bedding and furniture with little contrast. Make sure the furniture is scaled correctly with the room, opting for smaller furniture and choose only furniture that’s needed.

Tone

Cool colors visually recede, while warm colors advance. To the eye, where a wall looks back, looks away, therefore, the room looks bigger. Cool colors reflect light, while warm colors absorb it. Use these tricks, using cool colors on the walls to bounce the light around, such as blue, green or cool white. Avoid warm colors like red, orange or yellow to make the walls seem farther apart and to make the room appear larger.

Saturation

Lighter and less saturated colors reflect natural light, and the more light that bounces around the room, the brighter and bigger it seems. If you choose a dark color like deep red or dark brown, light is absorbed by the paint colors, which makes it look like the walls recede.

Ceilings

Do not forget the ceiling when you’re thinking about the color of the paint. Lighter colors make the ceiling brighter and seem to be higher, while dark colors make the ceiling feel closer and can make you feel a little claustrophobic. Choose white, cream or light blue for your ceiling to help make the room appear larger.

Brightness

Consider the gloss paint you choose. Most indoor paints are available in a variety of highlights, from flat to high. High gloss paints help bounce light around the room, while the flat paint makes the walls look less bright. However, flat paint doesn’t hide flaws on the walls, so if your room has walls with imperfections, choose a gloss level. Many bedrooms are painted with an eggshell finish, so if the walls are in relatively good condition, choose a semi-gloss or satin.