The Most Common Ways Water Can Leak Into a House

A water leak is a huge problem that can lead to expensive damage if ignored. It can cause furniture, books, and clothes to swell or even become ruined. It can also cause puddles to appear in your home or yard.

Many homeowners ignore leaks until they find a puddle on the floor or see their water bill spike. Identifying these leaks is key to saving time, money, and stress.

1. Burst Pipes

A burst pipe is one of the worst home plumbing problems you can face. It can cause major damage to your floors, walls and ceilings, and lead to thousands of dollars in repairs and renovations.

Luckily, you can often prevent this from happening by taking a few simple steps. First of all, you should always turn off your water supply as soon as you notice a leak or puddle on the floor. If possible, mark where the water shut off valve is so that you can find it quickly in an emergency.

Another important thing to do is to check your pipes regularly for cracks or leaks. This is especially important during winter, when it’s easy for the temperature to drop suddenly and freeze existing water in your pipes. When this happens, the ice will expand and create enormous pressure on the pipes, which could lead to them bursting. Ideally, you should install insulation in your house to help keep your pipes warm. This will also prevent them from freezing in the future.

2. Broken Pipes

Our homes are built on a framework of pipes that carry fresh water throughout. They are sturdy enough, but they can become damaged over time. This can happen for a variety of reasons, including age, environmental factors, and stress to the pipes.

If you notice a puddle or damp area on your floor, it could mean there is a broken pipe nearby. It’s important to act quickly so that more water doesn’t seep into your house, as this can lead to expensive damage to your furniture and drywall.

Other telltale signs of a broken pipe include a metallic smell and the presence of mold. The latter requires a moist environment to grow, so if you have mold on your ceilings or anywhere else in your home, this can be a sign that behind the walls, there is a leaky pipe. Make sure you turn off your water supply right away to avoid further problems. Then, call a plumber to find and fix the problem. You can also check your homeowner’s insurance policy to make sure the damages are covered.

3. Frozen Pipes

Pipes are prone to freezing during cold weather, especially older pipes or ones without enough insulation. Frozen pipes may not burst immediately, but over time they can crack or break and lead to water damage.

A common sign of a frozen pipe is turning on the faucet and only getting a trickle of water. You might also notice a bad odor coming from the sink or drain that connects to the frozen pipe.

One of the most important things to do if you suspect a frozen pipe is to shut off the water main at your home’s water supply valve. Next, you should call a plumber.

If you aren’t able to get your plumber right away, start by trying to locate the frozen pipe. Frozen pipes tend to be in areas with less heat, such as the basement, attic, or unused rooms in the house. Open up any cupboard doors so warm air can circulate in those spaces. Then, try to feel the pipes or tap them with a screwdriver handle or other object. If they’re frozen, they will feel cold to the touch and have a hollow sound.

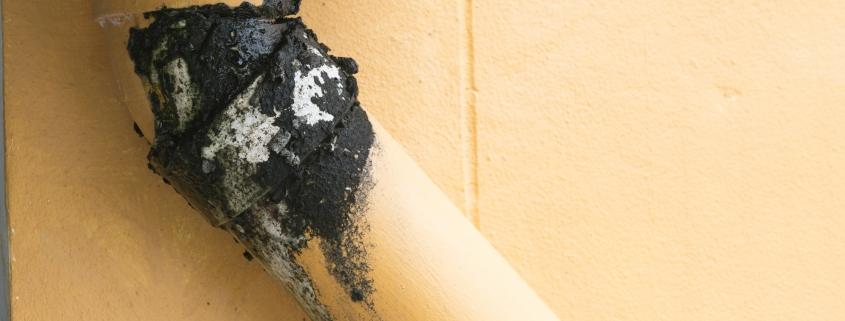
4. Clogged Gutters and Downspouts

Gutter downspouts carry rainwater away from your home to keep it off the shingles and roof. But gutters can become clogged with leaves, dirt, and debris that prevent water from flowing through. Without an effective gutter system, water collects on the roof and seeps into the house at jointed places like the fascia board and soffit, creating serious water damage over time.

A clogged gutter can also invite hearty weeds, grass, and plants to grow inside your gutter. If your gutters are clogged, it’s important to clean them on a regular basis and install gutter guards to reduce the number of clogs.

5. Leaky Appliances

Leaks from appliances such as refrigerator icemakers, dishwashers and washing machines can go unnoticed for some time. But they can lead to hundreds of gallons of wasted water and astronomical water bills. These leaks are also a prime opportunity for mold and mildew to grow, especially if left untreated.

One of the most important things you can do to help prevent water leaks is to make sure your appliances have proper seals and gaskets. You should also regularly inspect your appliances for leaks, especially if they are older.

If you notice a sudden increase in your water bill or water spots on walls or floors, shut off everything that uses water in your home and check the water meter. If the number has changed despite all the faucets, showers and hoses being turned off, there is a water leak somewhere in your home. You can also try using a moisture meter to find the location of the leak. If a leak isn’t fixed in time, it can cause major damage to your home. The best way to avoid this is to have regular plumbing inspections done by a professional.

Wood Options for Decks

When it comes to wood decks, there are a few different options. One of the most popular is pressure treated lumber.  This less expensive wood has been injected with preservative and is durable enough to last for decades.

Cedar is a beautiful option that feels good under your feet and resists rot and insect infestation better than other types of wood. However, it does require annual cleaning and staining.

Pressure Treated

Pressure treated wood is made of softwoods (most often southern yellow pine) that have undergone a chemical preservation treatment. This process makes it resistant to moisture and insect damage, making it a good choice for decking boards.

While it does need yearly washing, sanding and sealing, it can last for over 30 years with proper maintenance. It is also highly versatile, and can be stained or painted in any color you wish to match your home’s exterior.

Some pressure treated lumber is manufactured with a built-in water repellent, which can save you time and money on staining in the future. Look for brands like Ecolife, which use a less-toxic preservative called micronized copper azole, and have no added metals which could leach from the treated wood over time.

It is important to keep in mind that any time you work with a new or existing wood deck, the sawdust can be a respiratory irritant so wearing a dust mask and eye protection is recommended. You should also avoid prolonged skin contact with the wood, as it can be irritating.

Redwood

Redwood is a durable, weather-resistant softwood that resists decay and insect damage. It is a natural choice that will age to a stunning silver-gray color and feels great under your feet, but it also requires annual maintenance to keep it looking its best. Like all woods, it can rot or splinter without proper care.

Like Cedar, Redwood has an excellent strength-to-weight ratio and can withstand heavy loads. It is also easy to work with and accepts stains well. It is more expensive than other natural woods, but less than tropical hardwoods and pressure treated pine.

If you’re on a tight budget, consider the cost of your project and the environmental impact of the deck before selecting your materials. It is important to use a reliable source that sources their timber from forests managed in a sustainable and responsible manner. Otherwise, you may be contributing to deforestation and habitat loss that will take years to reverse. It is also worth considering the option of a synthetic deck made from recycled plastic and wood fibers. This durable, low-maintenance decking will never splinter or need staining.

Cedar

Cedar is a fragrant wood with a unique warm aesthetic offering a variety of natural hues and tight grain patterns. It naturally resists rot and insect infestation without the need for preservative chemicals. It is also dimensionally stable, meaning it resists warping and cupping in response to changes in moisture.

Because cedar is pitch- and resin-free, it accepts a wide range of stains, bleaches and paints. It also nails and screws well. However, cedar is softer than redwood and can be easily scratched or dented by furniture or pet claws. It also requires yearly cleaning and resealing.

Like all natural woods, cedar is a sustainable resource. And unlike pressure-treated wood, it emits fewer greenhouse gases when burned. However, it’s expensive and labor-intensive to install a deck made of cedar, which can add up quickly to an overall renovation budget.

Tropical Hardwood

Beautiful tropical hardwood has a premium look and can last 30 years or more. It is extremely dense, has a dark color and unique figuring, and it resists rot and insects very well. It also has a class A fire rating, making it even more resistant than redwood and cedar.

Because it is so hard, tropical hardwood requires special care. It needs to be oiled regularly to protect it from water damage. It can dull cutting tools, so you should always use carbide-tipped saw blades when working with it. It is also very heavy, so it is best installed using screws rather than nails.

Tropical hardwoods that are good for decking include Massaranduba, Garapa and Batu. These are similar in appearance to mahogany but are less expensive. You can also choose a sustainably harvested species like FSC-certified Brazilian Teak, which limits clear-cutting and helps preserve rainforests.

Alternatives

There are many alternatives to wood decking that can save you thousands and offer a smart, modern look to your outdoor area. Resistant to rot, mildew and pests, these alternative materials will last much longer than traditional timber.

One popular option is composite decking, which is made from a combination of wood and plastics. It’s similar to plastic lumbar and is one of the most popular, fastest-growing decking materials available today.

Another option is natural stone, which offers a beautiful, elegant look. It’s also resistant to rot and insects, which makes it ideal for any backyard retreat.

While no material can be considered “maintenance-free,” modified wood comes close. It’s easy to clean, looks like natural wood and can be sanded down if necessary. It’s also eco-friendly, as it is made from a byproduct of rice processing. It also reflects heat instead of absorbing it, which keeps your back deck cooler than traditional wood decks in the summer. It’s a great choice for homeowners who want to avoid the upkeep that comes with conventional wood decks.

The Process of a Flood Remediation Claim

Flooding can cause a variety of costly problems that are covered by flood insurance. In addition to the building structure and personal belongings, flood insurance also covers relocation expenses if necessary.

Before an adjuster visits, you should make a list of everything that was damaged in the flooding. This includes a description of each item, its value, and any receipts or bills you have.

Remediation

Flood remediation is the process of cleaning and sanitizing water-damaged materials. It’s also the first step in overall recovery. It can include everything from removing mud to sanitizing and disinfecting surfaces and materials affected by flooding.

Before work begins, an inspection will determine the level of contamination and the class of water damage. This information will inform the remediation process. For example, class one water is clean but a category three flood might contain sewage and other hazardous substances that require hazmat suits for safety.

A flooded home may need to be treated for mold and mildew. This is because these organisms thrive in damp environments and will eat organic material such as wood used for walls, floors, ceilings and furniture. If left unchecked they can spread quickly and release millions of spores that affect everyone in the home.

To help owners and professionals in their cleanup efforts, EPA has produced a guidance document called Flooded Homes Cleanup Guidance. The document discusses safe and effective methods for restoring flood-damaged homes, including specific approaches for removing standing water, cleaning and drying contaminated structures and materials, and mold testing.

Repairs

Whether your home or business is flooded by hurricanes, a burst pipe or other disasters, it’s crucial to take steps to restore the property as quickly as possible. The longer water sits, the more damage it can cause to building materials and furnishings.

Flood restoration services typically include cleaning up, drying and sanitizing areas and materials that have been impacted by floodwaters. This includes restoring or replacing items damaged beyond repair. Flood remediation services also include making structural repairs to protect the structure from further damage and ensure that it’s safe for occupancy.

One of the first steps in a flood restoration project involves draining the area. This may be accomplished using large tanker trucks or portable sump pumps. If the floodwater is contaminated, a trash pump can be used to remove sand, silt and other debris that might have entered the building.

The type of floodwater also influences the costs of cleanup and restoration work. Clean water is sometimes referred to as “clean” water and typically comes from sources like bathtubs, sinks or washing machines. Gray water is a slightly dirtier form of water that can contain contaminants but usually does not include fecal matter. Black water, on the other hand, can come from sewer line backups and carries a variety of dangerous bacteria and viruses.

Replacements

Before you begin flood remediation work, speak to your agent about what’s covered by your National Flood Insurance Program (NFIP) policy. Ask about any restrictions or limitations, such as how long the property must be occupied for. Also, find out whether you have an NFIP flood damage rider, which costs extra and can be a good investment in some situations.

Water damage remediation involves replacing damaged or destroyed materials and restoring the structure of the building to its normal condition. This includes disinfecting, cleaning and sanitizing the affected area to reduce the risk of bacterial and viral contamination. It is important that all contaminants are removed to prevent the growth of mold which can create health problems.

During the flood cleanup process, it is necessary to remove standing water as quickly as possible. This is especially important because contaminated waters can carry bacteria, viruses and other microorganisms that pose serious health risks to residents. This is particularly true when contaminated water seeps behind walls and in wall cavities.

Flood water often contains sewage, animal waste and garbage which can cause a variety of illnesses. It is essential to throw away any food that has come into contact with contaminated water and to disinfect foods that have been refrigerated. It is also recommended that you discard all insulation materials, such as fiberglass, cellulose and sponge rubber, that have been wetted by black or sewage water.

Final Inspection

During the final inspection, the inspector will check everything that was completed to make sure it meets local building codes. This includes checking the electrical wiring, plumbing, and ensuring that all work has been done correctly. If there are any problems, the inspector will note them on the report and make sure that they are addressed before the home is turned over to the new owners.

While the best way to prevent flood damage is by having a homeowner’s insurance policy that includes loss of use coverage, many cases of water damage can’t be prevented. If your home has been damaged by a flood, it is important to contact your insurance provider as soon as possible to begin the claim process. It is also important to take photos and video of the damage before any cleanup begins, so you can show these to the claims adjuster.

After reporting your flood damage, an insurance adjuster will inspect your property and write a proof of loss statement listing everything that was destroyed or damaged by the floodwaters. If you have a National Flood Insurance Program policy, it is important to ask about getting an advance payment to help cover immediate costs. These payments will be deducted from your final flood insurance claim settlement. It is also a good idea to review your flood insurance policy and the Claims Handbook, so you can better understand what is covered by your policy and how the process works.

What to Do If One of Your Trees Falls During a Storm

The first thing you should do is make sure that your family is safe. If the tree has hit your home or pulled down power lines, it is best to evacuate and stay at a neighbors house until authorities can assess the situation.

After ensuring that everyone is safe, survey the damage as best you can. Take photos if it is safe to do so.

Evacuate

The first thing you should do if a tree falls on your house is to evacuate the structure and ensure that all members of your family are accounted for and safe. This is especially important if the tree has damaged or destroyed your roof, caused flooding in your home, or created any other hazard, such as fire damage or electrical issues.

After evacuating your home, you should immediately call 911 or your local emergency authorities. It’s also a good idea to contact your homeowner’s insurance company so they can send out someone to assess the damage and determine steps moving forward (delaying this call may void your policy). If it is safe, take pictures of the fallen tree and any other affected areas in your home as soon as possible and from as many different angles as possible.

Contact Your Insurance Company

Depending on the reason the tree fell, your homeowner’s insurance policy may help cover the damage. This includes removing the fallen tree and any other damage it caused.

You should contact your insurance company as soon as possible. They can then send an adjuster to observe the damage and begin determining how to proceed with your claim.

Homeowners’ insurance usually covers storm damage, including damaged trees. However, the specifics of what will and won’t be covered can vary from insurance company to insurance company. For example, if the tree was in poor condition before the storm due to negligence, your homeowners’ insurance probably won’t help pay for it.

Even if the tree only partially falls on your property, it’s still important to notify your insurance company as soon as possible. They may be able to recommend an arborist who can perform an inspection of the tree and determine whether it’s safe to remove. Also, they can provide you with an estimate of the cost for repairing your property and removing the fallen tree.

Assess the Damage

A storm-damaged tree can cause severe damage to your home. If you live in an area that often experiences storms, it’s a good idea to have an evacuation plan in place in case your home gets damaged. Make sure everyone in your household is accounted for, and evacuate to a safe location. You should also consider preparing a “go-bag” with supplies, such as medication and important documents.

Once you’re safely away from the fallen tree, it’s time to survey the damage. Start by determining whether any of the tree or branches have fallen on your house or if they’re touching electrical lines. If they are, you’ll need to turn off your power and gas lines at the breaker box or at the meter.

Take photos of the fallen tree and the surrounding property. This will help your insurance company assess the damage and determine if it’s covered by your policy.

It’s also a good idea to inspect your property regularly for trees that are growing too close to power lines or overhanging your house. This can prevent them from falling during a storm and potentially injuring you or damaging your home. Handyman On Call can trim these limbs to reduce the risk of them falling during a storm. They can also recommend ways to strengthen your existing trees.

Take Photos

If it is safe, take photos of the damage caused by a fallen tree, both inside and outside your home. It is important to have a clear picture of the damage before you call in professionals for repairs or start cleaning up. Take photos from different angles and in good lighting if possible.

Once you have photographed the damage, contact your insurance company. A standard homeowners insurance policy covers damage caused by trees that fall onto insured structures like homes or detached garages.

Even if the fallen tree doesn’t fall on your house, you might still be able to file a claim for damage caused by a neighboring tree. Some tree species, such as Chinese elms, silver maples, sycamore trees, boxelder trees, and Bradford pear trees, have brittle wood that can easily break, especially when they’re grown close to buildings or utility lines. These fast-growing trees should not be planted in residential areas and should be pruned regularly to reduce the chance of them falling during a storm.

It is also essential to know where your power lines run in your yard before a storm hits, as downed trees or branches can become entangled with them, creating a fire hazard and a potential electrocution risk for you and your neighbors. Look for signs that a tree or limbs have taken down a power line, such as flickering lights in your home or no electrical power at the breaker box.

Choosing the Right Color for Your Fence

Your fence is a major element of your home’s curb appeal. It’s important to choose a color that will compliment the rest of your property.

Avoid using a color like purple on your fence because it’s used to mark private property in many states. Instead, use cool colors such as blues.

Lighter colors create the illusion of space

In general, it’s best to stick with a color that matches or blends in with the existing colors of your home and surrounding landscaping. In most cases, changing these elements is expensive and time consuming, so it’s important to work with the colors that are already in place.

A good option is gray, which can be used on everything from edgy modern style fences to traditional pickets. It’s also a versatile choice because you can use it with both stain or paint. Stain allows some of the natural wood grain and imperfections to show through, while paint gives a solid, opaque look.

Another great option is a light green shade, which blends in with most landscapes and can make your yard appear larger. It’s also a practical choice for many homeowners because it accentuates the color of flowers and plants in the garden.

One exception to this rule is if you have a very bright color, such as orange or blue, that you want to highlight on your fence. In this case, it’s a good idea to limit the amount of color you use and apply it only to accent areas. This way, you get the look you desire without making your entire fence an eye-catching distraction.

Darker colors are more dramatic

When it comes to choosing a fence color, you may be surprised at the range of options available. Many homeowners choose to stain their fence instead of painting it, which preserves the classic wood appearance. Stain is more expensive upfront, but it lasts longer and requires less maintenance than paint. In addition, it’s easier to recoat stain than it is to repaint a fence, which can be labor intensive.

When you choose a darker color for your fence, it can be eye-catching and provide an accent to the landscaping around your home. Vivid flowers and lush greenery will stand out against a dark fence, which can create a sense of drama. However, it’s important to keep in mind that your house will still be the focal point of the landscape, so you don’t want to choose a color that clashes with it.

It’s also a good idea to look at the colors of your home and other exterior elements before you start sifting through color swatches. One idea is to try to match your fence color with a trim or window shutter color on the exterior of your home. Doing so will help your home’s architecture blend seamlessly with your backyard and will create a unified aesthetic for the entire property. This can be particularly beneficial if you have to work with restrictions imposed by homeowner associations.

Greens and yellows are good choices

Using a shade of green can help blur the boundaries between your garden and your fence. This can be helpful if your garden is small and you want it to look bigger. This is because darker hues tend to shrink spaces while light ones can expand them.

A good green can also work well on a wooden fence. This is because the color accentuates the wood grain which can make your garden feel more natural. Similarly, a yellow tone can be very effective on a metal fence. This is because the color complements most metal finishes such as rust and corrosion.

Another color that can be very effective on a fence is brown. This is because it works well with most colors and can make your garden feel more homely. Moreover, a brown shade can work well if your garden has a lot of greenery.

If you decide to paint your fence, it is important that you choose a high-quality exterior paint. This will protect your fence from the elements and ensure that it lasts for a long time. In addition, it is also a good idea to sand your fence before painting. This will ensure that the final product is smooth and even.

While choosing a color for your fence, you should also consider the time of year. Different shades work better during different seasons. For example, spring and summer colors will stand out more against lush grasses while autumn tones will be more prominent against a backdrop of leafy trees. Finally, you should also review the policies of any homeowner’s associations or communities in your area before painting your fence. These groups often have rules regarding the colors that homeowners can use on their property and they may prefer more traditional hues.

Blues are calming

In addition to making your garden look bigger, cool colors like blues also help create a tranquil space. Whether you paint your fence with a blue shade or use blue flowers to accent it, the effect is the same – it blends the fence into the landscape rather than distracting from it.

Another option is to match your fence color with the exterior of your home. While this is not always feasible, if it works with your style it can add a cohesive look to the yard that is pleasing to the eye. If you have a traditional cottage or Colonial house, you might want to opt for a white fence while a more rustic ranch or farm-style home might be better suited to a natural wood stain.

Experts agree that choosing a tonal shade is preferable to using several bright shades that could clash with each other. This is especially important if you’re painting a large area, which requires the use of a brush, roller or sprayer. You should also make sure the paint you choose is formulated for outdoor use and that it is labeled as such.

In general, light colors will reflect the sunlight and help your garden seem larger while darker hues can be used to create a dramatic effect. If you decide to use a dark color, try to use it sparingly and to highlight specific features of the garden, such as trees or blooming flowers. Also, consider if your community or homeowners’ association has any policies governing the color of fencing.

Five Ways to Add Lighting to Your Deck

When it comes to deck lighting ideas, subtlety is key. “It’s important not to have lights that are too bright and that are too obvious,” says Mor.

Lights that are built into the deck like stair and railing lights are permanent fixtures, but other options can be moved around to suit your needs.

Decorative Post Lamps & Stair Lighting

Decorative post lamps add a touch of elegance to a deck. Choose models that feature a soft-warm glow and subtle decorative overlays. These fixtures look great on stairs, along railings or as a focal point above a patio door. Some styles have slide-on face plates for easier, tool-free bulb replacement. To reduce glare, these lights should be installed about 18 inches above the deck surface.

If you’re using a stair light to illuminate your steps, install it at the bottom of the tread or about 16 inches from the top of the deck surface. That way, the fixture won’t be pointing directly at your eyes when you sit down to rest or entertain on the deck.

Stair lighting can also enhance the visual appeal of your deck by illuminating railing balusters and other architectural features. For a more elegant look, consider recessed uplights on the side of the steps. These hidden fixtures are controlled by a single switch inside the house or an outside receptacle.

Low-voltage deck lighting uses a transformer to convert household voltage into 12 volts, which is safe for exterior conditions. Most systems have a timer or photocell that turns on the lights when dark and shuts them off when daylight arrives. Identify the location of AC power sockets on your deck or plan to add receptacles for plugging in the transformer. Use a transformer calculator to determine the number and lengths of wire needed. Then, take your deck plan to a professional and ask a salesperson to help you select fixtures and a power source.

Rail Lighting

Like post lamps, rail lights mount on deck railings but they cast light downward for a more subtle effect. They’re also easier to install since you don’t have to drill into deck boards.

If you want to brighten up your railing without changing your decor, try a lighting kit. These kits contain everything you need to light up your railing, including the transformer, lights and cables. Some even include controllers, timers and dimmers to make it easy to adjust the brightness or set special effects.

Aside from a few safety precautions, installing low-voltage LED deck lighting isn’t hard. The key is to make sure you follow the manufacturer’s instructions and never use metal staples or fasteners on electrical wiring, which can penetrate insulation and cause shorts.

Aside from deck rail lights, lanterns and string lights are great options for adding a touch of style to your outdoor space. They can also help bolster or complement other deck lighting ideas and can create a cozy sense of ambiance that’s perfect for summer evenings. Just remember that string lights are mainly intended for ambiance and may not be enough to illuminate areas where it’s necessary, such as stairs or other safety concerns.

Lanterns

Lanterns provide an attractive and simple way to introduce light to your deck. Unlike built-in lights (such as those that are embedded within the railing or on stairs) which can be more difficult to change, lanterns and other portable fixtures are easy to move around to different locations or bring inside for bad weather. These can be solar, battery-operated or simply candles in lanterns and are great for accenting a garden pergola or hanging over dining tables when entertaining outdoors.

While a single lantern can serve as an enchanting accent on your deck, multiples look especially lovely when grouped in trios or more.  A rounded handle makes it easier to carry them from place to place and these would look pretty dotted amongst a tangle of cherry blossom tree branches in full bloom in spring.

String Lights

If you want your deck to look like a cozy cabin in the woods, string lights can add that atmosphere. They’re easy to install and a simple way to create a warm and inviting space to relax.

Consider using LED string lights, which use 85 percent less energy than traditional halogen bulbs and have a much longer lifespan. You can find them in a wide variety of colors and lengths, from 12-foot options with Edison-style bulbs to 750-foot strands with shatterproof cafe-style bulbs that can be linked end-to-end.

To hang the lights, screw in cup hooks to your posts before putting them in the planters. Choose a color that coordinates with your deck, and choose hooks that are made for outdoor use. You can also add a weatherproof wire nut to connect the low-voltage cable to the fixture, and remember to follow the manufacturer’s instructions regarding polarity.

Used for Reclaimed Wood in The Home

Wood in general can make a home feel warm and cozy, but there’s a special type of wood that amplifies that effect — reclaimed wood. Repurposed from old barns and other structures, reclaimed wood is rich in character and history.

But where does this wood come from and what are some uses for it in your home?

Furniture

When structures like barns, factories or ships are demolished or redesigned, there is often a surplus of wood that would otherwise be tossed. Some companies save this material to give it a new life in furniture. Reclaimed wood usually goes through a process to remove any features that could undermine the quality of the finished product, such as excessive rot or irreparable damage. It is then kiln dried to further stabilize the material from cracking or warping.

The result is a stylish and rustic type of furniture that can be adapted to a wide range of design styles. Because of its history, reclaimed wood has character that you can’t find in newer materials. It tells a story about the house that you live in and can become a conversation piece among family and friends. It also adds an element of uniqueness to your home that stands out in a sea of cookie cutter homes. It can even raise your home’s value by making it more appealing to potential buyers. This is especially true when used in shared areas like living rooms or bedrooms.

Flooring

Using reclaimed wood in flooring creates a rustic look that is both unique and beautiful. In addition to the aesthetic appeal, reclaimed wood is environmentally responsible. When used in place of new hardwood floors, it reduces the demand for virgin wood and cuts down on landfill waste. Choosing reclaimed wood can also help curb deforestation by cutting down on the number of trees needed to produce virgin lumber.

Reclaimed wood floors are more durable and long-lasting than floors made from newer wood. This is because the older wood has already been exposed to temperature shifts and humidity changes over time. This makes it much less likely to warp or crack over time.

Another advantage of using reclaimed wood in your floors is the variety of tones and textures available. Unlike newer wood floors, which are often produced from fast-growing hardwoods, old wood comes from slow-growing trees that were harvested more than 100 years ago. This means that reclaimed wood floors have a more varied color scheme and a more rustic appearance. In addition, reclaimed wood floors often have wider planks than those made from newer wood.

Cabinets

Cabinets are a major investment in your home, so it’s important to select a material that will last. Solid wood cabinets are more durable than other materials and can be sanded down and restained if needed. They also tend to keep their value over time, which can increase the resale value of your home.

Reclaimed wood is another sustainable option for cabinets. It’s salvaged from other buildings and barns to give new life to them, and it can help add character to your home. This type of wood may have nail holes or marks from its previous use, but a carpenter can create custom cabinets that will hide these imperfections.

Doors

Many home builders choose reclaimed wood for doors because it adds character and is beautiful. It can also be more durable than standard doors that can warp and discolor over time.

Reclaimed lumber can look just like new wood, and it will hold up well to the elements in your home. It may need a little extra care when it is exposed to humidity, though, since it can swell and shrink in high humidity. Using dehumidifiers and taking measurements during dry weather can help minimize this effect.

Another great benefit of reclaimed wood is its ability to cut down on traveling sound. This can be a real benefit in single-family homes, and even in apartment buildings or college dorms.

Reclaimed barn door styles are a popular trend this year, and they can be an impressive accent to your home. They can add a touch of farmhouse chic, and match beautifully with other rustic home decor. You can leave them unfinished or paint them for a more personalized look. They can even serve as a focal point in your home office or living room.

Walls

Reclaimed wood adds a rustic feel to any room, and a beautiful alternative to new wall paneling. Reclaimed lumber is often milled to create a smooth surface or left in its rougher state, whichever look you choose. It is easy to install and works just like any other wood material.

To ensure a quality finish, it is important to thoroughly inspect reclaimed wood before installing. Look for areas of rot, and make sure they are not deep enough to cause structural damage. Also, check for nails and screws, as they may be embedded in the reclaimed wood.

If you do find nail holes, use a magnetic detector to locate and remove the fasteners. If the reclaimed lumber is painted, consider painting over the paint with zero VOC (volatile organic compounds) paint. This will help to protect your indoor air quality and maintain a fresh, natural looking finish. If unpainted, choose a color that complements the wood paneling, and be sure to use a water-based product. Using a high ceiling and a neutral paint color will help the reclaimed wood stand out and look great in your home.

Masonry Landscaping Projects for Your Home

Masonry is the craft of working with stone, brick and concrete to build structures like chimneys, walls, patios and fire pits. It also encompasses the landscaping features made from these solid materials, called hardscaping.

Ideally, landscape masonry should seamlessly integrate with the natural and existing elements of your yard. Here are five ways masonry can enhance your outdoor living experience:

Pavers

Adding pavers to your property will not only improve the look of your home but also increase its value. It’s a great way to bring in more visual interest to your landscaping design and give it a high-end feel that will make it even more livable after the sun goes down.

If you decide to do this project yourself, it is recommended that you purchase a few essential tools like a rubber mallet for tapping the pavers into place and a circular or diamond-bladed saw to cut the pavers to size. Other necessary tools include a plate compactor and a rake.

Before you start laying the pavers, excavate the installation area. Spaces that will only be used for foot traffic require 4-6” of base material, while driveways or projects in wet soil need more like 12”. Using stakes and string to mark out the work area helps gauge the slope’s degree. If the slope is too steep, you will need to install a retaining wall to level the installation area and prevent soil erosion.

Next, spread and compact the base material. Use a rake and a plate compactor to achieve the desired thickness, and make sure that the slope is consistent throughout the installation area. Then, install a layer of sand on top of the base. This is important, as sand fills in the gaps between pavers and prevents them from shifting.

Bricks

Brick is a durable building material and can be used in a variety of projects. Brick walls can be used to enclose patios, pools, and gardens. They are also used for fireplace surrounds, walls and other interior masonry. Bricks are available in a wide range of colors and textures. They can add a rustic or modern feel to any space.

Before starting to build a brick wall, it is important to prepare the site. This includes making sure it is level and plumb. It is also important to choose the proper type of brick for your project. There are two main types of brick: engineering and facing. Engineering bricks are made with precise specifications for weight distribution and tensile strength. Facing bricks, on the other hand, are more focused on appearance and texture.

When installing a brick wall, it is best to use running bond. This means that each course of brick should be set a half brick back from the previous course. This will help to create a straight wall and ensure that the mortar joints are spaced correctly. It is also important to use mason’s blocks and line at the ends of each course. This will help to keep the wall straight and make it easier to cut.

When working with brick, it is essential to wear a dust mask. Mortar mix can contain lime which can irritate your lungs if inhaled. It is also important to protect your skin from contact with the mortar and to wash your hands after touching it.

Stone

There are many different types of stone and each offers a unique look that can complement your design style. A masonry contractor can help you choose the right materials for your project and layout. For example, a brick walkway may be more suitable for high traffic areas than a bluestone walkway.

Masonry stones can be used for sidewalks, patios, and driveways to add a touch of elegance and sophistication to your home. They can also serve a functional purpose by defining your garden, lawn, and driveway space and reducing debris, dust, and runoff. They are available in a wide range of textures, colors and surfaces with load-bearing capacities and permeable finishes to reduce runoff.

Before installing any stone veneer, make sure the surface is clean and free of dirt, paint, and other residues. If you are covering an existing wall, you can apply the stone directly, but any new installation requires a sheathing of metal lath. If you’re installing on a wood surface, a weather-resistant vapor barrier must be installed first.

Prepare the surface for the veneer by applying a scratch coat of mortar that’s composed of two parts washed sand and one part Portland cement. While this mortar mix is still soft, scrape horizontal grooves into it with a metal scraper and let the scratch coat dry for 24 hours.

Fire Pits

This easy DIY project combines face brick and firebrick to create a circular fire pit that’s ideal for seating up to four people. Because regular brick can crack at high temperatures, use firebrick (also called refractory) to line the inside of your DIY outdoor fireplace. For the outside of the pit, use a type of face brick that has holes (“cored”) in it. You can buy it in various sizes at home centers and brickyards.

First, dig a hole for the pit that’s at least 7″ deep and make sure it’s completely round by tracing the circle on the ground with a stake or garden hose. Fill the hole to almost ground level with gravel, lava rock or sand. It’s important to avoid flammable materials such as pea gravel and compressed concrete blocks, which can trap moisture that turns to steam and explodes. Instead, use non-porous materials that don’t retain moisture such as sand or lava rock.

Whether it’s building stone stairs that align with your home or adding outdoor fireplaces that become the focal point of social gatherings, masonry is synonymous with creating a sense of permanence on one’s property. From constructing retaining walls to stabilize hillsides to laying paver patios that serve as the centerpiece of our landscapes, masonry is the perfect complement to any home.

Should I Stain or Paint My Deck?

Decks are exposed to extreme elements all year. Sunlight fades the wood, while humidity and rains break down the lignin that holds the fibers together. Paints protect a deck from these conditions and offer an array of color choices.

Stains highlight the natural wood design and come in solid and semi-transparent styles. Painting a deck is more time-consuming initially and costly than staining one.

Cost

Although they both may be applied in the same way and contain many of the same materials, stain and paint are very different. Stain seeps into the wood and can be transparent, semi-transparent or opaque allowing the grain and texture to show through while paint creates a top layer that covers the surface with thousands of color possibilities.

With the right choice of color, you can use paint to match your home or complement other outdoor fixtures and furnishings. It can also be easier to wash dirt off a smooth, painted surface than a rough, stained one. However, painting can make your deck slippery when wet or icy, which could be a concern if you have kids or pets.

If you opt for stain, it is important to choose a product that is rated for floors, contains mildewcides and UV protection to prevent fading. It should also be water, weather and mold resistant. Stain may last longer than paint, but it is still a more labor-intensive option because it needs to be reapplied more frequently.

It is best to have a professional perform a general inspection of your deck before you stain it, as they can identify potential problems like wood rot or damage from insects and recommend repairs. They can also help you determine the best color options and provide a detailed estimate for the project.

Appearance

Stain is a popular choice for decks because it can be more natural-looking than paint. It’s available in a wide range of opacities and colors, and it’s easy to apply with a brush or roller. It’s also available in a water-based formula, which reduces the amount of chemicals released into the environment.

The only downside of stain is that it’s not as durable as paint, and may need to be reapplied in a few years. It can also be difficult to clean, as dirt tends to cling to the surface of the wood. However, stains do offer some protection against weather damage, such as rot and mold, which is not always the case with paints.

Paint, on the other hand, offers a more uniform appearance. It can hide cracks in the wood, and it’s available in a wide range of color options to match your home or create a bold statement. Paint is thicker than stain, so it’s able to fill in gaps and ridges on the surface of the wood. It also dries more quickly than stain, and can be used on other outdoor surfaces like fences or unpainted wood siding.

However, it’s important to remember that if you choose to go with paint, you’re stuck with that color for the life of your deck. If you ever want to change the look of your deck, you’ll have to completely strip the old stain and repaint.

Maintenance

A good painting or staining company can give you the results you want for your deck. It is important that the wood is clean and dry before applying any coating. If you power wash a deck in the morning, and then paint or stain it that same day, there is a chance of moisture trapping within the wood and causing peeling or flaking. Using an oil-based stain is best as it will last longer than water-based products. A solid stain will also hold up against UV damage better than semi-transparent or transparent stains.

Staining your deck takes less time than painting, but it is important to apply it properly. A stain pad will make the job easier and faster. A stain sponge will help you get into corners and other trim areas that are difficult to reach. It is best to stain your deck when the weather is dry and clear, but if you cannot do it that way, it is still possible to stain your deck with the right techniques.

Environment

Wood decks are one of the great outdoor living spaces that many homeowners enjoy. They can be places to entertain friends and family, or quiet retreats for personal relaxation.

Regularly staining or painting a deck can help it endure the elements and last for years to come. Staining, which is more forgiving than painting in terms of misses and mistakes, also allows the natural beauty of the wood grain to show through, something that many people like. Stains also tend to be less slippery than paint, which can be a concern if you have young children or elderly guests who might fall.

Some top-quality woods, particularly tropical hardwoods, don’t hold stains well. If you’re going to stain a deck made with these dense and beautiful materials, be sure to use a penetrating stain that’s suitable for the type of wood. Stain can damage grass and plants, too, if it gets on their leaves, preventing them from absorbing water, nutrients, and sun.

It’s generally best to paint a deck in early spring, before the weather starts getting warmer and hotter. When the temperature starts to rise, the wood can expand and contract more than it does when it’s cold, causing the paint to crack or peel. It’s important to do this work on a cloudy day, as direct sunlight interferes with adhesion and color uniformity.

When choosing whether to stain or paint your deck, it is also important to consider the color and style you want. Paint offers more color options, and can be applied in a wide variety of finishes. It will not fade in direct sunlight like a stain, but it may fade over time. Paint can withstand the freeze/thaw cycle of colder winter states better than stain as well, but it will need to be reapplied more often.

Trending Bathroom Upgrades 2023

Whether you love modern, glamorous or rustic styles, these bathroom remodeling trends will inspire your next home makeover.

Houzz and NKBA report that shower upgrades remain popular, including larger two-person showers, multiple shower heads and zero-entry options for ageless accessibility.

Metallic finishes add a warm, luxe feel to the space, as well as a visual pop. Mix and match your hardware and fixtures to create a custom look.

1. Freestanding Tubs

Freestanding tubs are a great way to add style and luxury into your bathroom without overwhelming it. They can also work well in small spaces because of their clean lines and definition. They are available in a variety of styles and colors to fit any decor style and can be paired with many other bath upgrades to create a spa-like bathroom.

A freestanding tub can be paired with a walk-in shower, a tub-filler faucet or a jetted tub-filler to create a luxurious bathroom. If you’re planning on adding a bathtub-filler faucet, make sure you consult with a licensed plumber to ensure your home is properly wired and that you have enough electrical power for it.

2. Curved Tubs

The bathtub is the focal point of a bathroom, and it can make or break a home’s style. It’s important to keep the tub in sync with other design elements, and curved styles offer a unique aesthetic that stands out in a room.

Whether you choose a freestanding or built-in option, a curved tub is an eye-catching way to add style to your master suite or guest bath. Pair the design with soft neutrals or a subtle raffia wallcovering to highlight the smooth curves of your tub.

A whirlpool tub can also bring spa-like comfort to your home. The soothing experience will have you feeling relaxed and ready for bed after a long day.

A modern shower is another popular choice with buyers, according to Nancy Almodovar, president of Nan and Company Properties. The water-saving fixtures and sleek glass are an added bonus that boosts a home’s value. The design can be paired with a simple tile or bolder patterns for added visual interest.

3. Double Vanity

One of the most popular bathroom remodel ideas 2023, a double vanity provides plenty of storage space for personal toiletries without taking up too much floor area. A large mirror or two helps visually enlarge a small room, while brass fixtures and classic cabinets add elegance to the look.

For a contemporary aesthetic, choose a bold shade of blue such as navy-blue paint color which looks great on the walls or cabinetry and pairs well with white tile or wainscoting. It can also be used to highlight natural wood or anthracite-black bathroom elements for a bold contrast.

Fluting is getting a new twist as a design trend. Delicately ribbed finishes on vanities and shower doors are a visual and tactile treat, reminiscent of Art Deco glamour.

Aegean Teal and Hale Navy are other trendy bathroom paint colors that work well in a variety of styles. Earth tones are also on-trend, with sandy beiges and warm clay tones creating a serene backdrop for the bathroom. These nature-inspired shades are also a way to bring biophilia into the home with a modern twist.

4. Curved Sinks

While minimalist aesthetics still cling to many homes, new interpretations of the design style are finding their way into bathrooms. From vanity cabinet fronts to decorative shower doors, curved surfaces add subtle interest. These bathroom trends bring a touch of glamour to a primary bath and look equally at home in either traditional or modern designs.

Another way to bring a touch of luxury to the space is with a curved sink. This elegant feature is available in a variety of sizes, shapes, and materials. However, it’s important to choose a sink that matches the overall look of your bathroom. A curved sink can look out of place in an otherwise sleek room.

While brushed metals and chrome continue to be popular, softened metallic finishes like sage green and smoked glass are also making their way into the bathroom. Look for unique shaped hardware and sconces to complete the look.

5. Modern Lighting

Whether it’s for a modern bathroom design or a classic powder room update, a few well-placed fixtures can make a big difference. From recessed downlights to slimline wall sconces, you can add just the right amount of visual interest to your master bath without breaking the bank

Modern lighting is another popular bathroom upgrade that can help create a relaxing atmosphere. It’s important to have good lighting in a bathroom, especially when it comes to preparing for the day or unwinding at night. Pairing a light fixture with other stylish accessories, like sconces and a brass mirror, can also help pull your bathroom’s look together..

Lighting also plays a big role in the 2023 bathroom color trends. We’re seeing saturated shades like deep red and rich greens, as well as matte finishes that align with broader furniture trends. Meanwhile, black continues to shine in new shower enclosures and accessories.

For those who want to add a little extra sparkle, hardware and fixture designers are introducing softened metallics such as brushed gold. This look offers a bit of warmth and contrast that’s a great complement to sleek tile or marble surfaces. It’s also a good option for homeowners who don’t want to commit to a full-on brass bathroom.